
Choosing Essential Supplies
Assessing Your Needs
When preparing a first aid kit for hiking, it really helps to think about the specific conditions and challenges you might face in the great outdoors. Personally, I always consider the type of terrain, the length of the hike, and the level of risk involved. If I’m hiking a challenging route, I’ll make sure to pack some extra supplies compared to an easy day hike.
You also want to think about your individual health needs. Do you have any allergies or medical conditions that could arise during a hike? It’s smart to pack medications or any necessary equipment that you may need. I always take my allergy meds—better safe than sorry!
Remember, it’s all about striking a balance. You don’t want to overpack and weigh yourself down, but you definitely don’t want to be without something crucial when you need it. Taking the time to assess your needs will really help when choosing supplies for your kit.

Basic First Aid Items
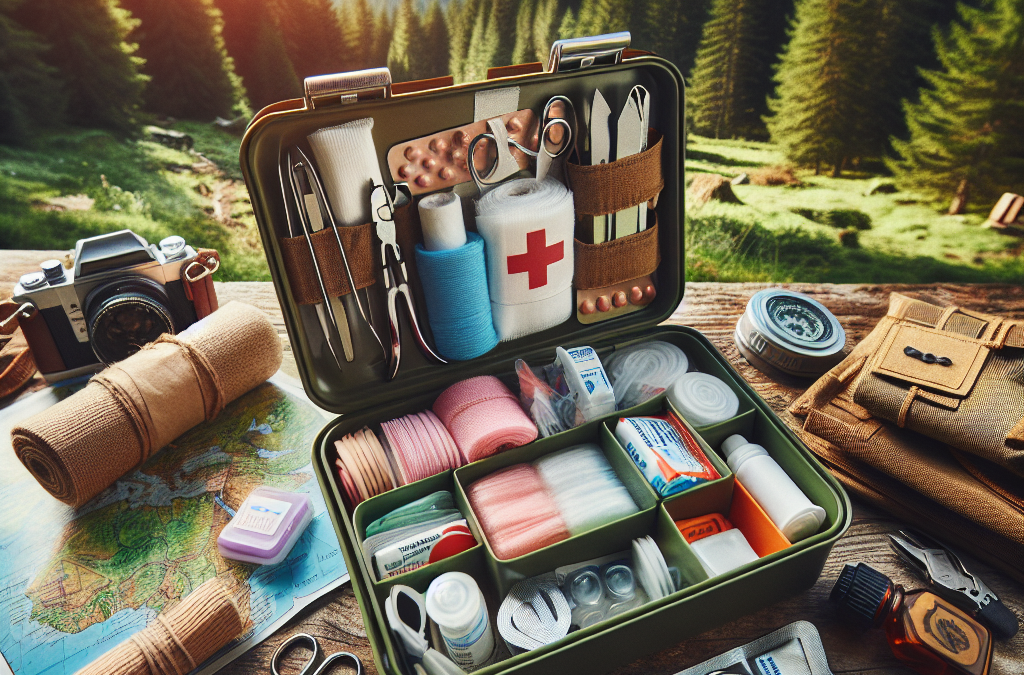
Once I know what I need, I start gathering basic first aid items. This includes items like adhesive bandages, gauze pads, antiseptic wipes, and sports tape. These items are small and lightweight, yet they can make a huge difference if someone gets a cut or scrape.
I can’t stress enough how handy a good pair of scissors can be; they’re useful for cutting tape or gauze. In my own kit, I also keep a pair of tweezers for splinters or ticks, which are unfortunately a common nuisance during hikes.
Lastly, don’t forget about pain relief! I usually pack some ibuprofen or acetaminophen because you never know when a headache or muscle ache might hit while enjoying nature.
Thank you for reading this post, don't forget to subscribe NOW for FREE!

Upgrades and Extras
Once the basics are sorted, I like to consider upgrades that could be beneficial for more serious situations. A compact emergency blanket can be a lifesaver if someone experiences hypothermia. These blankets are lightweight and fold up neatly, making them easy to include in a compact kit.
I also like to pack a small tube of burn cream. Trust me, you might not think you’ll need it during your hike, but if you’re near a campfire or get sunburned, you’ll be glad you packed it!
Another upgrade I found valuable is a CPR face shield. Accidents happen, and being prepared is crucial. Having the tools needed to perform CPR can really help if the unexpected occurs.
Size and Weight Considerations
Choosing the Right Container
The next thing I consider is the container for my kit. I want something durable yet manageable. A small, waterproof bag is my go-to because it protects my supplies from the elements and ensures everything stays organized. You can find various sizes, so I always opt for one that holds all the essentials without being bulky.
Keep in mind that if you’re hiking for an extended period, a more substantial container might limit what you can carry. Finding that perfect size means you can easily shove it in your backpack without worrying about it taking up too much space.
After all, the last thing you want is a rigid box that weighs you down. Flexibility and durability should be your top priorities when selecting a container for your first aid kit!
Minimizing Weight
Speaking of weight, the next step is minimizing it. One tip I’ve found helpful is to decant larger medicine bottles into smaller, labeled containers. You don’t need a whole bottle of painkillers for a day hike—just a few tablets will do!
Also, rather than packing a full-sized roll of gauze, I cut it down into smaller strips. This not only saves space but also lightens the load on my back. I keep a small zip-top bag to hold these smaller pieces as it’s compact and easy to access.
Remember, as hikers, we need to be prepared but also need to lighten our packs. Each ounce counts when you’re on the go!
Organizing Your Kit
Finally, organization is key for a compact first aid kit. I like to use small pouches within my container to separate items – for example, one for bandages, another for medications, and so on. This way, I’m not digging around looking for what I need when time is of the essence.
You could even go a step further and label each pouch. I just use a simple label maker, but you can use tape and a marker if that’s what you have on hand.
Being organized not only saves time but also reduces stress; you’ll be so grateful when you know exactly where everything is located in a pinch!
Regular Maintenance
Checking Expiry Dates
It’s easy to pack a first aid kit and forget about it, but I make it a habit to check expiry dates regularly. Medications can lose their effectiveness over time, and the last thing you want is to use expired supplies in an emergency!
I usually schedule a check every few months; it’s a simple step that can save lives. During this check, I also take the opportunity to reassess my needs. Are there new risks with the seasons changing, like more bug bites in summer or increased chances of getting sick in the colder months?
Keeping my supplies fresh and relevant ensures I’m always prepared for whatever nature throws at me. Trust me, it’s worth taking the time for these quick assessments!
Restocking Supplies
After checking expiry dates, I take stock of what needs restocking and replace any used items. Sometimes, I find that I’ve been using more of a certain item—like antiseptic wipes during bug bites—so I’ll increase the quantity I pack for next time.
I have a list I keep that outlines everything I want in my first aid kit. Each time I go on a hike, I tick it off after I’ve checked it. This simple practice makes sure I’m always prepared for the next adventure!
Plus, restocking isn’t just about keeping it full; it’s also about keeping it relevant. As I gain more experience, I sometimes add new items that I find helpful and remove what I don’t need.
Practicing with Your Kit
Finally, regular maintenance isn’t just about the physical supplies; it’s also vital to practice using your first aid kit. I’ve found that knowing how to use what you have is just as important as having it. I often take a First Aid/CPR course not just to stay certified, but also to refresh myself on how to respond in emergencies.
It’s a good idea to run through a mock scenario with friends or family. Practice makes perfect! Having everyone familiar with the contents of the kit and how to use them adds an extra layer of preparedness on group hikes.
So, grab your kit and have a little fun while making sure everyone knows the ropes. It’s all about staying safe while enjoying nature!
Frequently Asked Questions
What items should be included in a compact first aid kit for hiking?
A compact first aid kit should include adhesive bandages, antiseptic wipes, gauze pads, pain relievers, scissors, tweezers, and any necessary personal medications. Always assess your individual needs based on the length of the hike and potential risks involved.
How can I keep my first aid kit lightweight?
To keep your first aid kit lightweight, consider decanting full-sized supplies into smaller containers, removing unnecessary items, and organizing your kit efficiently. Also, aim to only pack the essentials for the length of your hike.
How often should I check and restock my first aid kit?
It’s a good practice to check your first aid kit every 3-6 months. Check for expired items, restock used supplies, and adjust the contents based on your hiking experiences or changes in environment.
What should I do if I use supplies during a hike?
If you use supplies during a hike, take note of what was used. After your hike, restock those items immediately so your kit is always ready for future adventures. This ensures that you won’t be caught short next time!
Is it necessary to take a first aid course before hiking?
While it’s not mandatory, taking a first aid or CPR course is highly recommended. It equips you with the skills needed to use your first aid kit effectively during an emergency. It’s a valuable investment in your safety and the safety of your hiking companions.


