
by Preparation | Apr 16, 2025 | Preparedness
Prepare Your Home and Surroundings
Recognizing Vulnerabilities
One of the first things I did was check out my home for weak spots. It’s crazy how many things can become dangerous during an earthquake—think heavy shelves, mirrors, and those cute but precariously stacked decorative items. I recommend getting down on your hands and knees and looking for anything that might topple over. This little exercise will give you a fresh perspective on your space!
Also, take a peek outside. If you live near large trees or buildings that are leaning a bit, consider how they could impact your safety. It’s all about understanding your environment and making smart adjustments. Plus, it’ll ease your mind knowing you’ve minimized risks!
Lastly, don’t forget to check your emergency supplies. Make sure you have essentials like food, water, and first-aid kits handy. I like to keep mine in a designated spot so I don’t have to search at crunch time. It’s all about being proactive!
Practice the “Drop, Cover, and Hold On” Technique
The Importance of Immediate Response
When an earthquake strikes, it can be hard to think straight. That’s why practicing the “Drop, Cover, and Hold On” technique is crucial. I personally practiced this with my family a few times, and trust me, it helps embed that immediate response in your brain.
Dropping to the ground is all about protecting yourself from falling debris. Covering your head and neck with your arms is next—imagine there’s heavy furniture above you; you want to shield yourself! Finally, holding on until the shaking stops ensures you’re prepared to move if needed.
Even practicing this method in different locations can be beneficial. Whether you’re at home, in a restaurant, or at a friend’s place, try running through in your head where you’ll drop and cover. You’ll feel less panicked knowing you have a solid plan.
Communication Plans
Setting Up a Contact List
Another essential skill is having a solid communication plan. I remember chatting with my family about our go-to contacts in case we get separated during an earthquake. It sounds simple, but knowing who to reach out to can relieve a lot of stress!
Create a contact list, and consider using text messages instead of calls during emergencies since they can get jammed. I also recommend designating a meeting spot where everyone can go if the chaos unfolds. That way, you know you’ll find each other without racing through the streets!
Make sure you have your phones charged and even consider getting a portable charger. When things get tight, a working phone can be your lifeline to loved ones and emergency services. I never go anywhere without mine fully charged anymore!
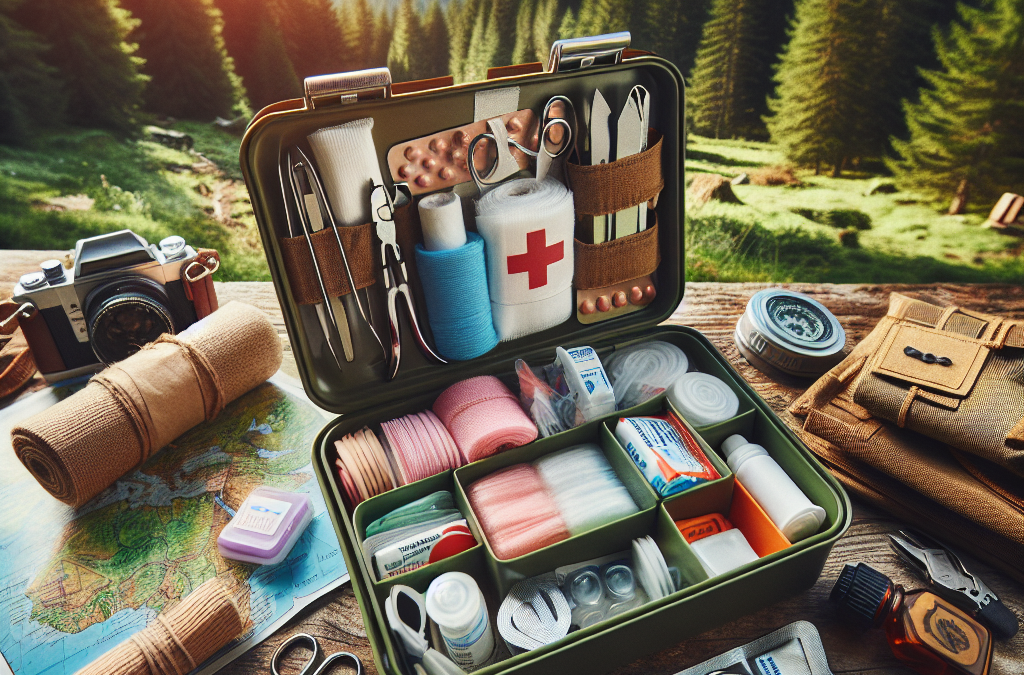
Evaluate Your Emergency Kits
What to Include
This is where things get practical. I’ve spent some time ensuring that my emergency kit has everything we’d need—food, water, and first aid are just the basics. Make sure to include enough non-perishable food to last at least three days. I prefer items that don’t need cooking, like energy bars and canned goods, because you never know what might happen!
Don’t forget about personal items like medications and glasses. Those little things can make a big difference in your comfort! I keep a small checklist in my kit so I can quickly see if anything needs replenishing.
Lastly, add any important documents or valuables in a waterproof container. It’s heartbreaking to think about losing family photos or important papers. Keeping these handy makes sure you’re prepared for whatever life throws your way!
Stay Informed About Earthquake Activity
Use Technology to Your Advantage
Staying informed is easier than ever, thanks to apps and local news. I’ve downloaded an earthquake app that notifies me of any seismic activity in my area. It’s a game changer! Knowing about tremors before they happen allows me to prepare and keep calm.
Connect with local emergency management agencies, too. They provide up-to-date information and resources, and they can be a reliable source during emergencies. Following their social media accounts or subscribing to newsletters can keep you in the loop.
Lastly, engage with your community. Joining local emergency preparedness meetings can offer more insights, plus it’s a great way to connect with neighbors and develop strategies together. You’re not alone in this; it’s always better when we tackle it as a team!
Frequently Asked Questions
What should I do immediately during an earthquake?
Drop, Cover, and Hold On! Get low to the ground, cover your head and neck, and hold on until the shaking stops.
How can I prepare my home for earthquakes?
Identify and secure heavy items, and make sure you have emergency supplies readily available in a designated spot.
Why is communication planning important during earthquakes?
During an earthquake, things can get chaotic. Having a contact list and designated meeting spot ensures you can find your loved ones safely.
What should I include in my emergency kit?
Include non-perishable food, water, first-aid supplies, medications, important documents, and personal items in your kit.
How do I stay informed about earthquakes?
Utilize earthquake apps, follow local emergency management agencies, and engage with your community for updates and resources.

by Preparation | Apr 16, 2025 | Preparedness
Choosing Essential Supplies
Assessing Your Needs
When preparing a first aid kit for hiking, it really helps to think about the specific conditions and challenges you might face in the great outdoors. Personally, I always consider the type of terrain, the length of the hike, and the level of risk involved. If I’m hiking a challenging route, I’ll make sure to pack some extra supplies compared to an easy day hike.
You also want to think about your individual health needs. Do you have any allergies or medical conditions that could arise during a hike? It’s smart to pack medications or any necessary equipment that you may need. I always take my allergy meds—better safe than sorry!
Remember, it’s all about striking a balance. You don’t want to overpack and weigh yourself down, but you definitely don’t want to be without something crucial when you need it. Taking the time to assess your needs will really help when choosing supplies for your kit.
Basic First Aid Items
Once I know what I need, I start gathering basic first aid items. This includes items like adhesive bandages, gauze pads, antiseptic wipes, and sports tape. These items are small and lightweight, yet they can make a huge difference if someone gets a cut or scrape.
I can’t stress enough how handy a good pair of scissors can be; they’re useful for cutting tape or gauze. In my own kit, I also keep a pair of tweezers for splinters or ticks, which are unfortunately a common nuisance during hikes.
Lastly, don’t forget about pain relief! I usually pack some ibuprofen or acetaminophen because you never know when a headache or muscle ache might hit while enjoying nature.
Upgrades and Extras
Once the basics are sorted, I like to consider upgrades that could be beneficial for more serious situations. A compact emergency blanket can be a lifesaver if someone experiences hypothermia. These blankets are lightweight and fold up neatly, making them easy to include in a compact kit.
I also like to pack a small tube of burn cream. Trust me, you might not think you’ll need it during your hike, but if you’re near a campfire or get sunburned, you’ll be glad you packed it!
Another upgrade I found valuable is a CPR face shield. Accidents happen, and being prepared is crucial. Having the tools needed to perform CPR can really help if the unexpected occurs.
Size and Weight Considerations
Choosing the Right Container
The next thing I consider is the container for my kit. I want something durable yet manageable. A small, waterproof bag is my go-to because it protects my supplies from the elements and ensures everything stays organized. You can find various sizes, so I always opt for one that holds all the essentials without being bulky.
Keep in mind that if you’re hiking for an extended period, a more substantial container might limit what you can carry. Finding that perfect size means you can easily shove it in your backpack without worrying about it taking up too much space.
After all, the last thing you want is a rigid box that weighs you down. Flexibility and durability should be your top priorities when selecting a container for your first aid kit!
Minimizing Weight
Speaking of weight, the next step is minimizing it. One tip I’ve found helpful is to decant larger medicine bottles into smaller, labeled containers. You don’t need a whole bottle of painkillers for a day hike—just a few tablets will do!
Also, rather than packing a full-sized roll of gauze, I cut it down into smaller strips. This not only saves space but also lightens the load on my back. I keep a small zip-top bag to hold these smaller pieces as it’s compact and easy to access.
Remember, as hikers, we need to be prepared but also need to lighten our packs. Each ounce counts when you’re on the go!
Organizing Your Kit
Finally, organization is key for a compact first aid kit. I like to use small pouches within my container to separate items – for example, one for bandages, another for medications, and so on. This way, I’m not digging around looking for what I need when time is of the essence.
You could even go a step further and label each pouch. I just use a simple label maker, but you can use tape and a marker if that’s what you have on hand.
Being organized not only saves time but also reduces stress; you’ll be so grateful when you know exactly where everything is located in a pinch!
Regular Maintenance
Checking Expiry Dates
It’s easy to pack a first aid kit and forget about it, but I make it a habit to check expiry dates regularly. Medications can lose their effectiveness over time, and the last thing you want is to use expired supplies in an emergency!
I usually schedule a check every few months; it’s a simple step that can save lives. During this check, I also take the opportunity to reassess my needs. Are there new risks with the seasons changing, like more bug bites in summer or increased chances of getting sick in the colder months?
Keeping my supplies fresh and relevant ensures I’m always prepared for whatever nature throws at me. Trust me, it’s worth taking the time for these quick assessments!
Restocking Supplies
After checking expiry dates, I take stock of what needs restocking and replace any used items. Sometimes, I find that I’ve been using more of a certain item—like antiseptic wipes during bug bites—so I’ll increase the quantity I pack for next time.
I have a list I keep that outlines everything I want in my first aid kit. Each time I go on a hike, I tick it off after I’ve checked it. This simple practice makes sure I’m always prepared for the next adventure!
Plus, restocking isn’t just about keeping it full; it’s also about keeping it relevant. As I gain more experience, I sometimes add new items that I find helpful and remove what I don’t need.
Practicing with Your Kit
Finally, regular maintenance isn’t just about the physical supplies; it’s also vital to practice using your first aid kit. I’ve found that knowing how to use what you have is just as important as having it. I often take a First Aid/CPR course not just to stay certified, but also to refresh myself on how to respond in emergencies.
It’s a good idea to run through a mock scenario with friends or family. Practice makes perfect! Having everyone familiar with the contents of the kit and how to use them adds an extra layer of preparedness on group hikes.
So, grab your kit and have a little fun while making sure everyone knows the ropes. It’s all about staying safe while enjoying nature!
Frequently Asked Questions
What items should be included in a compact first aid kit for hiking?
A compact first aid kit should include adhesive bandages, antiseptic wipes, gauze pads, pain relievers, scissors, tweezers, and any necessary personal medications. Always assess your individual needs based on the length of the hike and potential risks involved.
How can I keep my first aid kit lightweight?
To keep your first aid kit lightweight, consider decanting full-sized supplies into smaller containers, removing unnecessary items, and organizing your kit efficiently. Also, aim to only pack the essentials for the length of your hike.
How often should I check and restock my first aid kit?
It’s a good practice to check your first aid kit every 3-6 months. Check for expired items, restock used supplies, and adjust the contents based on your hiking experiences or changes in environment.
What should I do if I use supplies during a hike?
If you use supplies during a hike, take note of what was used. After your hike, restock those items immediately so your kit is always ready for future adventures. This ensures that you won’t be caught short next time!
Is it necessary to take a first aid course before hiking?
While it’s not mandatory, taking a first aid or CPR course is highly recommended. It equips you with the skills needed to use your first aid kit effectively during an emergency. It’s a valuable investment in your safety and the safety of your hiking companions.

by Preparation | Apr 16, 2025 | Preparedness
Utilize Trusted News Sources
Know Where to Look
When an emergency hits, you want to get accurate information quickly. It’s crucial to have a list of trusted news outlets you can turn to. Local news stations are often first on the scene and provide real-time updates. I personally like to check in with my local radio stations, which can be super helpful when other means of communication are down.
Online news we’re all familiar with, like CNN or BBC, often have live updates during major events. They not only cover national news but also lend a hand with what’s happening in local communities. A word of caution, though—make sure to filter out sensationalism and focus on objective reporting.
Social media can also be a valuable tool, especially when you’re looking for on-the-ground updates. Twitter, for instance, can provide firsthand accounts from people who are experiencing the emergencies. Just be sure to verify information with trusted sources before taking any action based on it!
Set Up Emergency Alerts
Local Alerts and Notifications
These days, setting up emergency alerts is easier than ever. I remember the first time I got an emergency alert on my phone; it felt like I was connected to a lifeline. You can sign up for notifications from your local government or emergency services, which will send you text messages or push notifications about urgent situations in your area.
Each state has its own alert system, so take a moment to find out what’s available in your area. The National Weather Service, for example, pushes out alerts for weather emergencies that can save lives. FYI, it’s often as simple as texting a keyword to a designated number!
Don’t forget to customize your notifications! You can choose which alerts you want to receive, so you’re not overwhelmed with unnecessary information. Being selective keeps you focused on what truly matters during a crisis.
Communicate with Friends and Family
Establish a Communication Plan
In tough times, staying in touch with loved ones is crucial. I’ve learned that having a realistic communication plan can give everyone peace of mind. Discuss how you’ll contact each other during an emergency—whether it’s through calls, text messages, or even social media.
I like to designate a central contact person in the family, someone who can keep everyone updated. If it’s tough to reach an individual, this person serves as the point of communication for the group. It makes things flow a lot smoother!
Make sure everyone knows how to reach this person and keep their contact information handy. Quick access can save precious time when you’re worried about your family’s safety during an emergency.
Stay Engaged on Social Media
Follow Reliable Accounts
Alright, let’s talk about social media. When an emergency unfolds, platforms like Twitter and Facebook can provide vital information. It’s best to follow reliable accounts related to emergency management, local authorities, and trusted news outlets. Think of it like creating your own “go-to” list for urgent information!
Being part of local community groups can also help you stay in the loop. Many neighborhoods have Facebook groups or Nextdoor forums where people share alerts, advice, and resources during emergencies. This way, you’re not only getting information but also connecting to your community!
Keep an eye on what’s trending. During emergencies, there’s usually a lot of chatter online. However, be cautious—don’t get caught up in the panic. Stick with your trusted sources for the most accurate details.
Prepare a Go-Bag for Emergencies
Contents of Your Go-Bag
A little preparation goes a long way. I can’t stress enough how important it is to have a go-bag ready to grab in case of emergencies. Think about what essentials you’d need to survive for a few days if things got really bad. I include water, non-perishable food, and basic first-aid supplies—stuff that would keep you going.
Don’t forget about documents! I keep copies of identification and important papers in there too—you know, just in case. It’s also a good idea to have cash on hand since, in emergencies, ATMs may not be working.
Lastly, consider adding items that cater to your family’s specific needs, like medications or pet supplies. Preparing this go-bag ahead of time takes a weight off your shoulders when you’re facing an emergency, trust me!
FAQs
1. What should I do first when an emergency occurs?
First, stay calm. Assess the situation and check in with reliable news sources to see what’s going on.
2. How can I ensure I’m getting accurate information?
Stick to trusted news outlets and official emergency services. Also, verify information before taking any action.
3. What goes into a good emergency go-bag?
Your go-bag should include water, non-perishable food, a first-aid kit, important documents, and anything specific to your family needs like medications.
4. How do I set up local alerts?
Visit your local government’s website to sign up for emergency notifications. It’s usually straightforward and needs just a little bit of your info.
5. Why is social media useful during emergencies?
Social media can provide real-time updates and firsthand accounts from those directly affected, although it’s vital to ensure you’re following reliable sources to avoid misinformation.

by Preparation | Apr 16, 2025 | Preparedness
Understanding the Value of Goods and Services
Recognizing What’s Valuable
When you’re deep in a crisis, the first step is recognizing what’s actually valuable. You might think that your old PlayStation is a treasure, but in a survival scenario, clean water and food are the hottest commodities. I can tell you, in my experience, getting to know the community and assessing their needs is paramount. If you can figure out what people around you find most valuable, you’re already on the right track!
Think about it: what skills do you have that others might need? If you’re a good cook, maybe your culinary skills are your best barter chip. If you’re handy, fixing stuff around the neighborhood could exchange for something you need. It’s a win-win when you understand the true value of what you can offer.
Don’t forget to look at seasonal goods. During a plant shortage, for example, home-grown fruits or veggies can be gold. So, tap into that awareness and keep a mental note of what’s hot and what’s not in your community.
Evaluating Your Own Resources
Before diving into bartering, take stock of your own resources. What do you have on hand that others might want? It’s not just about tangible items like tools or canned goods but also your skills or services. Trust me, once I started making a list of what I had, it opened my eyes to numerous opportunities for barter.
For instance, I once traded some homemade jams for firewood during a chilly winter. It’s these types of relationships that can bloom in times of need. You may have a spare set of clothes that could help someone in need. The key is to recognize that these resources can be incredibly useful during tough times.
Also consider any connections you might have. Maybe you know someone who can fix a car or set up a phone line. These are all part of your resource arsenal. Use what you have to make the most of the barter system.
Building Relationships
Bartering isn’t just a transaction; it’s also about relationships. In the heat of a crisis, trust becomes a currency of its own. When I first started bartering, I made sure to build connections with my neighbors. Getting to know them was key to success. Trust is what makes people willing to trade with you.
Be friendly, engage in conversations, and offer your skills or goods genuinely. Show that you care about their needs, and reciprocation in a barter system will follow naturally. I remember giving out some surplus food to neighbors, which directly led to getting help in return when I needed it. It’s all about cultivating a culture of trust and reciprocity.
Don’t rush these relationships, though. Take the time to get to know people’s stories. More than just an exchange, this can lead to a supportive network that lasts beyond immediate crises.
Creative Bartering Strategies
Mixing and Matching Resources
One of the fun parts of bartering is the creativity behind it. I’ve found that offering combinations rather than just one single item can be more enticing. Let’s say you have some canned goods, why not pair them with a few homemade cakes for a barter? These combos can often make the deal more appealing for both parties.
For example, I once combined some fresh veggies with a skill to bake bread. Many people had flour but no fresh produce, and vice versa. That melding of goods led to some delightful exchanges and made the bartering process richer!
Get your creative juices flowing and think about things like skills, crafts, or manuals that you could pair with tangible goods. The more unique the combination, the more likely you are to strike a deal.
Setting Barter Terms Clearly
When it comes to bartering, clear communication is super important. I learned this the hard way when a misunderstanding led to an unsatisfactory exchange. Always be upfront about what you’re willing to offer and what you expect in return. A simple conversation to lay out terms can save both parties from confusion later on.
Be aware of how you frame your offers. Instead of saying “Can I have that for this?”, try using a collaborative approach, like “What do you think about this in exchange for…?” This opens up the dialogue and allows for a smooth negotiation process.
And remember, it’s okay to walk away if you feel that the terms aren’t fair. Keeping your value in mind will reinforce your confidence in these exchanges.
Using Technology to Facilitate Bartering
In the age of technology, leveraging social media and community apps can enhance your bartering experience. I frequently utilize local Facebook groups and community forums to find out what others are offering or looking for. It’s a fantastic way to widen your reach without needing to physically go out.
Platforms like Nextdoor or even barter-specific apps can connect you with locals who are interested in trading goods or services. It’s amazing how technology can build a community feel, even in times of crisis.
Just remember to keep safety in mind. Always meet in public places or have someone with you when making exchanges. Building a bartering network offline that complements your online connections can provide a significant boost during tough times.
Reflecting on Your Bartering Experiences
Taking Time to Evaluate Successes and Failures
After a round of bartering, I always take a moment to reflect on what worked and what didn’t. This practice not only helps me improve for future exchanges but also makes me appreciate the relationships I’ve built. If a certain item didn’t trade well, I look at why that might be. Was it timing, price, or demand? Reflection provides invaluable insight!
This evaluation can enhance your future strategies. If one approach didn’t resonate, perhaps alter your resource offerings or your negotiation style. The learning from each experience is what fine-tunes your skills going forward.
Keep a little journal or notes on your phone of what worked well and what didn’t. These details can improve your bartering prowess significantly!
Sharing Experiences with Others
Finally, don’t underestimate the power of sharing your bartering stories with friends or community members. Sharing your experiences can not only inspire others but also build a stronger barter network. I’ve had people come back to me after I shared a successful barter idea, and it blossomed into a great community exchange event.
Additionally, discussions can yield new ideas for innovation. Each person brings a unique perspective, which can translate into fresh bartering techniques and strategies. Keep the dialogue open!
A community that learns together can become incredibly resilient. By sharing, we create an environment where everyone benefits, which ultimately makes our barter system even stronger.
Frequently Asked Questions
1. What are the first steps to start bartering?
The first step is to assess both what you have to offer and what you might need from others. Look around your space, whether it’s food, supplies, or skills, and figure out what’s in demand in your community.
2. How can I build trust with potential barter partners?
Building trust takes time. Start by engaging genuinely with people, offering help when you can, and being clear and honest in your exchanges. The stronger your relationship, the more willing they’ll be to trade with you.
3. Can I barter online?
Absolutely! Many community forums and social media groups facilitate bartering. Just ensure you follow safety precautions like meeting in public places.
4. What should I do if the barter doesn’t go as planned?
If you find that a barter didn’t meet your expectations, don’t hesitate to reflect on what went wrong to learn from the experience. Open communication can also help in finding middle ground for future exchanges.
5. How can I effectively evaluate my bartering success?
Take time to reflect after each barter. Consider what worked, what didn’t, and how both parties felt about the exchange. Keeping notes can help track your progress and adjust strategies for the future.
by Preparation | Apr 16, 2025 | Preparedness
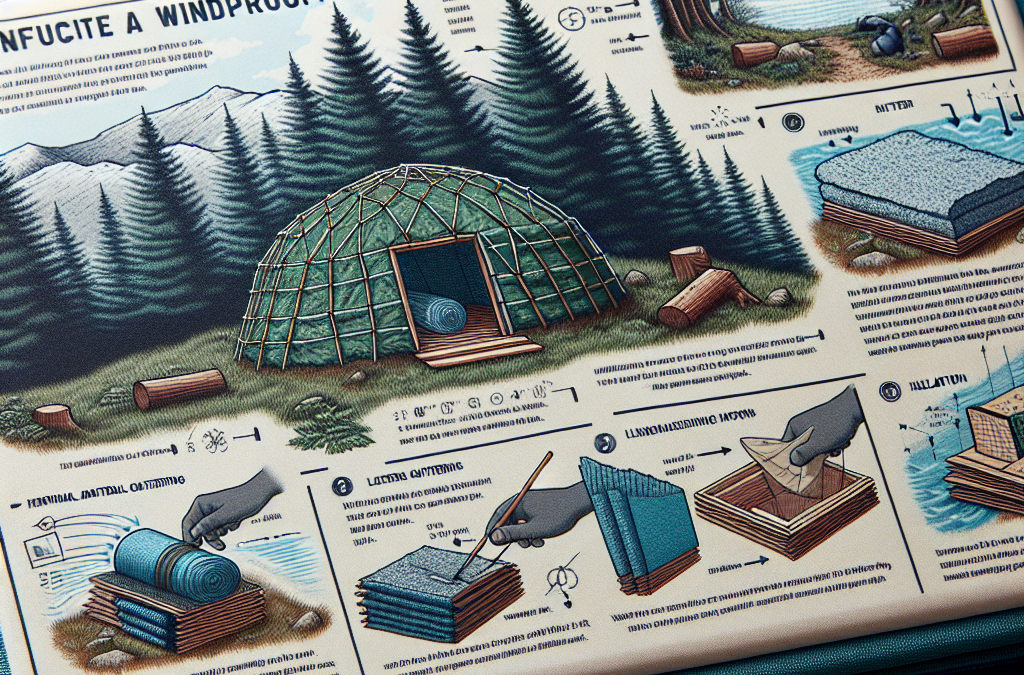
Selecting the Right Location
Assess Your Surroundings
Choosing the perfect spot for your windproof shelter is a critical first step. I always make it a point to check my surroundings thoroughly before I start building. Look for natural windbreaks like trees, hills, or even boulders. These features can significantly reduce the impact of strong winds on your structure.
Another thing I like to do is consider the terrain. Avoid low-lying areas where wind can swirl and pick up speed. Instead, I prefer locations that offer a bit of elevation without being too exposed. A spot that’s sheltered but still accessible is key to a successful build.
Finally, think about how close you are to water or resources. You want a place that’s convenient for you but also offers some form of natural protection. Balancing shelter and accessibility is essential for a windproof shelter that stands the test of time.
Mind the Wind Direction
Understanding the prevailing wind direction is fundamental in shelter design. You wouldn’t want to put your front door in the face of the wind, right? I typically check local forecasts or talk to locals to gather insights about which way the wind generally blows.
Once I know the wind patterns, I place the entrance of my shelter opposite to the wind direction. This simple adjustment makes a world of difference and keeps the inside of the shelter much more comfortable during storms.
It’s also smart to consider seasonal changes in wind direction. Make sure to plan ahead so that your shelter remains effective throughout the year, regardless of shifting weather patterns.
Consider Natural Wind Barriers
Building your shelter with existing wind barriers can greatly enhance its wind resistance. I often look for things like thick bushes or trees that can act as shields. If they’re already in place, I simply adapt my design to leverage them.
Sometimes, we can get a bit creative with our windbreaks. If there aren’t any solid features nearby, I might consider building a small fence or stacking some rocks. Techniques like these can create a buffer that significantly improves the windproof quality of my shelter.
Remember, nature can be your best ally. Incorporating the landscape into your design is a big win that pays off when the winds start howling.
Choosing Suitable Materials
Opt for Durable Options
The materials I choose for building my windproof shelter can make all the difference. Whenever possible, I go for sturdy options like logs, thick canvas, or reinforced tarps. The durability of these materials can withstand not only wind but also rain and snow.
I’ve found that selecting materials with some weight helps too. Heavier solutions tend to stay put during fierce gusts, while lighter materials may end up being tossed around like a feather. Choosing the right stuff from the get-go prevents a lot of headaches later on.
Also, think about weatherproofing. I often treat materials with a protective sealant or a weather-resistant coating. This additional step may seem small, but it can significantly extend the life of your shelter.
Use Wind-Resistant Designs
The design of your shelter plays a massive role in how well it stands up to the wind. I’ve learned that sloped or rounded roofs can help redirect wind away rather than letting it hit flat surfaces directly. It’s all about minimizing resistance.
You’ll also want to steer clear of sharp edges. The more streamlined your design, the better it can handle high winds. I tend to focus on creating rounded shapes that can disperse airflow rather than let it build up pressure against the structure.
Finally, I sometimes add additional stakes or ties to secure my shelter even further. This extra measure does wonders, especially when I expect challenging conditions.
Test Your Shelter’s Wind Resistance
Once my shelter is up, I always put it through a little test. I recommend standing inside during moderate winds and just feel how it holds up. Listen to the structure and see if there are any areas that creak or shake. It’s a good indicator of where improvements may be needed.
If possible, I like asking friends or family for help. Having a few people examine the structure and applying pressure in different areas can reveal weakness points I may have missed on my own.
Don’t be afraid to make adjustments. After an initial test, I sometimes tweak positions or add reinforcements where necessary. It’s all part of the building process, and every bit you do helps make your shelter even stronger.
Securing the Shelter Properly
Anchor It Down
No matter how great your design or materials are, it’s all useless if your shelter isn’t anchored properly. I always make sure to stake down the corners and use heavy rocks on top of any loose materials. This prevents the wind from lifting and shifting things around.
For extra security, I’ll sometimes use guy lines that extend outwards, creating a triangle of stability. It sounds technical, but it’s a straightforward method that pays off when the storms roll in.
Make it a habit to check your anchors regularly. Winds can change after a storm, and you want to ensure your shelter is still secure. Being proactive here saves you from disaster later on.
Inspect for Weak Points
Regular inspection is another golden rule I follow. After the initial build and after a storm, I like to comb through my shelter looking for any weak points. This could mean checking seams, hinges, or the integrity of the frame.
Maintaining your shelter isn’t just about looking for strong winds; it’s also about keeping up with wear and tear. I often find small repairs now can save me big-time headaches later.
If I do find damage, I address it immediately. A small tear can turn into a big problem if not handled right away. Being diligent means I can enjoy my time outdoors without worrying about where the next gust of wind will blow my shelter.
Prepare for Emergencies
It’s essential to have a plan in place should the winds get too high. I always make sure to have an emergency kit handy, with essentials like food, water, and first aid supplies. Knowing I’m prepared gives me peace of mind when the weather gets rough.
I also like to keep communication devices reset and tested, so I can reach out if things go sideways. There’s nothing worse than being caught off guard during harsh winds. Having reliable means of contact is key.
Lastly, I keep an eye on any weather updates and forecasts. Being informed lets me make proactive decisions about my shelter and whether I need to seek out shelter elsewhere if conditions worsen.
Choosing the Right Shelter Design
Understand Different Shelter Types
When I was starting out, I had no idea that the type of shelter could impact wind resistance. It’s crucial to know what your options are! For instance, a dome-shaped structure is naturally aerodynamic and can shed wind rather effectively.
I’ve also tried building A-frame designs, and they hold up pretty well against harsh winds. The key is to pick a design that complements your location and the materials you have at hand.
Researching different types gives you a broader perspective on what may work best for you. The great thing is, you can always combine elements of different designs to create something unique that fits your needs.
Adapt Your Shelter for Weather Conditions
You’ve got to be flexible! The most successful shelters I’ve built were ones that I could easily adapt based on the weather. For instance, adding extra walls on the windward side or a second layer for insulation makes a world of difference.
I often look for modular solutions. Building features that can be added or removed helps me stay prepared for any change in condition. If the wind picks up, I’m ready; if it calms down, I can simplify my setup.
Think about ventilation too! A well-ventilated shelter can limit wind effects while keeping you warm inside. Balancing these factors is all part of mastering the art of building a windproof shelter.
Experiment with Your Design
Building a windproof shelter is a learning process, and I really enjoy experimenting with different designs. Don’t be afraid to try something new! Each experience will teach you something valuable.
What I do is sketch out different concepts and then try them out. Some ideas work brilliantly, while others flop. But that’s okay—I consider each failure a step towards mastering my technique.
Engaging in building workshops or communities can be an excellent avenue for ideas. Sharing experiences, I find, can inspire innovative designs that can improve your windproof capabilities.
Frequently Asked Questions
1. What are the best materials to use for a windproof shelter?
The best materials include durable options like logs, thick canvas, or reinforced tarps. Always aim for something sturdy that can withstand not just wind but rain and snow too.
2. How can I tell if my shelter is anchored securely?
Check the stakes and ensure they’re driven deep into the ground. If the corners feel loose or can be easily shifted, it’s time to reinforce them. A good anchor keeps your shelter in place, even during strong gusts.
3. Should I worry about ventilation in a windproof shelter?
Absolutely! Proper ventilation helps prevent moisture buildup and keeps the interior comfortable. Make sure your design includes openings for air circulation without sacrificing the shelter’s wind resistance.
4. Can I build my shelter in a very windy area?
Sure! It just requires a bit more planning. Make sure to select a location that offers some protection, like trees or hills, and design your shelter keeping wind direction in mind.
5. What is the easiest design for beginners?
A simple A-frame or dome shape is great for beginners. These designs are relatively easy to construct and offer good wind resistance. Experimenting with these can help you build confidence in your skills.


