When I first started to deal with animals raiding my supplies, I quickly realized that understanding their behaviors was key. Animals like raccoons and rodents follow certain patterns. For instance, they tend to be more active at night. By observing their behaviors, I could adjust my own habits accordingly, such as securing my food right before dusk.
Did you know that some animals can smell food from great distances? This means that even if I think my food is well hidden, it can still be an easy target. Keeping food in sealed containers isn’t just about making it harder for the animals to get in; it’s about reducing the scents that attract them in the first place.
Learning to read the signs – like tracks or nests – gives me an advantage. The more I know about what these critters are up to, the better I can prepare to thwart their efforts. And trust me, once you have a few success stories, it becomes almost instinctual!
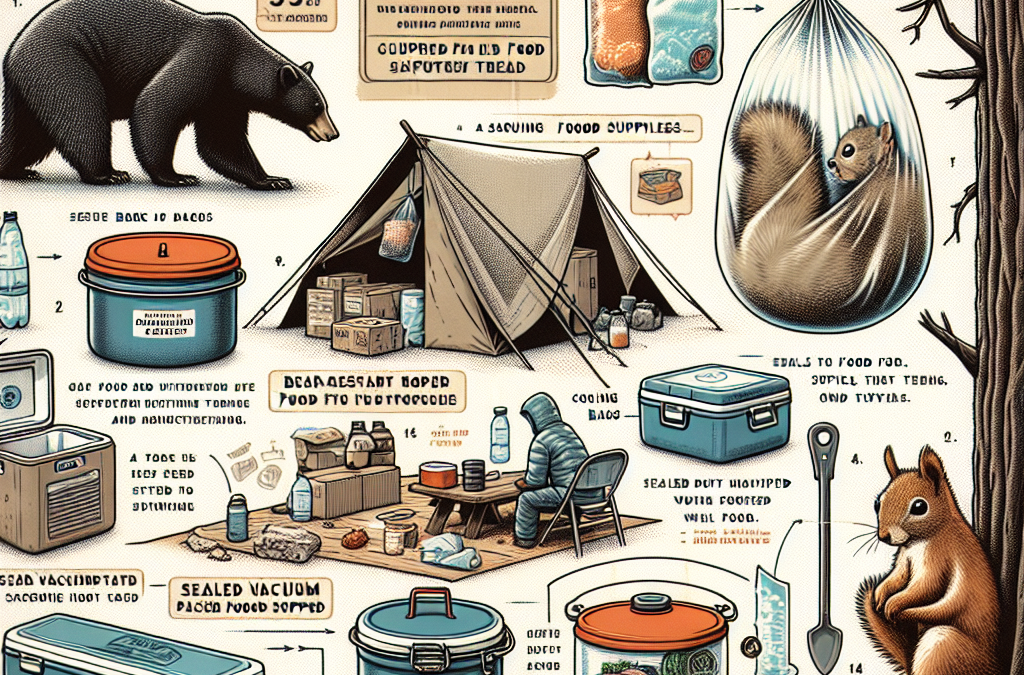
2. Proper Food Storage Techniques
Sealed Containers
I can’t stress enough how effective airtight containers have been in my efforts to secure food supplies. The investment in good quality bins has saved me lots of frustration. Not only do these containers keep out animals, but they also preserve freshness longer, which is a win-win.
Wooden crates or cardboard boxes just don’t cut it anymore. After a few encounters with mice gnawing through to my snacks, I quickly upgraded to thick plastic or glass bins. Every time I pop the lid open and see my food safely tucked away, it’s a little victory for me.
Labeling these containers with dates also helps me keep track of what I have. It’s so easy to forget what I stocked up on until it’s too late. Staying organized prevents waste and fortifies my defenses against animal intruders.
3. Creating Physical Barriers
Fencing Solutions
The first thing I did when trying to secure my food supplies was to build a fence around my garden. A simple fence made from wire mesh has proven to be quite effective. I opted for a height that would deter raccoons but also keep out smaller critters like rabbits.
Every few weeks, I take a stroll around the perimeter to check for any potential breaches. It’s all too easy for a tiny gap to turn into a quick access point for animals looking for a snack. Plus, I like to think of it as my weekly workout – who doesn’t want a little fresh air while ensuring security?
In areas where I store food outdoors, I also use gates and locks. While I wouldn’t call myself a master carpenter by any means, a simple latch and hinges can do wonders. Closing off access to food helps keep animals out and gives me peace of mind.
4. Utilizing Deterrents
Natural Deterrents
After countless snacks went missing, I turned to natural deterrents. Certain smells – like cinnamon or vinegar – repel many animals. So, I’ve started placing bowls of these substances around my food storage areas, and let me tell you, it’s been a game-changer!
Plants that animals dislike can also be strategically placed around my garden. For instance, marigolds are known to deter pests. Plus, they add a pop of color, so it’s a pretty functional decoration as well.
For me, utilizing these natural deterrents feels good because I’m not resorting to chemicals. I get to protect my food supplies and maintain a healthy environment. It’s about finding those eco-friendly solutions that align with my lifestyle.
5. Regular Maintenance and Monitoring
Frequent Check-Ins
Honestly, I stumbled into the habit of regular maintenance unintentionally. Once I started to see the difference in my food preservation, I began to check my storage areas daily. Doing quick visual scans can help me catch any signs of animals before they become a problem.
I keep a notebook handy where I jot down observations, like any unconventional activity or changes in odor. It’s not just a chore; it’s almost become a relaxing part of my day, as I reflect on how well my systems are working.
Also, I love involving my family in this process. Teaching kids about checking food supplies and understanding animal behavior has turned into a fun learning experience. Who knew that food security could turn into family bonding time?
FAQs
1. What types of containers are best for storing food?
Airtight containers made from heavy-duty plastic or glass work best. They help keep out moisture and odors, making it harder for animals to get in.
2. How can I tell if an animal has accessed my food supplies?
Look for droppings, gnaw marks, or tracks around the storage area. Any unusual odors may also be a sign that an animal has visited.
3. Are natural deterrents effective against all animals?
Natural deterrents can work well against many common pests, but results can vary. It’s good to combine them with physical barriers for the best results.
4. How often should I check my food supplies?
Frequent check-ins are essential, especially during warmer months when animals are more active. A quick daily visual scan can help you catch any issues early.
5. Can I train my pets to help deter animals?
Yes, pets like dogs can be trained to bark or patrol the areas where food is stored. Their presence can deter many animals.
Adversity is a universal experience. We’ve all faced tough times that make us question our ability to move forward. Personally, my encounters with adversity have often felt like they hit me out of nowhere, knocking me off balance. The truth is, grappling with difficulties is part of life, and understanding this concept is the first step in preparing ourselves for challenges.
When I look back on my life, the hardest moments often came paired with growth. It’s like the universe throws us a curveball, just to see how we’ll adjust our swing. Comprehending adversity not only helps us to define what challenges we face but also empowers us to confront them directly.
It’s essential to recognize that everyone has their own battles. Whether it’s losing a job, dealing with a health crisis, or simply navigating personal relationships, we all face adversity in different forms. Accepting this commonality allows for deeper connections with others who can relate to our struggles.
Shifting Mindsets
The Power of Positivity
After many experiences, I truly believe that keeping a positive mindset is crucial when you’re up against tough times. It might sound cliché, but it works. For me, it’s often about finding those tiny moments of light amidst the chaos. Sometimes, I’d catch myself smiling at a random memory and it would energize me to push through the gloom.
One technique I’ve adopted is reframing negative thoughts into positive ones. Instead of thinking, “Why is this happening to me?” I ask, “What can I learn from this situation?” This shift in perspective has helped me see obstacles more as opportunities for learning rather than just setbacks.
Surrounding myself with positivity has also been life-changing. Whether it’s following uplifting social media accounts or chatting with supportive friends, these influences help me sustain a mindset that is much more resilient in the face of adversity.
Building Resilience
Practice Makes Perfect
Resilience isn’t something you’re born with; it’s like a muscle that needs to be worked out. I remember the first time I had to deal with an unexpected setback—honestly, it was a tough pill to swallow. But over time, I learned that every small challenge I overcame was training me to face the next one even harder.
Setting small, achievable goals has been my go-to strategy for practicing resilience. When I successfully cross a task off my to-do list, regardless of its size, it builds my confidence and reinforces the belief that I can handle more significant challenges down the line.
Another key part of resilience is learning to cope with failure. Instead of viewing failure as a definitive end, I now see it as a stepping stone. It can be painful, but life is full of valuable lessons—and failure is often the best teacher of all.
Developing a Support System
It Takes a Village
No one fights battles alone, and I can confirm that having a solid support system is vital when overcoming adversity. In my experience, revealing our struggles to people we trust can lighten the burden immensely. It’s like sharing the load with someone else; you don’t have to bear it all on your own.
I’ve learned to be vulnerable and open up to close friends and family when I’m facing a tough time. They often offer perspectives I hadn’t considered or simply lend a listening ear, which alone can be incredibly comforting. We all crave connection, especially in dark times.
Joining support groups—whether online or in person—has enriched my life. Meeting others facing similar challenges has not only expanded my understanding of adversity but also forged friendships that are meaningful and supportive. We lift each other up in tough times, which is pretty powerful.
Embracing Change
The Art of Adaptability
Let me tell you, change is the only constant in life. I’ve found that embracing change, rather than resisting it, has been a game-changer for me. When I first faced major transitions, like changing jobs or moving cities, I realized that the more I fought against it, the harder it became. Adapting made things smoother.
One practice I found helpful is to focus on what I can control during times of change. Often, all the accompanying chaos can feel overwhelming, but honing in on my own actions and responses has enabled me to stay grounded. In short, I’ve learned to dance in the rain instead of waiting for the storm to pass.
Finally, seeing change as an opportunity for growth transforms the way I approach life. It shifts my focus from loss to potential gain, allowing me to welcome new experiences and challenges with open arms. After all, every change incorporates a new chapter in our story, right?
When it comes to staying warm in freezing temperatures, layering is my go-to strategy. It’s not just about throwing on a ton of clothes; it’s about knowing how to create a barrier against the cold. The idea is to trap heat while wicking moisture away from my body. I usually start off with a moisture-wicking base layer that hugs my skin, keeping it warm and dry.
The second layer, which I often choose to be fleece or down, helps to insulate. This is crucial because it traps body heat effectively but remains lightweight. It’s important to avoid cotton for this layer, as it absorbs moisture and loses its insulating properties. Trust me, getting wet in the cold is no fun at all!
Finally, I always top my outfit with a waterproof and windproof outer layer. This protects against wind chill and any wet conditions, ensuring that my inner layers stay dry and effective. Adopting the right layering technique has been an absolute game changer for me during cold weather outings.
Choosing the Right Materials
Not all fabrics are created equal when you’re battling the cold. In my experience, wool, polyester, and nylon are winners, while cotton is a big no-no. Wool is fantastic for retaining warmth even when wet, and believe me, I’ve had my share of snowy adventures where that’s come in handy!
Polyester, on the other hand, is excellent for moisture-wicking, keeping me dry during high-energy activities. When I’m out there skiing or hiking, staying dry is essential. As for nylon, it’s tough and offers wind resistance, which can be a lifesaver during blustery winter days.
One tip I’ve picked up over the years is to be mindful of my socks and gloves. I always go for thermal materials that not only keep my extremities warm but also wick moisture away. Cold feet and hands? Yeah, let’s avoid that at all costs!
Monitoring Your Body Temperature
Throughout my freezing adventures, I’ve learned to listen to my body. It’s super important to monitor how I’m feeling temperature-wise. If I start to feel too warm, I know it’s time to shed a layer or two. Conversely, if I begin to feel chilled, I need to add another layer back on.
Dressing appropriately can help me avoid both overheating and hypothermia. I often keep an eye on the signs of frostbite as well, particularly on my fingers and toes. Redness, tingling, or numbness are all indicators that I need to warm up quickly.
Being proactive about my comfort and warmth has really increased my enjoyment of winter activities. If I understand how my body reacts to cold, I can adjust my layers to keep myself cozy without overdoing it.
Building a Shelter
Finding the Right Location
Whether I’m stuck overnight in a snowstorm or camping out, knowing how to properly set up a shelter can be a lifesaver. I always prioritize finding a spot that’s away from the wind and provides some natural cover. Ideal locations might be near trees or boulders; those spots break the wind and reduce chill.
It’s also important to choose a spot that’s dry; the last thing I want is snow or moisture seeping into my shelter. If I can find a natural depression in the ground, even better! It naturally provides some insulation. I’ve learned that a good view might be nice, but protecting myself from the elements is way more important.
Orientation matters, too! Positioning the entrance away from the wind can make a world of difference. I’ve made the mistake before of not paying attention to this, and it left me cold and uncomfortable!
Constructing the Shelter
When I get the location figured out, it’s time to build the shelter itself. For a quick and effective structure, I often lean towards a simple snow cave or a debris hut. Both methods are pretty straightforward, and I love how easy it is to find materials in my surroundings.
A snow cave, for instance, uses the insulating properties of snow to keep the temperature regulated inside. I usually dig into the snow and design it in a way that it’s spacious enough for me to sit or even lie down comfortably.
If it’s not snowy, I tend to gather branches, leaves, and other debris to create a hut structure. Layering branches on a frame gives me a strong foundation, while more foliage offers insulation and wind protection. It’s amazing how resourceful you can be when you put your mind to it!
Insulating the Shelter
Insulation is key for ensuring my shelter remains warm. I like to gather leaves, pine needles, or even more snow (if available) to stuff in the nooks and crannies. This helps trap the heat and keeps the cold at bay. It’s surprising how much of a difference a few extra layers can make!
I also make sure to create a comfy place to sit or lie down. Finding or creating a bed of leaves or branches elevates me off the cold ground and gives added insulation. It’s so worth the time and effort for a better night’s sleep!
The whole insulating process makes my shelter not just a temporary fix but a real haven against the chilly temperatures outside. In my experience, putting in the effort to properly insulate pays off when I’m hunkered down in the cold.
Finding Food and Water
Locating Fresh Water
In cold climates, finding water can be as challenging as finding food. I always need to observe my surroundings for sources, like streams, rivers, or melting snow. Drinking snow is often a last resort, and I typically avoid it unless I’m desperate since it can lower my body temperature.
When it comes to melting snow, I generally prefer to use a stove if I’ve got one, but if not, I’ll collect it in a vessel and let it sit until the sun does the work. Every drop counts when you’re out in the cold.
I make it a habit to check for clear, running water, as it’s usually the safest choice. Staying hydrated is crucial; dehydration can sneak up on me during cold weather just as easily as in the heat!
Identifying Edible Plants
Foraging for food in the winter can seem daunting, but trust me, it’s doable. I’ve had luck by keeping an eye out for certain hardy plants; dandelions, for example, have leaves that can be eaten, and their roots are edible too. In fact, I’ve even made a tasty tea from dandelion roots when I’m in a pinch!
I also pay attention to berry bushes, as many species retain some fruit in colder months. Ripe berries are not only a source of food but can also provide a much-needed dose of energy. Just a quick word of caution, though—always double-check what you’re consuming.
Getting familiar with edible plants takes practice, but I’ve found that keeping a simple guide with me can be helpful. You never know when you might spot something edible on your chilly adventures!
Hunting and Trapping
If I’m in a situation where I need a more substantial meal, knowing how to hunt or trap small game can be perfect. Depending on the area I’m in, I look for tracks or signs of animals. I’ve often used snares or simple traps to secure food when essentials run low.
Setting up traps can be tricky, but it’s rewarding when done right. I usually look for spots where animals are likely to travel, like game trails. The more I observe their behavior, the better my chances become.
Remember, patience is key here. Waiting quietly is essential to let the animals do their thing. Eventually, I’ve managed to catch my own meals which adds a real sense of accomplishment to my winter survival skills!
Staying Warm with Fire
Gathering Firewood
Fire can be a lifesaver in freezing temps, so I always begin by collecting dry wood. I like to search for dead branches that are still off the ground; these tend to be much drier. When I’m getting wood, I also gather smaller twigs to use as kindling to help the fire get going.
It’s crucial to make sure everything is dry for an effective fire. I’ve learned the hard way that trying to burn wet wood can be a total bummer, so I do my best to find the best materials.
I also collect tinder from things like dry grass, pine needles, or birch bark. These can spark up quickly and help get the larger pieces of wood to ignite. Having these materials on hand often turns out to be a real game-changer!
Building the Fire
Building the fire itself is where the fun starts. I usually set up a small base using logs in a teepee or log cabin style, ensuring that my kindling is in the middle. The idea is to allow airflow, which helps ignite the fire more easily.
Once I’ve struck a spark onto my tinder and got it going, I gradually add larger pieces of wood to the fire. It’s all about patience; I’ve seen too many folks try to rush it, only to end up with a smoldering mess! If I take my time, I’ve found fires are much easier to maintain.
Finally, once the fire is going strong, I keep an eye on the flames and regulate the size by adding wood as needed. A well-maintained fire not only keeps me warm but also serves as a beacon in case I need to signal for help!
Using Fire Wisely
Fire is a powerful tool, but it demands respect. I’ve made it a point to never leave my fire unattended, as this can lead to dangerous situations. Safety is key, especially in remote areas. If it’s dry, I make sure to create a fire ring if I can to prevent any chance of it spreading.
Also, when the fire’s not in use, I’ll cover it up using some damp soil or leave it to go out naturally instead of dousing it with water. I’ve learned fires can leave a lasting imprint on the environment if not put out properly.
Lastly, I use my fire smartly, positioning it not just for warmth but for cooking or melting snow too. Balancing all functionalities has really enhanced my overall survival experience in freezing temps!
Using Survival Tools and First Aid
Essential Survival Gear
Having the right tools can be the difference between comfort and chaos. I always carry a well-stocked survival kit, including a knife, fire-starting tools, and a first-aid kit. A good knife is invaluable when it comes to making shelters or preparing food!
I also make sure I’ve included a multi-tool; this little gem can serve various purposes, from cutting to screwing or opening cans, you name it! It’s one of those tools that always comes in clutch.
Don’t forget a good map and compass, or a GPS if I have the battery life. Getting lost in the wilderness can be not only scary but dangerous, especially in freezing temps. I’ve learned to orient myself with the terrain around me and take the right tools along to always find my way home.
Basic First Aid Skills
Accidents can happen, and dealing with injuries in freezing weather can be tough. I find it crucial to know how to treat common ailments, such as frostbite or hypothermia. Recognizing signs early can make a big difference—like understanding when tingling starts in my extremities!
If someone is showing signs of hypothermia, I focus on warming them up with layers and getting them sheltered quickly. When it comes to frostbite, I’ve learned to never rub the affected area; instead, I should gently warm it up using body heat or warm water if possible.
Having a first-aid kit handy with bandages, antiseptics, and pain relievers keeps me prepared for any unexpected scrapes or bruises during cold adventures. I always take note of any allergies as well and plan the contents of my kit accordingly!
Emergency Signals
When all else fails, knowing how to signal for help is crucial. I usually pack a whistle—trust me, it’s way more effective than yelling! It carries farther, and I can conserve my energy this way.
I also don’t forget mirrors or bright colors that can be used to attract attention. Flashing sunlight off a mirror or wearing neon can work wonders. It’s all about being visible in the best way possible.
And finally, I always keep a flashlight handy. Not only does it help me to navigate in the dark, but it’s also a great signaling device if the need arises. Preparation is everything when I plan to face the elements!
Frequently Asked Questions
1. What’s the best way to stay warm in freezing temperatures?
The best way to stay warm is by dressing in layers. Start with a moisture-wicking base layer, add insulation, and top it off with a weather-resistant outer layer. It’s all about trapping heat and staying dry!
2. How do I make a shelter in the snow?
To build a shelter in the snow, look for a windbreak area, dig a snow cave, or construct a debris hut using branches and leaves. Be sure to insulate it well to keep warm!
3. Can I drink snow for hydration?
Drinking snow is not the best option as it can lower your body temperature. If you must, melt it first, but always try to find fresh water sources instead.
4. What materials are best for starting a fire?
When starting a fire, look for dry twigs, small branches, leaves, and other tinder materials. Using dry wood will help the fire ignite more easily.
5. What should be included in a survival kit for freezing temperatures?
A solid survival kit should include a knife, fire-starting tools, a first-aid kit, food rations, and water purification tablets. A map and compass are also vital for navigation!
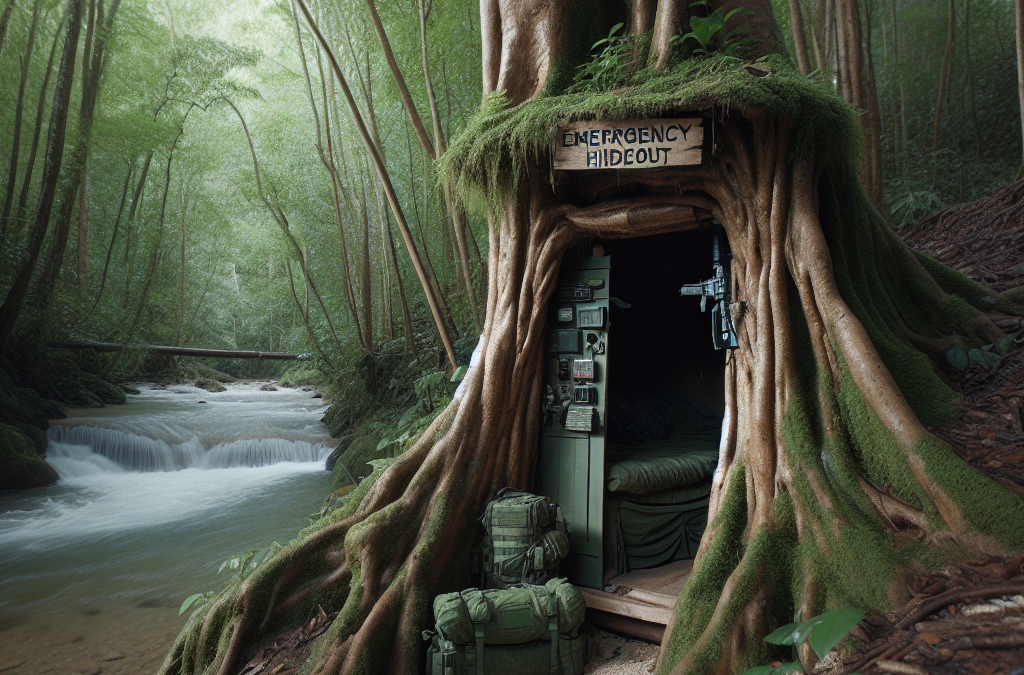
Finding the perfect spot for a hideout is super important. I always start by scouting out various locations around me. Parks, wooded areas, and even abandoned buildings can all be great options, depending on your situation. I recommend making a list of spots that seem discreet but accessible enough for a quick getaway.
Once you find a few potential areas, visit them at different times of day, and take note of foot traffic. Are there busy times when someone might wander by? If so, you might want to steer clear of those times or go for a spot that’s tougher to spot during rush hours.
Lastly, think about how easy it is to blend in or remain unnoticed in these spots. Remember, the key is to remain hidden, so your chosen location should offer some natural cover or be well out of sight.
Evaluate Accessibility
Making sure you can easily access your hideout is crucial. After all, what good is a hideout if you can’t get to it in a hurry? I usually identify multiple routes to my chosen place. Being able to approach from different angles can really help evade anyone looking for you, whether it’s a prank gone awry or something more serious.
Consider the weather conditions as well. You don’t want to choose an area that becomes a muddy mess in the rain or one that’s a sweltering oven in the summer heat. A good hideout is not just a place to stay; it’s a place that allows you to stay comfortable while waiting it out.
Lastly, think about your gear. If you plan on bringing supplies, you’ll want to ensure these routes can support your load—think about how you can get your essentials, whether it be a backpack or more complex gear.
Consider the Surrounding Environment
When evaluating your location, considering the environment is super important. How does the local wildlife impact your stealth? I’ve found that some areas are teeming with critters that can draw attention to your hideout. Keep your eyes peeled for animal trails or nests. Even in a stealthy location, the little things can betray you.
There’s also the aspect of human activity in the area. Are there nearby homes? It’s beneficial to stay out of earshot of prying ears. I’ve been in places where I thought I was safe, but then I heard kids playing or dogs barking, and it really stressed me out.
Finally, know how to use terrain to your advantage. Hills, trees, and backs of buildings can help conceal your hideout. I love a good natural windbreak that can obscure sound as well as sight. The goal is to learn how to leverage your environment effectively.
Gathering Essential Supplies
Compile a Survival Kit
Whenever I think of a hideout, I can’t stress enough how important a well-equipped survival kit is. The basics usually include a first aid kit, non-perishable food, water, and a flashlight. I like to make sure I have items that can sustain me for several days on my own. After all, I might not have the luxury of an immediate escape.
Another thing to consider for your kit is how discreetly you can store everything. Lightweight options that fit in a small backpack work best. I like using packing cubes to keep everything organized. You never want to be fumbling around if you need to grab something in a pinch!
Also, consider including personal items, such as a notebook, pen, or even a favorite book for downtime. It’s amazing how comforting familiar things can be when you’re in a tense situation.
Incorporate Self-Defense Tools
You never know what might happen when you’re hiding out, so having some self-defense tools is a must. I always carry something like pepper spray or a personal alarm. They’re lightweight and can literally make the difference between a safe escape or facing an unwanted situation.
Of course, it’s crucial to check local laws on self-defense items. I remember a time when I didn’t realize a tool I thought was harmless might raise eyebrows. Better safe than sorry, am I right?
Most importantly, just having these tools adds a layer of psychological safety. Knowing that I’m prepared helps me feel calmer, even in stressful situations!
Plan for Communication
In this age of technology, never underestimate the need for communication. I like to have a basic burner phone or walkie-talkies stashed in my hideout. It’s a fail-safe for contacting friends or family in case of an emergency. Imagine trying to explain your situation without a way to reach out!
Consider putting together a communication plan with trusted individuals. Establish set times when routine check-ins happen. That way, if something feels off, they know to alert the appropriate people.
Finally, think about signal techniques. If you’re not able to verbally communicate, a simple sign can alert someone to your situation without drawing unwanted attention. Chalk marks on a nearby tree or even a series of stones can help convey important messages discreetly.
Creating Concealment
Utilizing Natural Cover
I’ve had a bunch of experience with camouflaging my hideout using natural materials. Branches, leaves, and other debris can be your best friends when it comes to creating a concealment structure. I often collect what’s readily available nearby to blend my hideout seamlessly into the environment.
Take some time to assess how visible your spot is from various angles. From this perspective, I can learn how to better conceal my area while waiting out the storm. Knowing how to utilize natural camouflage not only protects you but can also add a personal touch to your hideout.
Don’t forget to use low-growing shrubs or thick brush to your advantage. These not only obscure sightlines but can help muffle sound as well. The quieter, the better!
Building a Stealthy Shelter
If you’re planning on staying a while, you might need a bit more structure. Constructing a temporary shelter is not only practical but can also be fun. I love using tarps, branches, and even some old fabric to create a makeshift cover. It’s like playing outdoors again but with a serious twist!
Always remember the balance between sturdy and stealthy. Make sure your shelter is eco-friendly and blends into the surrounding environment. I’ve found that simple lean-tos work great, but it’s crucial to maintain a low profile.
Also, keep in mind how to dismantle or hide the shelter afterwards. You don’t want your hideout to be detected just because of signs of previous activity.
Layering Invisible Barriers
Add an extra level of stealth by layering invisible barriers. You can use things like tripwires or low-cost traps that can alert you to unwanted visitors. I’ve had experiences where a small signal system gave me peace of mind while I was holed up.
Additionally, ensure the sounds created by these barriers remain unnoticed. I’ve been working on sound-dampening techniques using natural materials; it’s effective and doesn’t draw the eyes of passersby.
Always test your barriers beforehand to ensure they work as intended, but remain discreet. It’s all about making your hideout as elusive as possible while you’re hunkering down.
Maintaining Situational Awareness
Stay Updated on Surroundings
When I’m in a hideout, I make it a priority to keep an active awareness of what’s happening around me. I enjoy spending some time just listening, observing, and taking mental notes. I look for changes in the environment—whether it’s wildlife behavior or the presence of people.
I also recommend minimizing distractions like screens. Being in your hideout shouldn’t be about scrolling through social media, it should be about tuning into your senses!
Writing down what you observe helps, especially if you realize patterns exist in how people interact with the area. It can totally inform your next steps or decisions on when to leave your hideout.
Develop a Routine
Staying too idle can lead to impatience or poor decisions. Having a daily routine gives structure even in the most unexpected of situations. Include practical tasks, such as collecting water or gathering more natural cover.
I also find personal time valuable, like practicing mindfulness or even basic workouts. It helps to keep my mind and body sharp, making sure I’m ready to act if needed.
Of course, don’t forget to mix in periods of complete stillness. Being quiet and observant for an extended period can yield surprising insights about your surroundings.
Building a Contingency Plan
You must always have an exit strategy when creating a hidden space. The last thing you want is to be caught off guard. I typically visualize several scenarios: one that goes smoothly, and others that don’t.
This preparation includes routes to escape, alternative hideouts, and having an emergency contact plan in place. The flexibility to adapt your plan based on situational awareness is key.
I recommend practicing your escape routes beforehand, ideally during routine outings in the area. Being prepared can make all the difference when you need to act quickly.
FAQ
1. What materials do I need to make my hideout?
You’ll want basic survival supplies like food, water, first aid items, and tools for setting up the shelter. Don’t forget to include self-defense tools and a means of communication!
2. How often should I check my surroundings?
Staying aware is a continuous task. I recommend checking your surroundings at least every half hour and being quiet to listen for changes.
3. How do I ensure my hideout remains hidden?
Using natural materials to camouflage your space is key. Keep it low to the ground and avoid bright colors or unnatural shapes.
4. Can I have company in my hideout?
While it’s possible, be cautious! The more people, the more noise and potential to draw attention. If you must have someone over, make sure they’re trustworthy and share the same goals.
5. What if I need to leave my hideout quickly?
Always have escape routes mapped out, and keep your gear organized for a quick departure. I recommend practicing your exit strategy regularly to be fully prepared!
When you’re out in the wild, the first thing to remember is that Mother Nature doesn’t always play by our rules. You need to understand your surroundings—whether it’s a forest, mountain, or desert. Familiarize yourself with the area before embarking on your adventure. Map out where help might be available, even if it’s miles away. Knowing how to navigate can help calm those pre-birth jitters.
Get to know common plants and animals in the area. Believe it or not, some plants can aid in pain relief or serve as natural antiseptics. It’s like being a walking pharmacy! And who knows, you might even encounter some friendly wildlife that could help if you’re lucky. Just don’t count on it!
Preparation is your best buddy in this scenario. Take the time to gather supplies ahead of time—think about things like clean cloths, a makeshift blanket, and some basic first-aid gear. Your backpack should have what you need to manage a delivery. Trust me, having these essentials can transform a chaotic situation into something more manageable.
Recognizing the Signs of Labor
Knowing When to Act
Okay, so let’s get real here. If someone’s in labor, the last thing you want to do is be clueless. There are a few classic signs to look for, like contractions. They might start off mild and then become more intense. Pay attention—this isn’t the time to be distracted by your surroundings!
Other signs to watch for include a sudden burst of energy, which is not uncommon. This is sometimes referred to as “nesting.” The person might also feel anxious or even a bit crampy. If you see the water breaking, that’s your cue. Grab your gear and get ready—things are about to get real.
Don’t freak out! It’s totally normal to feel some panic. Just take a deep breath and focus. Clear the space around you and ensure the person feels safe and supported. Sometimes all someone needs is a calm companion to help ground them in a wild moment.
Essential Steps for Delivery
Gathering Your Supplies
Before you get into the nitty-gritty of delivery, make sure you have everything ready. You want your supplies close to you. Personally, I recommend a waterproof bag to keep everything dry just in case the rain decides to join your little party.
Things to have on hand include clean towels or cloths, a warm blanket, and some thin string or a clean shoelace to tie off the cord. Remember, sterile is key, so do your best to ensure everything is as clean as possible—even in the wilderness. Someone’s life depends on it!
It’s also a good idea to have a flashlight handy. It might get dark before you know it, and trust me, there’s nothing worse than trying to navigate a delivery in the dark. Plus, it can help signal for help if needed. Knowledge is power, my friends!
Managing Complications
Being Prepared for the Unexpected
So what if things don’t go as planned? First off, don’t panic. Complications can arise, and staying calm is the best way to approach them. Know that things can happen, but remember you’re not alone—you’re equipped with knowledge and supplies. If there’s something you need to improvise, don’t be shy. Creativity can go a long way!
Recognizing signs of distress in both the mother and the baby is crucial. If the contractions are too close together or if the mother is experiencing excessive bleeding, you need to act swiftly. Having a partner can hugely help in these moments. Someone can focus on the laboring person while the other assesses the situation and seeks help.
There’s no shame in reaching out for help. If you have a phone and coverage, don’t hesitate to call 911. Even if you’re deep in the woods, many areas have emergency services that can get to you quickly. Information is key, so be sure to relay all necessary details to them.
Aftercare and Support
Post-Delivery Care
Congratulations! You’ve made it through! But wait—there’s still work to be done. Taking care of the mother and the newborn immediately after delivery is essential. Ensure the baby is breathing and wrapped securely in a clean blanket. Skin-to-skin contact can help regulate the baby’s temperature—good stuff!
Don’t forget about the mother’s needs. Hydration is important; a sip of water can do wonders. Monitor her for any signs of distress or complications, like heavy bleeding. Check on her emotional well-being, too. This can be a wild ride, and discussing every part of the experience can help ease anxiety.
Lastly, don’t forget to reach out to family and friends for support once you’re back in civilization. New parents need their support crew more than ever during these first few weeks. It’s a whole new world, and having a strong support system is invaluable.
Frequently Asked Questions
What should I pack for an emergency childbirth in the wilderness?
Be sure to have clean towels or cloths, a warm blanket, string or shoelaces for tying off the cord, and a flashlight. Having these items can make a huge difference!
How will I know when labor is happening?
Look for signs like contractions, a sudden burst of energy, and water breaking. If you notice these signs, it’s time to be ready for action!
What if complications arise during delivery?
Stay calm and assess the situation. If the mother or baby shows signs of distress, have a plan for how to address these issues, including calling for help if necessary.
What is the most important thing to do immediately after childbirth?
Make sure both the mother and baby are safe and secure. Wrap the baby in a clean blanket and monitor the mother’s condition closely for any complications.
How can I prepare myself for a potential wilderness childbirth?
Learn about childbirth basics, familiarize yourself with your environment, gather supplies, and practice staying calm under pressure. Preparation is key!