by Preparation | Apr 24, 2025 | Preparedness
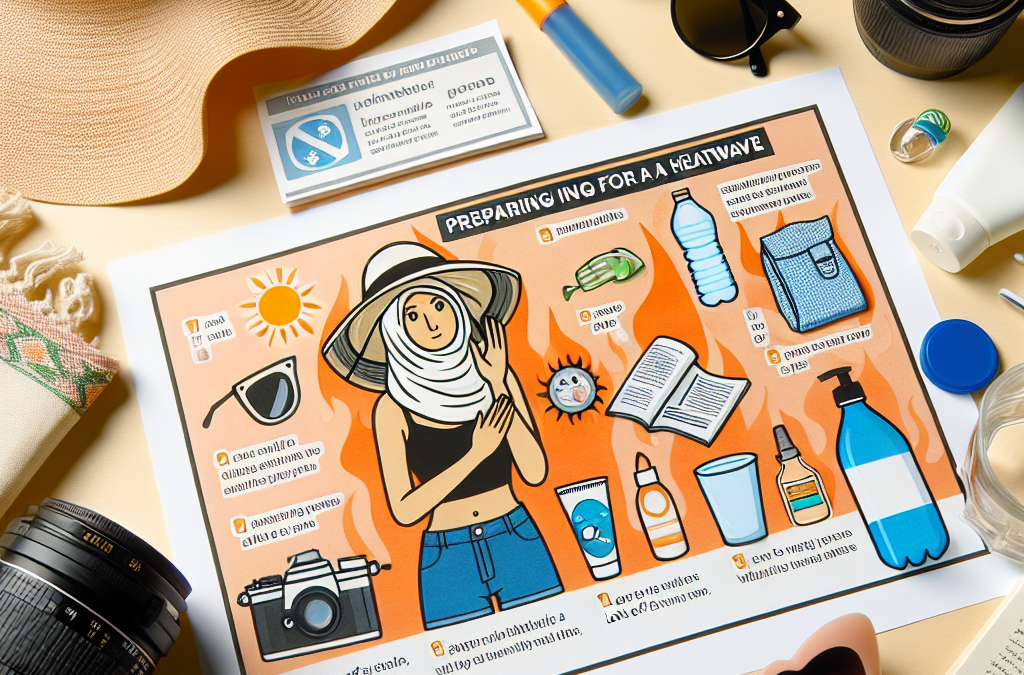
Preparing for a Heatwave: What You Need to Know
Preparing for a Heatwave: What You Need to Know
Here are the top 4 semantic keyword phrases for this article:
- Stay Hydrated During Extreme Heat
- Protecting Your Home from Heat
- Heat Safety Tips for Vulnerable Groups
- Planning Ahead for a Heatwave
Stay Hydrated During Extreme Heat
Importance of Staying Hydrated
Let me tell ya, staying hydrated during a heatwave is no joke. I’ve learned the hard way that when temperatures soar, your body needs extra fluids. Water is your best friend; it helps regulate your body temperature and keeps everything running smoothly. Not staying hydrated can lead to heat exhaustion or worse, and trust me, I’ve seen it happen!
When it’s blazin’ outside and you’re sweating like crazy, water alone sometimes doesn’t cut it. Your body is losing more than just H2O; you’re losing electrolytes too. So, I like to mix things up with some electrolyte drinks. They help replenish what you’re losing, keeping those cramps at bay.
Remember, hydration isn’t just about drinking water when you’re thirsty; it’s a constant process. I keep a bottle with me all day. Set reminders if you need to—trust me, you’ll feel so much better for it.
Tips for Staying Hydrated
As a pro tip, always carry a reusable water bottle when you’re out and about during a heatwave. I’ve found that filling it up before heading out becomes a little ritual for me. Whether I’m going for a walk or just chilling in the backyard, this habit has helped me stay on top of my hydration game.
Another strategy I use is eating water-rich foods. Fruits like watermelon, cucumbers, and oranges are not only refreshing but also packed with water. I often toss a fruit salad together or blend smoothies that keep me cool while hydrating at the same time!
Lastly, avoid drinks that can dehydrate you like alcohol or caffeinated beverages. I’ve fallen into that trap, thinking a cold drink will cool me down. Instead, I opt for flavored water or iced herbal teas that taste great and keep me hydrated.
Protecting Your Home from Heat
Creating a Cool Environment
I can’t stress how crucial it is to keep your home as cool as possible during those scorching heatwaves. It’s all about creating a comfortable oasis. I started using blackout curtains in my windows. They help block out that blazing sun, reducing the indoor temperature significantly.
Ceiling fans are another lifesaver. I make sure to have them going all the time. If you reverse them, they can even circulate cool air better! You wouldn’t believe how much a little airflow can help.
If you have air conditioning, keep it running, and don’t forget to clean those filters regularly. I learned this lesson after one sweltering summer when my AC barely worked because I neglected its maintenance. Keep your system in good shape to survive the heat!
Sealing Up Your Home
Another thing that worked wonders for me was sealing up any drafts. I’ve gone around my house with a can of caulk, sealing up windows and doors. It sounds tedious, but it can really keep that cool air from escaping, making it feel like a sanctuary indoors.
Also, keep heat sources to a minimum. I try to use my oven less and stick to cooler meal options. Your stovetop and oven create extra heat in the house, so I often rely on my trusty slow cooker or grill outside during the summer months.
Plus, don’t forget to hydrate your plants. They help cool down your environment too! I’ve grown a little herb garden, and besides giving me fresh herbs for cooking, I feel like they create the perfect little green space that helps lower the overall temperature inside.
Heat Safety Tips for Vulnerable Groups
Understanding Vulnerable Groups
When it gets hot outside, certain folks are more vulnerable than others. I’ve seen firsthand how heat affects the elderly, infants, and those with chronic illnesses. They’re at a higher risk for heat-related illnesses, so being aware can make a huge difference.
If you have elderly neighbors or family, checking in on them during extreme heat is crucial. A simple phone call can let them know you care and remind them to stay hydrated and inside as much as possible.
For parents, keeping an eye on your little ones is equally important. They don’t always know when they need a break from the heat. I always set timers when my kids are playing outside so they can come in for a cool drink and rest.
Creating Safety Plans
Making a heat safety plan is something I’ve found helpful for my family. We discuss where they can go if it gets too hot. If we don’t have air conditioning, we’ve identified public places like libraries or community centers as our go-to’s during a heatwave.
Having a buddy system worked well for me, too. Keeping an eye on each other can save you from potential heat emergencies. My friends and I often check in on one another during those hot days; it’s a great way to stay connected and safe.
Don’t forget about pets! They can also suffer from heat stress. I make sure to provide plenty of water, and keep them indoors during the hottest hours of the day, just like I do for myself.
Planning Ahead for a Heatwave
Monitoring Weather Reports
Planning ahead for a heatwave isn’t just about stocking up on ice cream. I’ve learned to check the weather regularly, especially during the summer months. Trust me; being prepared can really take the sting out of those hot days.
Weather apps can be your best friend. I have one on my phone that sends me notifications about excessive heat warnings. Being one step ahead allows me to plan my day better, whether that means changing my usual outdoor plans or making sure I have extra ice in the freezer.
Listening to local news can also provide you with updates about heatwave resources. Often, they announce cooling centers or special programs for those who may need assistance during high temperatures.
Stocking Up on Supplies
Another pro tip is to stock up on supplies before the heatwave hits. I always keep bottled water, electrolyte drinks, and non-perishable snacks around. You never know when you might get stuck inside due to a heatwave, and it’s great to have a little stash!
Don’t forget sunscreen and hats if you must venture outside. The last thing you want is to end up with a sunburn. I’ve been through that, and let me tell you, it’s no fun.
Additionally, having a first aid kit handy is a smart move. You might not need it, but it’s better to be safe than sorry. It’s always a relief when I know I have the basics ready just in case someone feels unwell or encounters heat exhaustion.
FAQ
What are the best drinks to stay hydrated during a heatwave?
Water is your top choice, but you can also go for electrolyte drinks or smoothies that have water-rich fruits. Keeping your hydration fun is key!
How can I cool my home effectively without AC?
Using blackout curtains, fans, and sealing drafts can significantly cool your home. Plus, cook less indoors during the heat of the day to keep the temperature down.
What should I do if I have a vulnerable person in my care during a heatwave?
Check in on them regularly, help them stay hydrated, and create a safe environment for them indoors. Planning visits to cooling centers if necessary is always a good idea!
How can I prepare for an unexpected heatwave?
Monitor weather reports, stock up on water and snacks, and ensure you have supplies ready, including first aid kits and hydration options. Planning ahead makes all the difference!
by Preparation | Apr 24, 2025 | Preparedness
How to Protect Your Home from Earthquakes
How to Protect Your Home from Earthquakes
- Earthquake-proofing your home
- Building codes and regulations
- Seismic retrofitting techniques
- Emergency preparedness plans
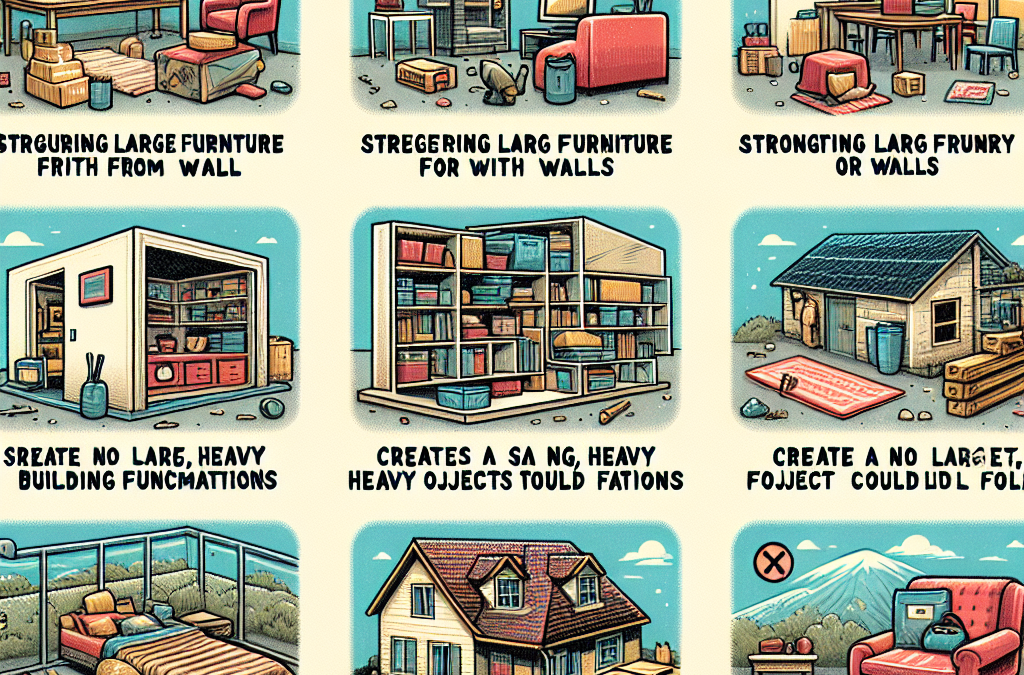
Earthquake-proofing your home
Understanding the Basics of Earthquake-resistant Design
When I first started learning about protecting my home from earthquakes, I realized that the basics of earthquake-resistant design are crucial. It’s all about how your house is constructed. The materials and structure matter—especially when the ground starts shaking.
A well-built home can sway gently without crumbling. For instance, houses on sturdy foundations fare much better than those built on sandy soil. And let me tell you, understanding the physics behind it really opened my eyes. I mean, it’s like knowing the secret sauce that keeps your house standing tall during a shake.
So, if you’re looking to make your home more earthquake-proof, begin by evaluating your home’s foundation. It’s the backbone of your whole structure. Think of it like upgrading to a better internet plan; it gives you a smoother experience and stronger security.
Bracing and Reinforcing Your Structure
After getting down the basics, I started thinking about bracing and reinforcing. This step isn’t just for those living in high-risk areas; it’s vital for everyone. Adding braces to your walls helps support them during an earthquake—kind of like adding more muscle to your workout routine.
You might want to consider plywood sheathing. It adds that extra layer of support to your walls and can save you from extensive damage. Plus, it’s relatively simple to install if you’re handy, and honestly, who doesn’t love a good weekend DIY project?
Lastly, check your roof. Roof-to-wall connections are often overlooked, but they’re so important. A solid connection here means a better chance of everything staying intact, even on the wildest of days!
Choosing the Right Materials
Choosing the right materials can make all the difference. I remember when my neighbor used lightweight materials for his roof—it was probably one of the best decisions he made. These materials reduce the overall load on your house, decreasing the risk of collapse.
Reinforced concrete and steel are great options for framing and supports. They have immense strength and can flex just right during an earthquake. It’s like having a great friend who can tough it out with you in tough times.
Don’t forget about non-structural materials either, like using flexible plumbing and electrical connections. These small choices can prevent major frustrations after the shaking stops. Believe me, being proactive now saves a ton of headaches later!
Building codes and regulations
Staying Informed About Local Regulations
As I was figuring all this out, I learned that following local building codes is a must. These regulations are like a well-crafted recipe; they ensure you’ve got the right ingredients for safety. Many regions have specific codes addressing seismic safety because they’re familiar with the risks.
Check with local authorities. They usually have guidelines outlining the necessary precautions to take when building or renovating a home. You might be surprised by what you find! Catching this information early can save you a lot of headaches down the road.
It’s also a good idea to connect with local builders or contractors who are familiar with these codes. They can guide you through the ins and outs so you don’t miss anything vital.
Understanding the Importance of Professional Inspections
I’ve always advocated for getting professional inspections, especially if you’re in a seismic zone. Having an expert review your home can reveal hidden vulnerabilities that you might overlook.
An inspector can provide a comprehensive analysis of your home’s structure and recommend where improvements can be made. Think of it as a friendly check-up for your home, ensuring everything’s in tip-top shape!
Investing in a professional inspection might seem pricey upfront, but in the long run, it’s worth it. Nobody wants to walk back home after an earthquake to a big ol’ surprise of damage that could’ve been caught early.
Renovation Guidelines to Follow
If you’re considering renovations, pay attention to how the changes could affect your home’s seismic resilience. This is where consulting your local codes comes in handy again.
For instance, if you’re converting a garage into living space, it’s essential to ensure that the new walls and supports align with earthquake safety standards. It may take a little extra effort, but it could make all the difference when the ground starts to shake.
Remember, going the extra mile during renovations can keep your home safe over the long haul. It’s all about creating an environment that stands resilient against nature’s challenges.
Seismic retrofitting techniques
What is Seismic Retrofitting?
When I first heard about seismic retrofitting, I was intrigued yet baffled. Essentially, retrofitting is updating your existing home to make it safer against earthquakes. Think of it like upgrading your phone; it keeps you running smooth and secure.
Simple additions can help beef up your home, allowing it to withstand the forces of Mother Nature. From securing the foundation to strengthening walls, these methods can drastically improve your house’s resilience.
Knowing the right techniques can be empowering, especially if you’re thinking about how to make your home safer. It’s all part of doing our best to protect what we love.
Methods for Retrofitting Your Home
Digging deeper into retrofitting, I found several effective methods to help. One of my favorites is using plywood shear walls. These create stronger lateral support and can be a game changer if you live in a high-risk area.
Another method is to add steel braces, which can absorb and transfer seismic energy efficiently. Bracing helps prevent walls from collapsing, which is a comforting thought when you think about what could happen during a quake.
Lastly, base isolators are an advanced option; they can physically separate your home from the ground’s motion. Imagine being on a boat that gently sways, while the waves crash around you!
Finding Experienced Retrofitting Contractors
Now that you’re ready to consider retrofitting, finding the right contractor is key. I can’t stress how important it is to choose someone experienced in this niche. It’s like picking a trusty mechanic; you want someone who understands their stuff!
Look for contractors who specialize in seismic retrofitting and check their references. Learning from others’ experiences can save you time and money. Plus, reading reviews can offer insights into their work ethic and reliability.
Connecting through local community groups can also be a treasure trove of recommendations. First-hand experiences can steer you in the right direction, ensuring you find someone who cares as much about your home as you do!
Emergency preparedness plans
Creating a Family Emergency Plan
One of the most eye-opening moments for me was realizing that I needed an emergency plan. It’s easy to think, “It won’t happen to me,” but life can throw unexpected challenges—like earthquakes!
Start by creating a family communication plan. It can be simple—like having a designated meeting spot or a group text. The idea is that everyone knows what to do and where to go after a quake.
Once you’ve got that ironed out, invest time in practicing your plan. It might feel silly at first, but trust me, having a routine can alleviate panic when it matters most.
Preparing a Supply Kit
Another layer of preparedness is developing an emergency supply kit. I’ve learned that these kits should include essentials like water, non-perishable food, a flashlight, batteries, and a first-aid kit. Pretty standard stuff, right?
Mix in unique items that your family might need. For me, it’s a stash of my favorite snacks; hey, comfort food can make a tough situation better! And don’t forget about important documents—keeping copies in a waterproof bag can save you stress later.
Lastly, make sure to update your kit regularly. I often check mine a few times a year, replacing expired items and ensuring it reflects any changes in my family’s needs.
Staying Informed About Local Resources
Getting connected to your community is also an important part of emergency preparedness. Knowing where to find local resources for help post-earthquake is key.
Local schools, community centers, and fire departments often have resources and information available. They can provide you with knowledge about emergency services available in your area after a quake, and trust me, that sense of security goes a long way.
I also recommend tuning into community meetings or online forums; they can be incredible sources for learning about disaster readiness events and resources nearby. Connecting with others in your community can even help form support networks and shared plans.
FAQs About Protecting Your Home from Earthquakes
What is the best way to earthquake-proof my home?
The best way to earthquake-proof your home is to start with a solid foundation, strengthen your walls with bracing materials, and ensure you’re following local building codes.
How can I find a reputable contractor for seismic retrofitting?
You can find a reputable retrofitting contractor by checking online reviews, talking to friends or neighbors for recommendations, and looking for specialists in your area with experience specific to seismic safety.
What should be included in an emergency supply kit?
Your emergency supply kit should include water, non-perishable food, a flashlight, batteries, a first-aid kit, essential medications, and copies of important documents.
How frequently should I update my emergency kit?
It’s a good practice to check and update your emergency kit at least twice a year. This way, you can replace expired items and adjust the contents based on any changes in your family’s needs.

by Preparation | Apr 24, 2025 | Preparedness
Are You Overlooking These Essential Survival Skills?
Are You Overlooking These Essential Survival Skills?
Before diving in, let me share the top four semantic keyword phrases that will guide our discussion today:
- Basic Survival Techniques
- Essential Wilderness Skills
- Emergency Preparedness Skills
- Skills for Survival Situations
Basic Survival Techniques
Understanding Your Environment
When it comes to survival, the first step is knowing your surroundings. I remember my first camping trip where I got lost. Sounds scary, right? But just by paying attention to my environment, the trees, the landmarks, and even the sounds, I found my way back. Nature communicates in subtle ways, and tuning in to those signals can be a game changer.
Start by familiarizing yourself with the area: is it forest, desert, or mountainous terrain? Each environment presents unique challenges and resources. Knowing where to find water, shelter, and food sources could mean the difference between life and death.
Additionally, utilize tools like maps and compasses. They might seem old school, but trust me, they save you when GPS fails. Don’t rely on technology alone; get hands-on with the basics.
Fire Crafting
Ah, fire—the ultimate survival skill. I still remember the thrill of striking that first spark. It took me several tries, but it was worth it. Fire provides warmth, light, and the ability to cook food. But starting it? That’s a skill that needs practice!
First, gather your materials: tinder, kindling, and fuel wood. Tinder can be anything from dry leaves to paper; just ensure it ignites easily. The key is to build a small pile and add kindling gradually to grow the fire without snuffing it out.
Not sure where to start? Try using a fire starter. Whether it’s a lighter or flint, it makes the process way easier. Once the fire starts, remember to keep it contained. Safety first—and enjoy that homemade s’more!
Water Sourcing
Your body can survive days without food but only hours without water. That was a tough lesson for me during a backpacking trip! Learning to find and purify water is crucial for survival. I’ve had days when I relied on streams and springs, and others where I had to get a little creative.
Look for indicators of water sources: animal tracks, vegetation patterns, and low-lying areas tend to collect rainwater. When you find a water source, always purify it. Boiling is the simplest method, but if you’re in a pinch, consider using water purification tablets.
Always carry a portable water filter when trekking. They’re fantastic and lightweight, making them an essential part of my gear. Keeping hydrated is not just essential—it’s a must if you want to keep your wits about you in a survival situation.
Essential Wilderness Skills
Building Shelter
Ah, shelter—the cozy side of survival. One of my favorite skills is crafting a makeshift shelter. Sure, you can sleep under the stars, but trust me, a bit of cover goes a long way!
Start by looking for materials like branches, leaves, and anything natural that can keep you dry and shield you from the wind. The classic lean-to is a lifesaver. Find a sturdy branch and prop it against a tree, then cover one side with leaves. Voila—instant shelter!
Remember, positioning matters. Ensure you’re not too close to water (hello, flooding!) and check for falling branches above. I’ve had my close calls—better safe than sorry!
Signal for Help
Now, let’s talk about making your presence known. I learned this skill the hard way during a hiking trip. When things went south, I had no way to signal for help. Thankfully, it’s not rocket science, and you can use whatever you have at hand!
First off, create a signal fire with green leaves for smoke—an obvious indicator. Making large, bright symbols or writing “HELP” with rocks can also do the trick. The visibility from the air is often what ultimately saves you.
Also, carrying a whistle or mirror can help. It’s lightweight and doesn’t take too much space. I keep one hooked to my pack—totally worth it!
Foraging Basics
One of my favorite skills? Foraging! Knowing what plants you can eat and which are toxic can give you a massive advantage in survival scenarios. I’ve had some hits and misses, but it’s a journey worth taking.
Start slow. Familiarize yourself with common edibles in your area. Wild berries, certain nuts, and edible greens can be found almost everywhere. A quick rule? If you’re not sure, don’t eat it! Learn to recognize poisonous plants like poison ivy and nightshade.
Books or apps can be your best friends when foraging. They provide visual guides that can help you quickly identify what’s safe to eat. There’s a rush when you successfully identify and eat something you gathered yourself. It’s a sense of accomplishment you’ll love!
Emergency Preparedness Skills
Basic First Aid
Let’s dive into something super crucial—first aid. Injuries happen, and knowing how to handle them is vital. I remember a time when a friend cut themselves while preparing food. Quick thinking and basic knowledge helped us avoid serious trouble.
Learn the basics: how to clean a wound, apply bandages, and understand simple treatments for common issues like burns and bites. Carry a basic first-aid kit with you wherever you go—it’s a lifesaver!
Take a first aid course if you can. It’s not just about bandaging wounds; you learn about CPR and how to respond in emergencies. That knowledge is something I find invaluable in both wilderness settings and daily life.
Planning and Preparation
No one plans to go into survival mode, but preparation is the key. It’s not enough to just pack your bags; I’ve made checklists that outline everything from food to gear. It may sound tedious, but it keeps you organized and aware of what you need.
Consider the worst-case scenarios. What if you get lost? What if there’s a storm? Having a plan can lift a weight off your shoulders. I like to tell everyone: hope for the best, but prepare for the unexpected.
Always inform someone of your location and expected return. It’s a simple step, but it means help can find you faster if things go south. Keep your phone charged, or better yet, bring a portable charger!
Practice Makes Perfect
This is the part I love the most: practice! All the knowledge in the world won’t help if you don’t use it. I make it a point to spend weekends practicing my skills—whether it’s building shelters, making fires, or foraging.
Join local survival workshops, or find a group of friends who are equally interested. Not only is it fun, but you can learn from each other’s experiences. Plus, nothing beats a good campfire story at the end of the day!
Regular practice makes these skills second nature. You’ll feel a sense of confidence that’s hard to beat. And let’s be real, you never know when you might need them!
Skills for Survival Situations
Decision Making Under Pressure
When you’re in a tight spot, clear decision-making is your best ally. I’ve faced moments where panic threatened to set in, but my survival training reminded me to assess the situation calmly. It was all about taking a breath and weighing my options.
Practice scenario drills. Creating hypothetical situations and working through them helps build your critical thinking. I find it’s all about asking the right questions: What’s my immediate need? What resources do I have? What’s my exit strategy?
Learning to prioritize can save lives. You might need to decide whether to make shelter first or find food. Each decision must be informed by your situation—trust your instincts but back them up with training and knowledge.
Teamwork and Communication
Don’t underestimate the power of teamwork. I’ve been on group survival trips, and the success was largely based on how well we communicated. Having a plan is great, but everyone needs to be on the same page.
Assign roles based on individuals’ strengths. If someone is a whiz at fire-making, let them take charge of that while someone else scouts for food. It streamlines the process and fosters a safe environment.
Don’t forget to check in with one another. Regular communication can help prevent accidents and misjudgments. Plus, it makes the experience more enjoyable!
Staying Positive
Finally, and perhaps most importantly, maintain a positive mindset. This might sound cliché, but I’ve found that a good attitude goes a long way. When faced with tough situations, remind yourself that you can handle it!
Share stories within your group, keep morale high, and focus on small victories. Whether it’s successfully building a shelter or cooking a meal, celebrate those moments.
Doubt can creep in, but facing your challenges with optimism can make all the difference. Your spirit plays a huge role in overcoming obstacles, and it’s something I cherish about the survival community.
Frequently Asked Questions
What are the most important survival skills I should learn?
The essential skills include understanding your environment, fire crafting, building shelter, and basic first aid. But don’t overlook foraging and emergency planning as they play crucial roles.
How can I prepare for unexpected emergencies?
Preparation involves both mental and physical readiness. Create a checklist for your outings, carry a well-stocked first-aid kit, and inform someone about your plans. Practice your skills regularly to keep your knowledge fresh.
Where can I learn more about wilderness survival?
Consider signing up for a survival course, joining workshops, or even looking for online training videos. There’s a wealth of resources out there—from local groups to books that cover various survival topics extensively.
How often should I practice my survival skills?
I recommend practicing at least a few times a year, but the more often, the better! Regular practice not only builds your confidence but also helps embed those skills in your memory, making them second nature in emergencies.
by Preparation | Apr 24, 2025 | Preparedness
What’s in a Proper Emergency Medical Kit? Find Out
What’s in a Proper Emergency Medical Kit? Find Out
- Essential Items for a Basic Emergency Medical Kit
- Advanced Supplies for Serious Medical Needs
- Organizing Your Emergency Medical Kit Efficiently
- Customizing Your Emergency Medical Kit for Specific Situations
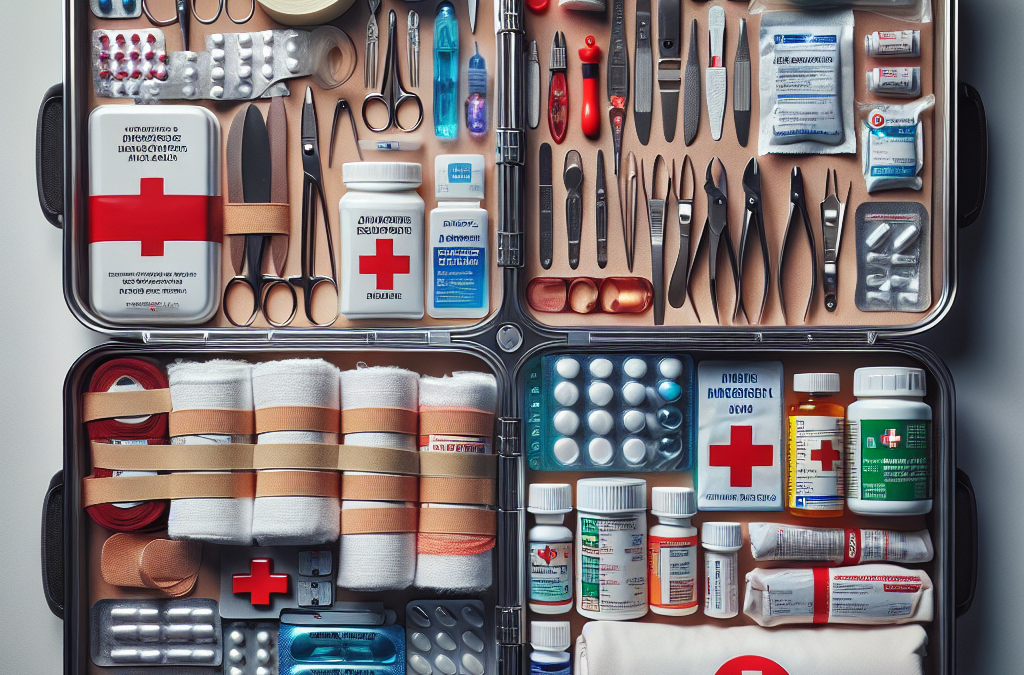
Essential Items for a Basic Emergency Medical Kit
So, when it comes to creating an emergency kit, the essentials are truly where we start. I remember when I first ventured into this territory—I totally underestimated what I actually needed. First things first, here are your must-haves!
First Aid Basics
You can’t go wrong with the traditional first aid supplies. Pack sterile bandages, gauze, and adhesive tape. I always make sure to have supplies that cater to any little scrapes and cuts that might happen. When my kid slipped off his bike, having these goodies on hand was a lifesaver!
Don’t forget Antiseptic wipes! Those little packets can really save the day by preventing infections. Trust me, the last thing you want is a tiny scratch turning into something major. And while you’re at it, throw in some tweezers for splinters—you never know!
Honestly, just having these basic items gives me peace of mind. They’re straightforward and can get you through most small accidents without a hitch.
Medication Must-Haves
Now let’s chat about medications. Having a few basic over-the-counter medicines is a game-changer. I keep pain relievers like ibuprofen and acetaminophen in my kit; they’re helpful for headaches or bumps and bruises that might happen.
It’s also handy to have allergy medication, especially during the pollen-filled months. There’s nothing worse than being stuck somewhere when allergies hit hard! And a little antihistamine can really save the day in those moments.
If you or anyone in your family has specific prescriptions, consider keeping a small supply in your kit, too. It can be as simple as a couple of extra doses—just in case of emergencies.
Basic Tools and Equipment
Don’t overlook the tools! A pair of scissors is something I never knew I needed until I had to strap up an injury. I also recommend having a thermometer and a flashlight—being able to check a temperature in the dark? Priceless.
Another handy tool is a CPR face shield or mask. I won’t lie; it’s not something I thought about until I took a basic first aid course. Having that little piece of equipment has made me feel way more prepared for any unexpected scenarios.
Last but not least, make sure you have a first-aid manual. It’s easy to forget the steps when panic sets in, and having that guidance can really help in a pinch!
Advanced Supplies for Serious Medical Needs
As I got deeper into emergency preparedness, I realized that sometimes the basics just won’t cut it. Depending on your situation, you might need some more advanced items in your kit. Here’s what I swear by!
Advanced Trauma Kits
If you’re in an area where serious injuries could occur—like hiking in the mountains or even driving long distances—consider upgrading to a trauma kit. These may include tourniquets, hemostatic agents (fancy word for stopping bleeding), and larger, more specialized dressings for big wounds.
Tourniquets have been life-savers for me. I once witnessed a gnarly bike accident, and having one ready was super beneficial. It gives you time to get proper help without exacerbating any injuries.
Also, my trauma kit has those hemostatic dressing pads, which are magic for bleeding wounds. I always felt confident having these on hand, knowing they would work wonders when needed.
Oxygen and Airway Management
If your CPR knowledge extends that far, consider packing supplemental oxygen equipment. This is more for those trained for high-risk situations but could really come in handy in emergencies where someone is not breathing properly.
Plus, you should think about carrying some airway adjuncts, like oropharyngeal airways, if you’re familiar with them. I took a course, and knowing how to use these could really make a difference in a serious respiratory emergency.
Trust me, it’s not just about bandages. Being prepared for various scenarios means thinking about how your kit could cater to more critical needs.
Specialty Supplies for Specific Risks
Don’t forget that specialty supplies might be key based on your environment. If you’re a road-tripper like me, consider including auto-specific first aid items for car accidents—things like spine boards or more extensive back injury gear. It’s all about being aware!
If you go hiking or camping often, maybe include items for snake bites like a snake bite kit. Research the area you’re going to, and adapt your kit to be as effective as possible for your adventures.
Remember, the more tailored your kit is to your needs, the more it’ll serve its purpose. Knowledge of your surroundings is your best ally!
Organizing Your Emergency Medical Kit Efficiently
Okay, by now you should have a lot of great supplies in mind! But even if you have all the right stuff, if your kit’s all jumbled, it might as well be useless. Here’s how I keep mine organized to navigate quickly in an emergency.
Use Clear Containers
I swear by using transparent containers. Having everything in clear bags means I can see what’s there at a glance. I’ve tried the whole “let’s shove everything in one bag” approach, but that was a headache waiting to happen!
For certain sections of my kit, I use labeled bags: First Aid, Medications, Advanced Gear. It saves loads of time when you’re frantic and searching!
Not to mention, clear containers can also help keep everything dry in case it rains. Trust me on this one; I’ve learned the hard way!
Regularly Check and Update Supply Levels
It’s super important to review your kit regularly. I put reminders in my calendar every couple of months to check the supply levels and expiration dates of medications or supplies. Nothing worse than trying to rely on expired stuff!
I tend to reorder or restock immediately after I’ve used anything. This way, I know I’m always prepared for the next outing or emergency! Think of it as keeping your kit alive, making sure it’s ready to go at a moment’s notice.
Your peace of mind is worth every effort in this regard. It ensures that if or when disaster strikes, you’re never scrambling.
Make a Quick Reference Guide
I can’t stress enough how helpful it is to create a quick reference guide! This can be a small booklet or an easily accessible digital file on your phone, detailing the contents of your kit along with first aid procedures. It’s an absolute lifesaver in a moment of panic!
When I had to deal with an unexpected injury while out camping, my quick reference guide was the first thing I turned to. Not only did it save me time, but it also calmed my nerves since I had a plan!
A well-organized kit paired with a quick reference guide means you can provide help faster. It’s preparation meeting potential emergencies, and it pays off every time!
Customizing Your Emergency Medical Kit for Specific Situations
Lastly, let’s talk about customization because one kit doesn’t fit all! It’s essential to tailor your medical kit to fit your lifestyle, travel situation, and family needs, and I’m here to tell you how!
Family and Personal Medical History
Consider every family member’s medical history. If you’ve got someone with allergies or chronic conditions, make sure you cater your kit to them specifically. This isn’t just about the general scenario; it’s about your individual needs!
I keep a mini kit for my son’s allergies and another for my chronic health issues. It sounds a bit overboard, but knowing I have what I need on hand calms my nerves! Trust me; it’s all worth it when you’re faced with a flare-up.
Every family has unique needs, so don’t overlook this step. Adjusting your kit makes it truly comprehensive.
Myth-Busting Specialized Kits
If you’re into specific activities—like hiking, biking, or even if you just live in an area prone to natural disasters—consider specialized kits. I’ve encountered myths about what you *need*, and believe me, you don’t have to go over the top.
For example, a wilderness medical kit is crucial if you’re often in remote areas and far from help. It’s easy to add specialized tools without going crazy—really think about what you genuinely need!
I even keep a separate kit for when I travel overseas! It’s got local medications and gear that’s specific to where I’m headed. It saves me hassle and keeps me safe!
Involve Your Family
Lastly, involve your family in creating the kit! This makes it a collective effort. When my kid joined me in packing and learning about the items in the kit, he felt empowered and confident. It wasn’t just a bunch of stuff; he understood its importance!
Make it fun! Use the chance to educate your kids on basic first aid. The more they learn, the better prepared they’ll be in emergencies—seriously, it’s teamwork at its finest!
Plus, you won’t be the lone ranger during an emergency. Everyone will know what’s in there and how to use them if something happens.
FAQ
What are the essential items for a basic emergency medical kit?
The essentials include bandages, antiseptic wipes, scissors, adhesive tape, and over-the-counter pain relief. Don’t forget to throw in a first-aid manual for guidance!
How can I organize my emergency medical kit effectively?
Organize using clear containers or labeled bags for categories. Regularly check and update the supplies, and consider creating a quick reference guide to help you find items quickly in an emergency.
What should I consider when customizing my emergency medical kit?
Look at your family’s medical history and the specific risks related to the activities you participate in. Cater your kit to include medications needed for allergies or chronic conditions and any specialized items for your hobbies, like hiking gear.
Why is it necessary to regularly update my emergency medical kit?
Supplies can expire, and items can go missing. Regularly updating guarantees that all supplies are fresh and that you have everything you need on hand. It’s all about being ready for whatever life throws your way!
by Preparation | Apr 24, 2025 | Preparedness
How to Stay Safe During a Wildfire: Pro Tips
How to Stay Safe During a Wildfire: Pro Tips
Top 4 Semantic Keyword Phrases
- Wildfire safety tips
- Emergency evacuation plans
- Protecting your home from wildfires
- Staying informed during wildfires
Wildfire Safety Tips
Understand Fire Behavior
When it comes to wildfires, I’ve learned that understanding fire behavior is super crucial. Fire doesn’t just move in a straight line; it dances and flows with the wind. Observing weather patterns can clue you in on how it might spread. For instance, during hot, dry, and windy conditions, fires can escalate quickly.
Another thing I’ve found valuable is to keep an eye on the terrain. If you live in a hilly area, it’s essential to know how slope affects fire behavior. That is, fires tend to move faster uphill than downhill. Who knew a little geography could make such a difference when facing something as destructive as a wildfire?
Lastly, stay updated on the fire’s path. There are apps and services that provide real-time updates. Trust me, knowledge is power, especially in life-and-death situations like these!
Create a Fire-Resistant Buffer Zone
I’ve made it a habit to keep a defensible space around my property. This means clearing out any flammable debris like dead leaves or overgrown grass. It sounds like a boring chore, but it’s absolutely worth it! Aim for at least 30 feet of clearance around your home.
You’ll also want to consider using fire-resistant plants and materials in your landscaping. Some folks don’t realize just how flammable certain plants can be! Instead of a beautiful, but risky, rose bush, opt for some less flammable options.
And let’s not forget the importance of your home’s exterior. Investing in fire-resistant siding or roofing may seem pricey upfront, but it pays off when you think about the devastation wildfires can bring.
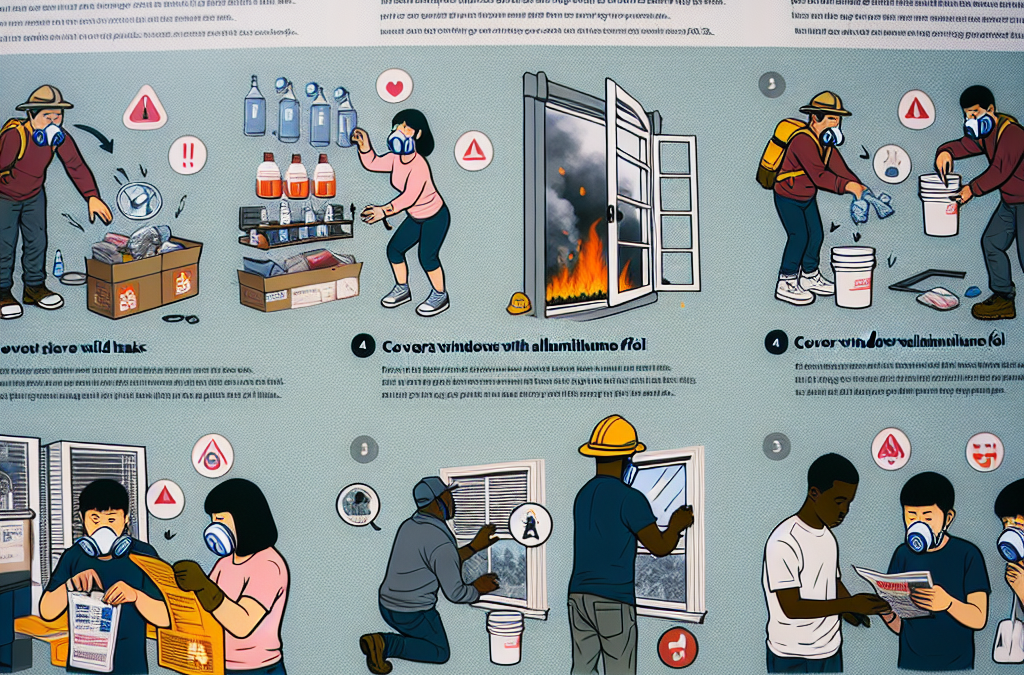
Have a Fire-Preparedness Kit Ready
I can’t stress this enough: being prepared can make all the difference. I always keep a fire-preparedness kit readily accessible. This kit should include essentials like water, non-perishable snacks, a flashlight, and a first aid kit. You never know when you might have to evacuate in a hurry!
It’s also a good idea to include important documents like insurance policies, IDs, and prescriptions. I keep these in a waterproof container; let me tell you, it takes a weight off your shoulders to know I’m ready for anything.
Lastly, don’t forget about your pets. Their food, medications, and a safe carrier should also be part of your kit. They don’t have the same understanding of the situation, and I find that keeping them calm is a top priority.
Emergency Evacuation Plans
Create a Family Evacuation Plan
Your family’s safety is number one, right? Creating a family evacuation plan isn’t just a good idea; it can genuinely save lives. Sit down with your loved ones and talk about how you’ll react in the event of a wildfire. Make sure everyone knows the escape routes and, importantly, the meeting spot outside your house.
After we made our plan, everyone felt more secure knowing we had a solid back-up plan. We even practice these drills; let me tell you, it’s not always pretty. But it’s worth it when you see everyone can navigate through the chaos.
Additionally, consider having a buddy system in place with neighbors or friends. That way, no one gets left behind, and everyone knows who to check in with during evacuation.
Stay Aware of Local Authorities
I’ve found that local authorities are key players in a crisis like wildfires. Always listen for alerts from officials on the best time to leave. Trust me, it’s easy to think you can manage, but it’s vital to heed their warnings.
I also recommend installing a weather app on your phone for instant notifications. Many of them offer information on air quality and fire warnings, which can be lifesavers.
And if evacuations do occur, prioritize following the established routes. It may sound tempting to take shortcuts, but those could lead to dangers you aren’t prepared for. A little patience can go a long way!
Emergency Communication Methods
Adopting reliable methods of communication during an emergency is huge. I always carry a portable charger to keep my devices running. Phones can die quickly when you’re trying to reach loved ones amidst chaos.
It’s also good to note that text messages may get through even when phone calls can’t. So, I’ve started using messaging apps that work on Wi-Fi like WhatsApp. They really help during emergencies when network towers are bogged down.
Lastly, establish a contact who lives outside the fire zone as your communication central. Having a single point of contact can make it easier to share updates and ensure everyone is safe.
Protecting Your Home from Wildfires
Assess Your Property’s Vulnerability
Before you even think about what to do next, it’s essential to really assess your property. I’ve walked my yard multiple times, checking for vulnerabilities. Are there branches hanging over my roof? Is there flammable mulch too close to the house? These seemingly small details can make a massive difference.
Don’t be afraid to consult with fire experts, either. They can provide insights and recommendations on how to make your property more fire-resistant.
I also recommend doing this assessment at least once a year, especially at the beginning of wildfire season. It’s just part of that proactive life!
Install Fire-Resistant Structures
As I mentioned before, investing in fire-resistant materials really pays off. I’ve updated my roofing and siding, opting for materials that are less susceptible to flame. I also use non-combustible fences around my home to further protect it.
Moreover, think about your windows; using double-paned glass can be a better choice. You’d be amazed how far these efforts can go in protecting your sanctuary.
And let’s not forget about creating safe zones within your property. Clear spaces around pool equipment or outdoor furniture help manage the risks better.
Utilize Outdoor Equipment Wisely
Part of maintaining your outdoor space is using your tools wisely. I’ve seen folks using their lawnmowers on dry grass, which is a big no-no during fire season. Make sure you know your landscaping equipment can create sparks and take those fire safety steps.
Additionally, I keep hoses that can reach around my whole home during fire season. If you can spray down your property, do it! It may sound simplistic, but every little effort counts.
Lastly, being mindful of how you grill or use fire pits can also prevent potential disasters. I’ve stopped grilling on windy days—better safe than sorry, you know?
Staying Informed During Wildfires
Regularly Check Local News and Updates
I know it can be easy to get lost in the hustle and bustle of life, but checking your local news regularly during wildfire season is vital. They’ll have the latest on fire patterns, air quality, and evacuation orders. I try to dedicate a few moments each day to get updated.
Also, don’t forget about your social media channels. Many local agencies use their accounts to relay real-time information. Just make sure they’re reliable sources!
With the slew of information out there, keeping your news sources clear and concise helps avoid confusion. I personally have a few news apps on my phone that deliver the information I need without overwhelming me.
Join Community Alerts and Notification Systems
One of the best things I did was sign up for community alert systems. They send texts or emails during emergencies—so handy!
My community has a system in place that alerts us about local incidents, including those pesky wildfires. Signing up is usually quick and simple, so don’t skip this step!
Staying in the loop also fosters a sense of community. I feel much better knowing I’m not alone during a stressful situation.
Engage with Your Neighbors and Community
This one might sound a bit old-fashioned, but talking to your neighbors is worth the effort. Create a network and make it a point to discuss wildfire preparedness. You never know; your neighbor may have tips or experiences to share that can be super helpful!
Group discussions can give everyone a boost in confidence during tough times. Plus, setting up neighborly check-ins during fire season can enhance that sense of community.
Lastly, consider engaging with local groups or online forums that focus on wildfire preparedness. Being able to share information and experiences creates a sense of collaboration that’s incredibly comforting.
FAQs
What should I include in my fire preparedness kit?
You should include essentials like water, snacks, a flashlight, a first aid kit, important documents, and pet supplies. Anything that you would need to make a quick exit and be comfortable during an emergency!
How do I create an effective family evacuation plan?
Creating an evacuation plan involves mapping out escape routes, designating a meeting spot, and practicing your plan together. Regular drills help everyone know what to do if the time comes.
What materials are best for fire-resistant landscaping?
Fire-resistant plants, as well as non-combustible mulch and stone, are ideal for creating a defensible space. Look for materials specifically rated for fire resistance to maximize safety.
How can I stay informed during wildfire season?
Regularly checking local news and signing up for community alert systems can keep you updated. Also, consider following local authorities on social media for real-time updates on emergencies.


