by Preparation | Mar 17, 2025 | Preparedness
Assess Your Environment and Risks
Understanding Your Surroundings
First things first, take a good look around your home or office. What potential hazards do you see? Whether it’s a nearby river that could flood, a busy street you’re close to, or even just the layout of the building, knowing what risks are present is crucial.
Make sure you’re aware of the various exits available. Some buildings have hidden emergency exits that might not be obvious at first glance. Familiarizing yourself with those exits can save precious seconds during an emergency.
I also recommend keeping a mental or written note of nearby landmarks. These can serve as important reference points, especially if the lights go out or panic sets in. You want to know where you’re headed when the urgency kicks in!
Identifying Potential Evacuation Routes
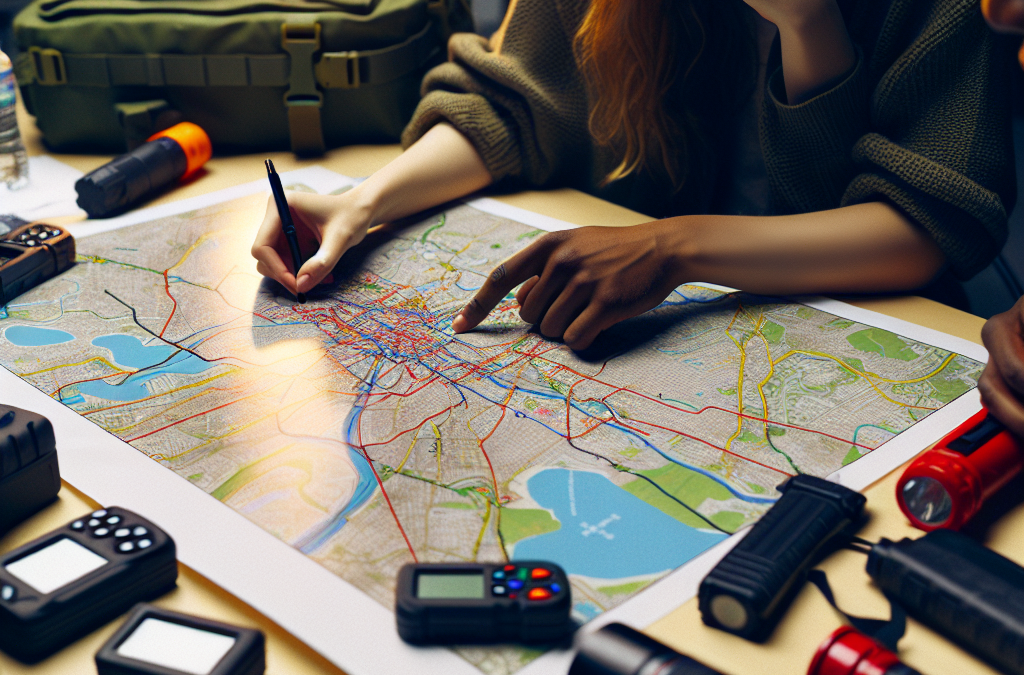
Now that you know your surroundings, it’s time to figure out which routes you could take. Walking, driving, or even biking—there’s often more than one way out. I like to say, “Don’t put all your eggs in one basket,” so explore various ways to exit safely, depending on your location.
Create a map, even if it’s just a rough sketch! I remember drawing a map of my apartment complex once, charting out the quickest routes to the exits. That way, if something ever happens, I feel much more prepared and confident.
Don’t forget to consider different scenarios. For instance, if there’s a fire and smoke is pouring out of one exit, what’s your backup? Plan A may quickly turn into Plan B, so be ready for anything!
Check Accessibility and Obstacles
Next, think about accessibility for everyone in your household or workplace. If you have elderly folks or individuals with mobility challenges, make sure those routes cater to their needs. The last thing you want in an emergency is for someone to struggle to get out.
Also, while doing this, consider any obstacles that might block your chosen routes. Is there furniture, gates, or maybe even landscaping that could make getting out tricky? Assessing these obstacles early can save a lot of hassle later.
And don’t forget about pets! If you have furry family members, include them in your evacuation plan. A sudden dash for the door might need an extra step to grab them, so keep that in mind when plotting your escape routes!
Plan Your Evacuation Procedure
Create a Step-by-Step Plan
It’s all well and good to have identified the routes, but now we need a solid plan in place. I suggest writing it down; there’s just something about seeing it on paper that makes the plan feel more real. Each person should know where to go and what steps to take.
Break it down into basic steps. For example, “Once I hear the alarm, grab my phone and keys, then head to the nearest exit.” Simple and clear instructions can truly make a difference.
Simplifying your steps is key. I often practice them myself, just to ensure those instructions stick. It becomes second nature, and that sense of preparedness can really calm nerves during a real emergency.
Communicate Your Plan
Now, here’s where it gets interactive! Share your plan with everyone involved—the kids, roommates, coworkers, whoever it may concern. Keeping folks in the loop about where to meet and how to get there can prevent chaos when it really counts.
I like to hold a little family meeting or team huddle, whatever fits the situation! Brainstorm potential hitches and solutions together. This not only gives them a voice but also fosters a sense of responsibility and teamwork.
Repetition is your friend! Discuss the plan often so it sticks. Whether it’s casual check-ins or periodic drills, keeping the lines of communication open is essential to ensure everyone is on the same page.
Incorporate Checkpoints and Safety Measures
One way of making your evacuation plan even more effective is to incorporate checkpoints. Decide ahead of time where everyone should go once they exit the building, whether it’s a tree in the park across the street or a neighbor’s driveway.
I set these checkpoints because they help in ensuring no one gets left behind. If you’re doing group evacuations, having a roll call at a designated spot helps ensure everybody’s safe and accounted for.
Don’t hesitate to evaluate and adjust safety measures along the way. Learn from others’ experiences. I once heard a harrowing story of someone who evacuated without a good plan; their tale became part of my evaluation of my own process.
Practice Your Evacuation Plan
Conduct Regular Drills
Okay, so you’ve got your plan down—now it’s time to practice like you mean it! Running drills helps everyone familiarize themselves with the process. It’s all about muscle memory. I highly recommend doing this a few times a year.
Don’t make it too serious either; keeping it light-hearted can ease any tension associated with drills. I usually involve the family pets too, just to make sure everyone knows how to handle a situation and it becomes a fun family bonding time.
Take your time, and keep a log of how long it takes to evacuate. Timing will show you where you might need to speed things up or adjust your routes or processes.
Evaluate and Adjust Your Plan
After each drill, sit down and talk about what worked and what didn’t. I find that reflecting on these practices can unveil areas for improvement. Maybe the route was blocked or someone didn’t know which way to go—this is your chance to pivot!
Staying flexible is key! Your environment may change over time—new routes might open or close; even family dynamics might shift. Regular evals guarantee that your plan evolves with you.
Remember, just because it worked last time doesn’t mean it’ll be perfect this time around. Adaptation keeps your plan relevant and effective.
Keep Everyone Informed
Finally, continued education about your plan is essential. It’s not just about practicing; I find it helpful to have reminders about the procedures around the house or workplace. Something as simple as a printed checklist near the exits can significantly enhance remembrance during a crisis.
Also, I use resources like family group chats or regular safety meetings to keep everyone updated. In a world that changes rapidly, staying current is vital.
If someone new joins your household or workplace, educate them about the evacuation protocol right away. It creates a culture of safety that extends beyond just your circle.
Frequently Asked Questions
1. Why is it important to plan an evacuation route?
Having a plan means you’re prepared for an emergency, significantly reducing panic and confusion when time is of the essence. Knowing where to go ahead of time can save lives!
2. How often should I practice my evacuation plan?
Regular drills are ideal—aim for at least twice a year, but more if possible! Changes in your circumstances may warrant more frequent practice.
3. Should I involve my pets in the plan?
Absolutely! If you have pets, ensure they are included in the evacuation plan, and be prepared to grab them quickly if an emergency arises.
4. What if someone in my household has mobility issues?
This is where careful planning comes into play. Design evacuation routes that are accessible and practice different strategies to ensure everyone can exit safely.
5. How can I communicate the plan effectively?
Hold family meetings, use visual aids, and keep the conversation ongoing. Repetition and inclusion help embed the plan into everyone’s minds.
by Preparation | Mar 17, 2025 | Preparedness
Create an Emergency Plan
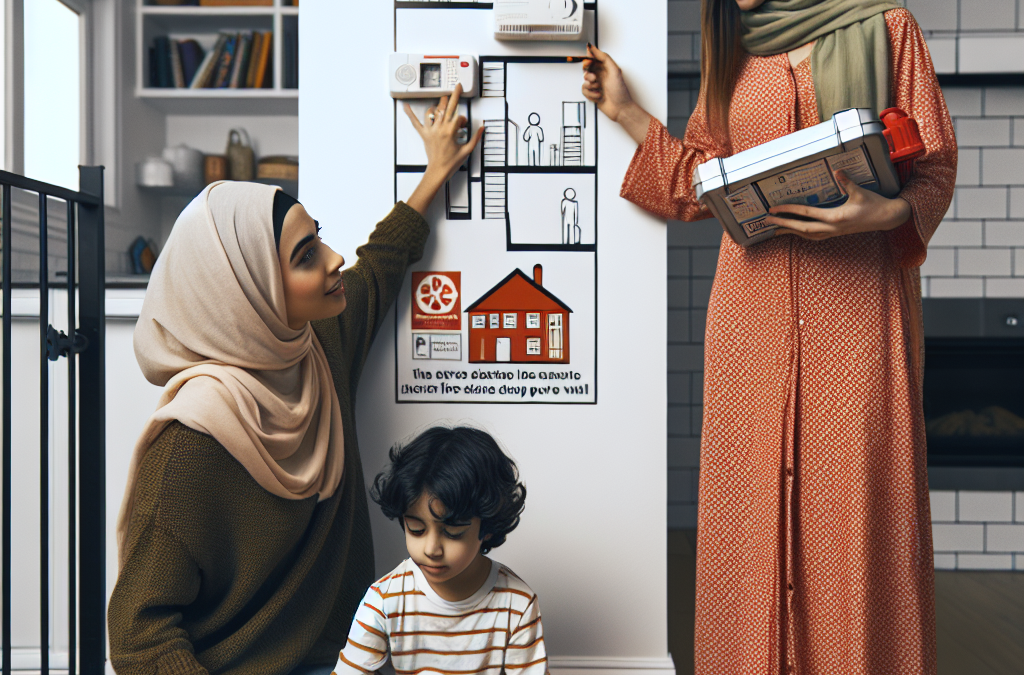
Gather Your Family
So, the very first thing I did was bring the family together. It’s super important to sit down as a unit. I made sure everyone, from the little ones to the adults, understood the gravity of the situation—any emergency can knock on our door at any time.
We talked about what emergencies could happen—natural disasters, fires, and even home intrusions. It’s not all doom and gloom, but knowledge is power! Each family member felt more involved and it made the discussions way less scary.
Everyone had a voice; we tossed around ideas about the best ways to react in emergencies. This isn’t just a mom or dad thing; it’s a team effort to make sure we’re all on the same page when things hit the fan.
Assign Roles
After we established our plan, the next step was assigning roles. This was something that truly made me feel comforted! I assigned simple and clear responsibilities, so if something happens, everyone knows what to do without scrambling.
For instance, I designated one of my kids to grab the emergency kit, while another was in charge of keeping track of our pet. Knowing who’s doing what helps a ton to keep our minds clear during chaos. It made them feel important, and that little boost of confidence is key.
Every role was age-appropriate. I remember my youngest was proud to help by dialing an emergency number. Making them part of the solution really eased my nerves—if everyone knows their part, we’re much more likely to succeed!
Regular Drills
Next up was the fun part—practicing! We started conducting regular drills. I turned them into games to keep the atmosphere light and engaging. Kids love playtime, and it makes learning less intimidating!
Doing these drills made it clear what needed to be done without panic. It’s amazing how these repetitive actions became second nature for us all. We’d practice logging out of our home quickly, taking our emergency kit, and checking in with each other afterwards.
I can’t stress enough how vital those moments are; when the real deal comes knocking, it’s too late to be figuring things out. So, we made it a tradition—silly but effective in getting our kid’s little hearts ready for the “what ifs.”
Emergency Supplies
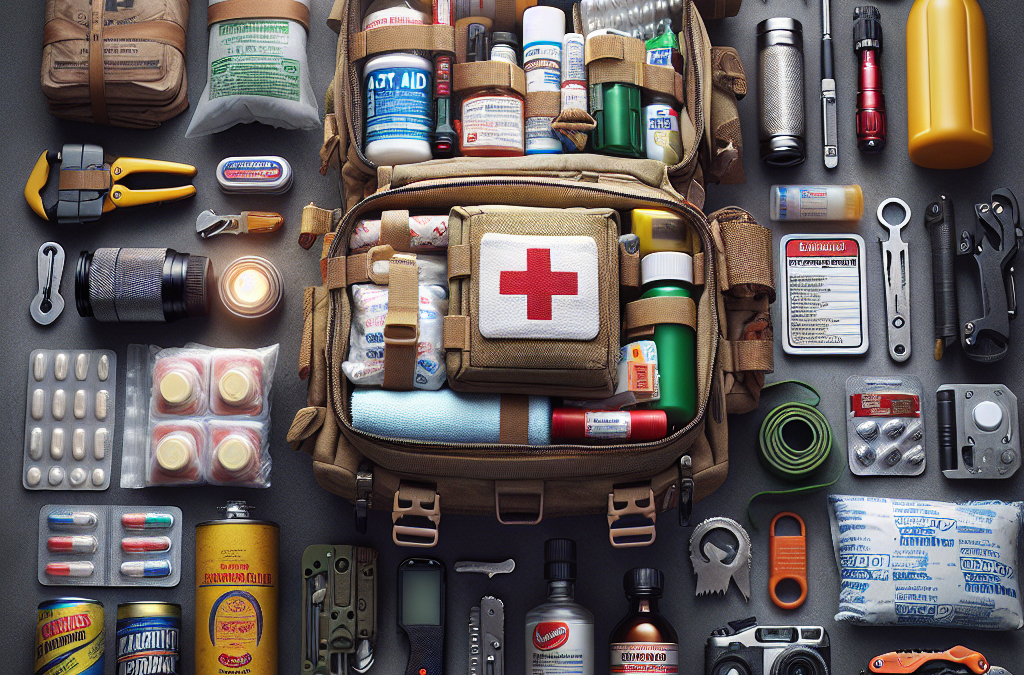
Pack an Emergency Kit
Now, let’s talk about emergency supplies! I can’t stress this enough: having an emergency kit ready is crucial. I created a checklist, or as I like to call it, our ‘survival backpack’!
This kit is stocked with essentials like water, snacks, first aid supplies, and flashlights. I made it a rule to check it every six months and rotate the snacks. Trust me, you don’t want scampering kids and expired granola bars when the stress is high!
There’s a certain peace of mind that comes with knowing you have what you need ready to go. Next time a storm is brewing, I know I won’t be flying by the seat of my pants—I’ve got our backs covered!
Plan for Basic Needs
Aside from just the emergency kit, I made sure we had plans for basic needs too. That means knowing where to find alternative sources of food, light, and warmth. We diversified our supplies beyond the initial kit.
For instance, we now keep extra blankets and warm clothes in our car, just in case we find ourselves stuck somewhere. It’s about being proactive rather than reactive. No one wants to find themselves cold and hungry; it’s about ensuring comfort in discomfort.
We even researched local shelters and resources, so we’d know where to turn in case home isn’t safe. Making these plans gave me an overwhelming sense of responsibility; the “What ifs?” could now have answers.
Regular Updates
Just as important as packing the kit is making sure it’s updated! I learned the hard way that supplies can change, kids grow, and what we need may vary over time. So, keeping our emergency kit fresh was essential!
I began scheduling those refreshes on our family calendar to make them a priority. A simple reminder helps us remember, “Hey, it’s time to sift through the emergency stuff!” and we all get excited about it together!
It’s a great bonding time, sorting out what’s still useful and perhaps letting go of things we no longer need. Update your kit, and it gives another angle of peace, knowing you’re all prepared for whatever comes your way.
Communication
Establish Safe Words
The next gem I discovered is communication. Establishing safe words can be a literal lifesaver. We came up with words that would signify we need to act securely without creating too much panic.
For example, if I shout “pineapple,” everyone knows it isn’t a joke—they need to gear up and follow the backup plan. It’s fun to see the kids shout it out around the house, knowing it means serious business when it counts!
This ability to communicate effectively brought us much closer. By establishing these codes, we ensure that a stressful situation does not spiral into chaos; clarity transforms what could have been confusion.
Emergency Contacts
Another crucial aspect of communication is having updated emergency contact lists. I made it a habit to have my family’s contacts written out, including out-of-town relatives who can help.
We put this list on the fridge to ensure it’s visible. The kids learned how to dial those numbers, giving them a solid grasp of who to reach out to when needed. It’s all about making sure they feel a sense of safety in their ability to communicate.
This is doubly important in an age where phones can die. A little old-school paper works, too! We even laminated our list so it stays intact. I encourage you to gather those numbers, as it truly saves worry when the chips are down.
Community Resources
Engaging with community resources and emergency services can bolster our safety protocol. We reached out to our local sheriff’s office to understand better what resources were available, which led to some invaluable insights!
They provided resources for neighborhood watch programs and local shelters. That networking helped us stay informed about community drills or exciting family safety events, encouraging more families to be aware and prepared.
Once we participated in a local emergency preparedness fair, the kids loved learning about it while also earning some fun giveaways. Getting involved nurtured a supportive environment for the whole family. Two heads are better than one, right?
Stay Informed
Emergency Alerts
Staying informed is key. I’ve set up emergency alerts through our local government and weather services. Getting these alerts can really help navigate through potential disasters before they strike.
There’s nothing worse than being caught off guard! Our phones buzz, and I gather everyone around to explain what we need to do next. This knowledge ahead of any emergency is empowering and helps decrease panic levels.
Besides, it’s cool to be in the know. I mean, who doesn’t love feeling like the family hero with timely updates? It has also encouraged my kids to pay attention to the world around us.
Trustworthy Sources
In our digital age, there’s a ton of info online—but not all of it is trustworthy. I’ve established a list of reliable sources that I check for updates, like the CDC or local government pages.
I talk with my family about fact-checking and distinguishing between real news and clickbait. I think it’s so important to instill that understanding in them early on; it builds a strong knowledge base.
We even decided to turn it into a family project; they’d grab a news source and share what they found, and we’d discuss it. Keeps them engaged while learning what’s trustworthy, and earns parental brownie points!
Regular Family Meetings
Lastly, I can’t emphasize enough the importance of regular family meetings. We set aside time to gather everyone to share updates on our emergency plan. It’s as much about sharing knowledge as it is a reunion.
This leads to open discussions about any concerns, adjustments in plans, and sharing our success stories from practicing drills. It warms my heart to see the kids taking pride in what they’re learning!
Reinforcing this ongoing open communication fosters a safety net of support and knowledge that will carry us through any emergencies. It’s more than just plan updates; it’s our family growing together!
Conclusion
Keeping my family safe in an emergency boils down to preparation, communication, and education. From creating a solid emergency plan to building bonds through practice, every step I’ve taken has been rewarding.
It gives me peace to know that we are well-prepared. Setting everything in motion has not only enhanced our safety but transformed our family dynamic—creating an encouraged and united front.
So, I encourage you not to wait. Take that next step in preparing your family—it’s one of the best things you can do for peace of mind. Remember: it’s a journey, and every small effort counts!
FAQ
1. What should be included in an emergency kit?
Ideal items include water, food, a flashlight, batteries, a first aid kit, and personal medication. Tailor it to the specific needs of your family!
2. How often should I review and update my emergency plan?
It’s a good idea to review your plan at least every six months or after any significant life changes, like moving or adding new family members.
3. What is a good way to establish a family communication plan?
Gather your family and discuss roles and safe words, and ensure everyone knows how to contact each other during an emergency. Keep that list handy!
4. How do I find trustworthy emergency resources online?
Stick to official resources like government websites, the CDC, and trusted news outlets. Always cross-check information for accuracy!
5. Can community resources help during an emergency?
Absolutely! Engaging with community resources can provide critical support, and networking helps you stay informed about local safety initiatives.
by Preparation | Mar 17, 2025 | Preparedness
1. Emergency Supplies
Food and Water
When I think about prepping for an emergency, food and water are at the top of the list. It sounds obvious, right? But the reality is, having enough non-perishable food and fresh water could be the difference between comfort and panic. Stock up on items like canned goods, granola bars, and dried fruits. And don’t forget about water—aim for at least one gallon per person, per day.
It’s not just about quantity, though. You also want to think about the variety in your food supplies. Having some fun snacks can lift spirits during tough times. So, throw a few bags of your favorite chips or chocolate bars into the mix. It’s all about keeping morale high!
Lastly, don’t forget to rotate your supplies. Eating the canned food that’s been sitting on the shelf for a while is great, but make sure to replace it with fresh stock every now and then. It’s all part of staying prepared.
First Aid Kit
Next up is the first aid kit. I cannot stress enough how important it is to have a well-stocked first aid kit on hand. Accidents can happen at any time, and having the right supplies ready to go can be a lifesaver. Make sure your kit contains bandages, antiseptic wipes, gauze, pain relievers, and any personal medications you or your family might need.
Don’t just grab a pre-packaged kit, though; personalize it! For example, I always add in some allergy medications for pollen season and a few extra band-aids because my kids seem to attract scrapes and bruises like a magnet.
And remember, it’s important to know how to use the items in your first aid kit. Consider taking a basic first aid course. Honestly, it doesn’t hurt to be prepared to help others, too, especially in emergency situations.
Flashlights and Batteries
Imagine a storm knocking out power in the middle of the night. That’s why having a few trusty flashlights and a stash of batteries is so crucial. I keep flashlights in various places around my house—one in the kitchen, one in my bedroom, and a couple in the garage—just in case. You never know when you might need one!
When selecting flashlights, I always opt for LED versions; they last longer and provide brighter light. Plus, I recommend getting solar-powered or rechargeable flashlights to save on battery costs in the long run.
Lastly, remember to check those batteries frequently. There’s nothing worse than reaching for a flashlight and finding dead batteries. Tossing a reminder on my calendar to check them every few months keeps this simple task from slipping out of my mind.
2. Communication Tools
Emergency Contacts
Having a list of emergency contacts is super vital. I like to have a printed list stuck on my fridge and a digital version on my phone. This list should include family members, neighbors, and local emergency services. Having these contacts handy means you can reach out for help or coordinate with loved ones easily.
When making your list, consider including contact info for your children’s schools and daycare centers, too. If anything goes wrong during the day, knowing who to call can save time and stress. And don’t forget about backup contacts; sometimes, having someone a little further away may be more effective if local resources are stretched thin.
I also find it helpful to talk through this list with my family. Setting up a communications plan ahead of time helps everyone know exactly what to do, and it eases that panic if you ever find yourself needing to use it.
Two-Way Radios
Cell phones can be unreliable during emergencies, right? That’s where two-way radios come into play. I’ve got a set of these at home, and they’ve proven to be lifesavers during camping trips and stormy nights. They offer a direct line to friends and family without needing cellular service.
When choosing two-way radios, I recommend selecting ones with a decent range, so you’re covered even if you end up a little farther from each other during an emergency. Plus, look for models that are easy to use. Nothing is worse than fumbling around with complicated gadgets when every second counts!
Practicing how to use them can also be a fun family activity. It’s not just about function; it’s about creating a connection. Next time you’re out at the park or hiking, practice with the radios to make sure everyone knows how to operate them.
Different Communication Methods
Finally, having multiple methods of communication is a smart move. Consider apps that allow for messaging without cell service, like WhatsApp or messaging services specifically designed for emergencies. You want to be prepared for a range of scenarios.
Also, social media can be a great tool during emergencies. Many communities set up informal messaging boards to keep everyone informed. Just remember, relying solely on one method can leave you vulnerable; redundancy is key!
And as a bonus, talk to your family and ensure everyone knows these different methods and what they should do in case of an emergency. Again, setting this all up beforehand can save loads of stress later!
3. Shelter and Warmth
Tents and Tarps
Creating a temporary shelter is an important aspect of emergency preparedness. If something catastrophic ever happens, I want to ensure I’ve got a solid tent or tarp on hand. These items are versatile; you can use a tarp for quick shelter or cover up supplies, and a proper tent can help keep everyone safe and dry.
When selecting your gear, make sure to invest in quality. It’s worth spending a bit more for durable materials that can withstand the elements. Plus, a tent that’s easy to set up is a blessing during high-stress situations.
Don’t forget to practice setting up your tent at home! I find that it eases my mind knowing that when push comes to shove, I can set it up without a hitch—and it’s also a fun camping practice with the kids!
Sleeping Bags and Blankets
Keeping warm is another must during emergencies. I recommend investing in good-quality sleeping bags that are suitable for colder temperatures, as well as having extra blankets on hand. You can’t go wrong with a cozy setup when things get chilly.
Consider adding emergency Mylar blankets as well. They’re lightweight, compact, and can help trap body heat without taking up too much space in your emergency kit. You never know when they might come in handy!
As a side note, I always have at least one portable camping stove or a way to cook food that’s safe for indoor use. Having hot food can warm up your spirits—although, if you’re not careful, it might lead to a bit of a dinner disaster!
Fire-Producing Tools
Let’s not forget the power of fire! A reliable way to start a fire is essential for warmth, cooking, and even signaling for help. I personally prefer waterproof matches and lighters, coupled with fire starters like cotton balls saturated in petroleum jelly—it’s a game changer!
Be sure to store these items in a dry, accessible spot. You want to keep them handy but safe from moisture or damage. And remember to practice fire safety. Teaching everyone how to safely build a fire will take the worry off your shoulders if you need that warmth later on.
There’s something comforting about firelight, too. It creates a space to gather and share stories, which can be really important during stressful times.
4. Personal Protection Equipment
Masks
In today’s world, having the right protective gear is essential. Masks should always be part of your emergency kit. They can help you filter air in cases of smoke or dust, allowing you to breathe a bit easier during a crisis.
When selecting masks, look for those that offer good filtration, like N95 or KN95. They might feel a bit restrictive but trust me; it’s worth it to feel secure! And hey, having a few styles at home means you can switch it up depending on your needs.
Consider keeping both reusable and disposable masks on hand, too. That way, you’ll have options based on the situation at hand. Staying protected is key, and every little bit helps!
Gloves and Protective Clothing
In emergencies, having protective clothing can also be super practical. I keep a stock of gloves in my kit, ranging from rubber gloves for cleaning to heavy-duty work gloves for handling debris. You never know what you might encounter when you’re digging through your stuff!
When it comes to clothing, layers are your friend! Make sure to have some durable clothes that are appropriate for the climate. I also recommend including an extra pair of sturdy shoes because, trust me, you don’t want to be walking around in flip-flops during an emergency.
Lastly, think about safety goggles. If you ever find yourself in a situation with flying debris or hazardous materials, they can protect your eyes and make a significant difference.
Self-defense Tools
In emergencies, personal safety should be a top concern. Whether it’s a natural disaster or an unexpected situation, having self-defense tools can provide peace of mind. I keep some options at home, including pepper spray and personal alarms. It’s a small step toward feeling secure!
However, it’s not just about having these items—it’s crucial to know how to use them. Consider taking a self-defense class, not just for emergencies but for daily situations as well. Knowing how to protect yourself can boost your confidence.
Ultimately, it’s about feeling prepared for whatever life throws at you. And being equipped isn’t just about the tools; it’s a mindset that helps you stay calm in the chaos.
5. Financial Preparedness
Emergency Cash
Having a little cash tucked away for emergencies can be a lifesaver. In today’s digital world, we often forget that during big events—like a natural disaster—ATMs and credit card systems might be down. Keeping some emergency cash on hand (think small bills) is a smart move.
Where do I stash mine? I keep it in a separate location from my main money stash, just in case. This ensures that I can access funds even if I have to evacuate. Plus, having cash readily available can make all the difference in a pinch!
And while you’re at it, don’t forget to document your cash stash, including serial numbers. This makes it easier to manage and replace later if need be. Just one more way to keep yourself organized!
Important Documents
Collecting important documents might seem like a chore, but trust me, it’s so essential! You want to have copies of your ID, insurance policies, medical records, and any valuable documents stored securely but accessible. I keep mine in a waterproof fireproof box—just to be extra cautious.
Consider going digital, too. Many cloud services exist that allow you to store documents securely online. This measure ensures that even if you lose physical copies, you still have access to them. Important documents give you leverage while dealing with insurances and services during emergencies.
Be sure to periodically review your documents as well. Changes in your life, like moving places, business changes, or family situations mean documents need to meet your new reality. Keeping everything updated will save you headaches down the line!
Emergency Plan
You’ve got your supplies, but what’s the plan? I always encourage people to sit down and create an emergency plan with their families. This plan includes meeting points, communication methods, and roles for each family member. It’s all about making sure everyone is on the same page.
I cycle through what our plan should look like every few months, discussing what to do in case of different scenarios. From fire drills to tornado warnings, it’s invaluable to run through these things when everyone is calm.
The best part? It turns into a bonding experience. It’s not just about preparation; it’s about making sure everyone feels included and empowered to act in tough situations.
FAQs
1. What basic supplies should I have for emergency preparedness?
You should focus on necessities like water, non-perishable food, a first aid kit, flashlights, batteries, and a multi-tool. These form the core of your emergency supplies.
2. How often should I check my emergency supplies?
I recommend checking your supplies at least once every six months. This way, you ensure that everything is up-to-date, especially food and medications.
3. What communication methods should I include in my emergency plan?
Your plan should feature a list of emergency contacts, two-way radios, and alternative messaging apps that can work without a cell signal.
4. Why is it important to practice my emergency plan?
Practicing your plan helps everyone understand their roles and reduces panic during an actual emergency. It turns a stressful situation into a more manageable one.
5. What is the best way to store important documents for emergencies?
The best practice is to keep copies in a waterproof fireproof box. Additionally, consider using cloud storage to access them anytime, anywhere.
This article covers essential tools for emergency preparedness in a friendly and personable tone while following the specified structure. Hope you enjoy reading through it!
by Preparation | Mar 17, 2025 | Preparedness
Hey there! So, you’re interested in becoming more self-reliant with your food supply? That’s awesome! There’s nothing quite like knowing where your food comes from and being able to grow it yourself. After diving into this journey myself, I’ve found five key areas that can really help you on your path to food independence. Let’s break it down together!
1. Planning Your Garden Space
Understanding Your Environment
The first thing I did was to take a good look around my property. Every garden’s success relies heavily on understanding its environment. Consider factors like sunlight, soil quality, and water availability. You want a spot that gets plenty of sunshine without drastic winds, and that usually means observing how the sun charts its arc across the sky throughout the day.
Then, test the soil pH! This step can make a big difference in your garden’s health. There are simple kits available at gardening stores. If your soil is too acidic or basic, you can easily amend it with specific products to create a healthy growing environment.
Lastly, prepare for challenges like pests or weeds. It’s always easier to set up barriers before issues arise rather than trying to fix them later. This proactive approach can save you a ton of hassle down the road.
Choosing What to Grow
Next up, you’ve got to decide what crops to grow. In my experience, starting with a mix of easy-to-grow veggies and herbs is key. Tomatoes, cucumbers, and basil were my first choices—they’re user-friendly and versatile for various dishes!
Consider what you and your family actually eat. It can be tempting to grow things just because they look cool, but if no one’s going to enjoy the produce, what’s the point? Tailoring your garden to your tastes will ensure you have a sustainable supply of food you love.
Lastly, think about growing perennials—a bit more work upfront, but they come back year after year! Plants like asparagus and rhubarb can be low-maintenance once established.
Using Companion Planting
I discovered that companion planting can really optimize space and boost plant health. Certain plants have unique relationships that can deter pests or enhance growth when grown together. For example, planting marigolds alongside your veggies can help keep harmful bugs at bay.
Another benefit is maximizing your garden’s output. Tall plants like corn can provide shade for shorter crops like lettuce, while beans can add nitrogen to the soil, which is great for their leafy buddies.
Believe me, it’s like a little gardening symphony! When these plants work together, they create a thriving ecosystem that benefits all the participants involved. It’s pretty neat to watch your garden flourish through partnership!
2. Soil Health and Nutrition
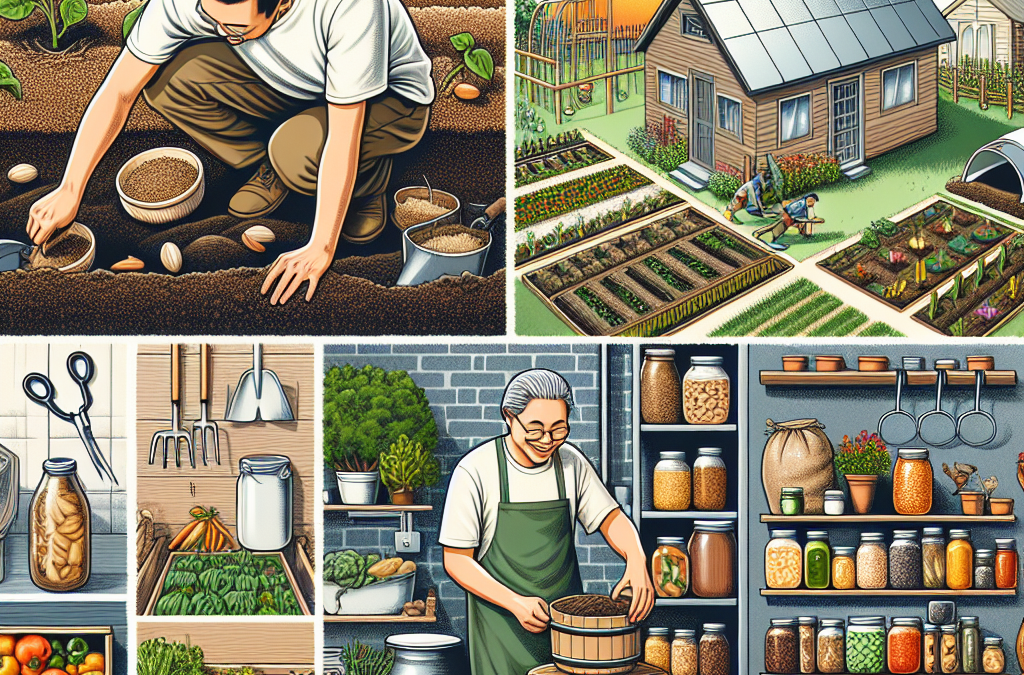
Composting Basics
Where do I even start with composting? It felt kind of intimidating at first, but trust me, it’s totally manageable. Composting is essentially recycling organic materials, and it’s one of the best things I did for my soil. Seriously, it’s like gold for your garden!
To kick it off, I gathered kitchen scraps (think veggie peels and coffee grounds) and yard waste (like grass clippings and leaves). Just make sure to avoid meat and dairy products, as they can attract unwanted critters.
Then, I set up a simple compost bin—something you can DIY with pallets or even purchase ready-made. I kept it turned and moist, and in just a few months, I had rich compost to mix into my garden soil. It’s rewarding to see that waste transform into something so resourceful!
Understanding Fertilizers
While compost is fantastic, understanding which fertilizers to use is crucial too. All plants have unique nutrient needs. At first, I was clueless! However, I learned that a good balance of nitrogen, phosphorus, and potassium (the big three) was essential for healthy growth.
I experimented with both organic and synthetic fertilizers, but I quickly realized that organic options—like worm castings or fish emulsion—provided not just nutrients but also improved soil health over time.
Don’t forget to read the labels and follow instructions closely. Over-fertilizing can burn your plants. Less can often be more, so start small and monitor how your plants respond!
Crop Rotation
Crop rotation became a game changer for my garden! I learned that rotating different plant families each season helps prevent diseases and promotes soil health. It’s like a mini holiday for your soil, allowing it to replenish certain nutrients while deterring pests.
For instance, legumes can fix nitrogen back into the soil after pulling up something like tomatoes that may have depleted it. Just keep a chart to track where you’ve planted each crop year after year. It might take a bit of planning, but it’s so worth it for the sake of your garden’s vitality.
Give it a try! After implementing crop rotation, I noticed healthier plants, higher yields, and less time battling pests. It’s a win-win!
3. Water Management
Smart Watering Techniques
Now let’s talk about one of the most crucial elements of gardening—water! Initially, I thought just sprinkling water here and there would be enough. Boy, was I wrong! I learned that early morning is the best time to water; that way, plants absorb it before the sun saps it away!
Drip irrigation was another cool tip I stumbled across. By investing in some simple tubing and drip emitters, I managed to deliver water directly to my plants’ roots, avoiding waste and reducing the likelihood of fungal diseases.
Another trick is mulching. Not only does it help retain moisture by preventing evaporation, but it also suppresses weeds. Plus, organic mulches gradually break down and enrich the soil!
Rainwater Harvesting
Harvesting rainwater was a revelation! I set up a rain barrel, and honestly, it became one of the best ways to water my garden sustainably. I can collect gallons of free, chemical-free water—nature’s gift!
Plus, using rainwater is also better for the environment. It reduces runoff and can lower water bills. Talk about a win-win! Just ensure you’re monitoring the barrel for any debris or contaminants, and you’ll have a great supply for all those hot summer days.
It feels satisfying to know I’m conserving water while also hydrating my garden. It’s a small change that makes a huge difference!
Understanding Plant Needs
Each plant has unique water needs, and that became clearer as I experimented. I discovered that some plants like cucumbers are thirsty, while herbs tend to do better with less. Learning about these differences helped me develop a more effective watering routine.
I even found out about the “soak and dry” method—where you allow the soil to soak up water for longer but then let it dry out in between waterings. This method encourages deep root growth, leading to stronger, healthier plants.
As I adapted my approaches based on each plant’s requirements, I started to notice healthier and more resilient crops. It’s all in the details, my friends!
4. Pest Control Strategies
Organic Pest Solutions
Pests—oh boy! They can be the bane of any gardener’s life. But instead of reaching for harsh chemicals, I learned the value of organic pest control methods. For example, neem oil or insecticidal soap can effectively tackle common culprits without harming beneficial insects.
I also started creating my own garlic spray. Mixing water, garlic, and a few drops of dish soap can deter many pests while being completely safe for my plants. It’s super easy and leaves my garden feeling fresh, not toxic!
Implementing these natural solutions helped me feel more in tune with my garden and the environment, reducing my carbon footprint while keeping pests in check.
Encouraging Beneficial Insects
While pests can cause chaos, I learned that beneficial insects can help keep the ecosystem balanced. Ladybugs, lacewings, and predatory wasps are the tiny heroes that munch on aphids and other critters. It felt great to attract them by planting flowers like yarrow and marigolds.
I even set up a little “insect hotel.” It’s amazing how providing shelter can encourage beneficial insects to stick around and do their jobs. I loved watching them zoom around my garden—it felt like creating my little wildlife sanctuary!
It’s all about embracing a balanced approach—finding harmony rather than declaring war on all creepy-crawlies. Trust me, it brings you closer to nature!
Physical Barriers
Sometimes, a simple physical barrier is the best defense. Row covers and netting can protect your crops from specific pests, and they’re usually easy to set up. I used them for my young plants, and I can’t tell you how much easier life got!
Plus, creating a diverse garden layout can confuse pests. Instead of planting all your tomatoes in one line, scatter them around. It keeps pests guessing and helps maintain your harvest!
Over time, I learned that vigilance pays off. Regularly checking for signs of pests or diseases meant I could act quickly before they devastated my plants. It’s all about being proactive and protective!
5. Harvesting and Preservation
Knowing When to Harvest
Harvesting might seem straightforward, but timing is everything! Picking produce at its peak flavor not only makes for delicious meals but also encourages continued production. I learned to check for color, size, and even feel for ripeness.
Some crops, like zucchini, should be harvested young for the best taste, while others, like tomatoes, can continue to ripen off the vine. It’s like having a conversation with your garden, figuring out what they need and when!
Documenting your harvests helped me track which varieties did well and when they produced best. It’s an educational journey that I love sharing with fellow gardeners!
Preserving Your Bounty
After all that hard work, preserving your harvest is so rewarding! I explored various methods like canning, freezing, and drying, and each has its unique charm. Canning my tomatoes became a tradition I cherish, and it’s a great way to have summer flavors in the winter.
Freezing is easy—just wash, chop, and pop those veggies in bags. I’ve even started preserving fruits for smoothies later. There’s something delightful about enjoying the fruits of my labor when the snow is flying outside!
Don’t forget to share! Whether it’s trading produce with a neighbor or gifting a jar of homemade jam, community makes this journey even more worthwhile. Building those connections is part of the joy!
Planning for Next Season
Once the harvest wraps up, I take some time to reflect. What worked? What didn’t? It’s all about learning and improving each year. I started keeping a garden journal to jot down my thoughts and plans for the upcoming season. It’s like having my plant diary!
Consider planning a crop rotation schedule to keep things fresh. This prep work sets you up for success, and I find it gives me something to look forward to during the winter months.
One of my favorite parts is browsing seed catalogs during the colder seasons. I feel excitement, imagining what I’ll grow in my garden next year. It’s a never-ending journey of growth—for both the plants and me!
Frequently Asked Questions
1. How long does it take to start a garden?
Starting a garden can take anywhere from a few weeks to several months, depending on your planning and what you choose to grow. Some crops, like lettuce, can be ready within a month, while others, like tomatoes, may take a bit longer. The best thing is to enjoy the process and have fun with it!
2. What are the best vegetables for beginners?
Some great starter veggies include radishes, lettuce, beans, zucchini, and tomatoes. They tend to be hardy, quick-growing, and forgiving if you’re just mastering your gardening skills!
3. How can I manage pests without chemicals?
There are plenty of natural solutions like neem oil or garlic spray. Plus, encouraging beneficial insects and using physical barriers can help you manage pests organically!
4. Can I garden in small spaces?
Absolutely! Container gardening, vertical gardening, or raised beds work wonders for smaller spaces. You don’t need a huge yard to grow your food; you just need creativity and a bit of planning!
5. How can I preserve my harvest effectively?
Canning, freezing, and drying are all excellent methods for preserving your harvest. Each has its unique benefits, so it depends on your preferences and what you’re preserving!
by Preparation | Mar 17, 2025 | Preparedness
Understanding Your Power Needs
Assessing Your Usage
First off, I really think that understanding your power needs is paramount. You gotta sit down and jot down what exactly you need from a backup power solution. Are you looking to keep your essentials running during a blackout, or do you need something that’ll power your whole house? The choice of a generator or an inverter really hinges on this assessment.
Start by creating a list of all the appliances you rely on. How many do you think you’ll truly need? Maybe you just need to keep your fridge running, or perhaps you want to run your entire home office setup. Take a mental inventory; it can save you from making a huge mistake later.
When you’re clear on your needs, it also helps in determining the type and capacity of the backup power solution you should look into. There’s definitely peace of mind in knowing you’ve got the right gear without overspending on power you won’t even use!
Evaluating Power Outage Frequency
Next, I find it useful to consider how often the power goes out in your area. This seems kinda obvious, right? But you’d be surprised how many folks don’t think about how regular outages affect their lives. If this is something you deal with a lot, it’s better to invest in something more robust.
If local weather patterns or infrastructure issues keep the lights off more than you’d like, then a more substantial backup solution might be your best bet. Investing in higher capacity systems can seem daunting, but trust me, it’s better to be prepared than to get stuck in the dark.
I remember chatting with a neighbor about their backup power situation; they seemed annoyed by how many times their generator barely made it through a storm. Don’t let that happen to you! Prepare for the reality of your environment.
Identifying Critical Appliances
This is another one of those steps that many people overlook. Identifying which appliances are critical during an outage is key. Which items can you live without for a few hours and which ones are absolute must-haves?
I, for one, can’t live without my fridge running. There’s nothing worse than having to toss food due to a power failure. But maybe for you, it’s the medical equipment, computers, or essential heating or cooling systems that take priority. Whatever it is, getting clear on the essentials will guide your choice in backup systems.
So, grab that notepad again and separate your must-haves from the nice-to-haves. This is gonna make your decision process a lot smoother. Pro tip: make sure the backup solution you choose can handle that critical load without breaking a sweat!
Exploring Different Backup Power Solutions
Generators vs. Inverters
Alright, let’s dive into the juicy part – the types of backup systems available! The most common options you’re likely gonna come across are generators and inverters. Generators are often gas-powered, providing a solid chunk of power when the grid fails. But hey, they can be pretty loud and require some upkeep.
On the other hand, inverters can run off batteries, making them generally quieter and more environmentally friendly. They also work great for smaller setups, but if you’ve got larger power needs, you might need to look at larger systems or multiple inverters.
It’s crucial to know what you’re getting. Research the pros and cons of each type, and think about what aligns best with your lifestyle. I always weigh my options carefully here; you don’t wanna put yourself in a sticky situation in the middle of a storm!
Portable vs. Standby Systems
Another consideration is whether you want a portable unit or a standby system that kicks in automatically when the power goes out. Portable generators are affordable and great for short power outages, but don’t forget: they need to be manually started and refueled.
Standby systems, however, are more of an investment. They’re permanently installed and start up automatically – what’s not to love? I remember having a friend who had one installed; it was as smooth as butter during our last blackout. No frantic digging around for the manual to find out how to start it!
Think about your lifestyle and how much you’re willing to spend. What works for me might not be your best bet, and that’s okay! Take some time to figure it out.
Fuel Source Options
Let’s chat about fuel! Your backup power solution’s fuel source is crucial. Whether it’s gasoline, diesel, propane, or natural gas, each option has its strengths and weaknesses. I tend to lean towards propane for several reasons; it’s cleaner-burning, has a longer shelf life, and is usually more accessible.
But keep in mind that each fuel source comes with its own considerations, like storage, availability, and even safety precautions. I currently keep a small stockpile of propane on hand because it just makes me feel a bit safer knowing I can keep my systems running without worrying about fuel shortages.
Step back and think about what’s realistic in your situation regarding storage and supply. You want convenience without added hassles later on.
Budgeting for Backup Power Solutions
Estimating Total Costs
Next on the agenda: budgeting. Let’s be honest – the price tag can be a deal-breaker. So, estimating total costs upfront is super important. Don’t just look at the cost of the unit itself; factor in installation, maintenance, and fuel needs.
After spending years working out budgets for various projects, I can’t stress enough how critical it is to have a clear understanding of what you’ll need to invest upfront and long-term. Make sure that whatever solution you choose fits comfortably into your budget without stretching you too thin.
Having to skimp on maintenance or fuel later is no fun – trust me! That’ll lead to more costly repairs or system failures when you really need them to work. Do your homework and keep your budget realistic.
Long-term Savings Considerations
Sometimes, we forget that spending a little more initially can save a LOT down the line. For instance, purchasing a higher-quality generator or inverter might have a higher upfront cost, but often results in better efficiency and longevity. Plus, think about how often you may have to service cheaper options.
Long-term plans should incorporate future needs as well. Say you plan to expand your family or your home office; consider how your backup needs might evolve. Investing wisely now could prevent more expenses down the road.
Keeps in mind that peace of mind during a blackout is often worth its weight in gold. A small investment could save you from a ton of headaches later on, so be thorough in your budgeting process.
Researching Financial Incentives
Lastly, don’t forget to check if there are any available financial incentives to help offset some of your costs! You might be surprised to find government programs, tax credits, or local incentives that encourage homeowners to invest in efficient backup power solutions.
I once got a rebate when I installed my generator, and let me tell you, it felt like Christmas! Research local and federal options that might apply to your situation. It’s worth the time and effort to look around because these savings can really help.
Taking the time to check for these financial boosts can help you make a more affordable choice, ensuring you get that sweet backup power you need without breaking the bank.
Installation and Maintenance of Your Backup Power Solution
Professional Installation vs. DIY
Installation is the next hurdle. Should you hire a pro or tackle it yourself? Well, I usually recommend getting a professional involved, especially if you’re considering a generator that requires more than just a simple plug-in setup.
Having a pro install your system means it’ll be set up correctly and safely. Trust me, I’ve learned the hard way that going the DIY route can occasionally lead to complications that are just not worth the headache of figuring it all out. Getting it done right the first time pays dividends in the long run.
However, if you’re handy, a smaller portable generator might be right up your alley! Just be sure to read the manual and follow safety precautions – or you might be calling for expert help sooner than anticipated!
Regular Maintenance Tasks
Once that installation is complete, maintenance comes next. Just like any appliance, your backup power system will need some love to keep it operating at peak performance. Regularly checking oil levels, replacing fuel filters, and doing battery tests should be on your maintenance checklist.
Life gets busy, I know, but setting reminders can help keep things on track. I personally set seasonal reminders to check my systems to make sure I’m never caught off guard. You really don’t want to realize your generator is out of commission when a storm rolls in!
By keeping on top of maintenance, you’ll extend the life of your equipment, save money on repairs, and ensure everything runs smoothly when the time comes. It’s one of those things that just makes sense, and maybe even keeps your neighbors a bit jealous of your power prowess!
Emergency Preparedness Plan
Lastly, incorporate your backup power systems into an overall emergency preparedness plan. Have a clear idea of how your power needs fit into your broader emergency plans. It’s not just about having backup power; it’s about knowing when and how to activate it.
Discuss with your family how to operate the backup system if an outage occurs. Creating an easy-to-follow plan, complete with contact numbers for pros and emergency services, is always a solid move. I mean, I want my family to know how to keep the lights on, even when I’m not around!
Incorporating your backup power into a broader strategy helps ensure that everyone knows their roles and responsibilities, creating an air of confidence when facing emergencies.
FAQs about Choosing Backup Power Solutions
1. How do I know what size generator I need?
Start by assessing the total wattage of the devices you want to power during an outage. Create a list of essential appliances and their wattage, then look for a generator that can handle that load.
2. Are portable generators safe for indoor use?
No way! Portable generators should NEVER be used indoors. They produce carbon monoxide, which can be deadly. Always use them outside and at a safe distance from windows and doors.
3. How often should I perform maintenance on my backup power system?
It varies by system, but a general rule of thumb is to check your generator or inverter every three to six months. Change the oil, check filters, and ensure that fuel is fresh.
4. What’s the difference between a standby generator and a portable one?
A standby generator is permanently installed and automatically activates during an outage, while a portable generator is manually operated and requires filling up with fuel during a power failure.
5. Can my backup power solution work while using solar energy?
Absolutely! Some systems are designed to work in tandem with solar energy. Being dual-powered can help extend the power you get from the sun and back it up for times when it’s not shining.
by Preparation | Mar 17, 2025 | Preparedness
Understanding Off-Grid Living
What is Off-Grid Living?
So, diving into off-grid living has become a bit of a passion project for me over the years. It’s not just about
removing yourself from the rat race; it’s about embracing a lifestyle that’s as self-sufficient as it gets. In
essence, off-grid living means you’re not relying on public utilities. We’re talking water, electricity,
sewage—you’re essentially creating a little self-sustaining world for yourself.
Why would anyone want to live off the grid, you ask? Honestly, it varies from person to person. For some, it’s
an escape from the hustle and bustle of urban life. For others, it’s a way to reduce their environmental
footprint. And let’s not forget those who just want to give a big middle finger to utility companies!
But like all big lifestyle changes, it comes with challenges. I mean, no one tells you how tricky it can be to
find clean drinking water or how often you’ll have to wrestle with your solar panels! But don’t let that scare
you away. Trust me; the freedom is absolutely worth it!
Essential Skills for Off-Grid Living
Self-Sufficiency Skills
One of the biggest lessons I’ve learned is that you’ve gotta have some serious self-sufficiency skills under your
belt. Whether it’s growing your own food or learning how to fix what’s broken, the more skills you acquire,
the more confident you’ll feel in an off-grid setting. I actually started small—I learned to garden and even
dabbled in canning jars like a grandma on a mission!
Don’t overlook the importance of cooking from scratch. You’d be surprised how many convenience foods you take
for granted until they’re not available anymore. Being able to whip up a meal from your pantry is a must,
my friend. Let’s just say having a good recipe book on hand has become more precious than gold!
And let’s talk DIY repairs. You’ll need to channel your inner handyman (or woman!). From fixing leaky roofs to
simple plumbing issues, being a bit of a jack-of-all-trades will save you a ton of cash and headaches down the
road.
Choosing the Right Location
Land Selection Criteria
Location is everything! Seriously, this is where it all begins. After some soul-searching, I learned to look
for a piece of land that really spoke to me. For me, access to fresh water was non-negotiable. I made sure to
look for spots near rivers or streams—water is life!
Then there’s the aspect of sunlight. If you’re relying on solar power (which I totally recommend), scout out a
location with plenty of sun exposure. You don’t want to be living in a shadowy nook wondering why your solar
panels aren’t doing their job.
Lastly, always check local regulations. Some places are all about that free spirit vibe, while others are super
strict. It’s crucial to know what you can—and can’t—do with your land. I once thought I could build a little
cabin wherever I wanted. Spoiler alert: I couldn’t!
Building Your Off-Grid Home
Design and Construction
Let’s chat about building your off-grid home—this part is thrilling, but also kinda daunting! The design of
your house is super important. I learned that opting for smaller, energy-efficient designs can make a world of
difference in resource management.
And hey, building DIY can be a satisfying option! But be prepared for a steep learning curve. I didn’t know
squat about construction when I first started. I watched tons of YouTube videos and picked up a skill or three.
Just remember, good quality materials go a long way in durability.
Also consider waste management. I know, I know, not the sexiest topic but critical nonetheless. Composting
toilets became my best friend, and now I can’t imagine living without one. Much easier than traditional plumbing
and friendlier to the environment—win-win!
Energy Independence
Renewable Energy Sources
Alright, let’s geek out over energy independence! One of the first things I invested in was solar panels. The
sun is a magical thing; harnessing it can power your living space and reduce your reliance on traditional
energy sources. I swear, watching my energy bill drop felt like Christmas morning every month!
Wind turbines are another rad option. Depending on your location, setting up a small turbine can further boost
your energy production. Just be aware of your surroundings—trees and other obstructions can really mess with
your wind flow.
Batteries for energy storage are an absolute must if you want to maintain independence. I learned the hard way
just how crucial this was during cloudy days or storms. Investing in quality batteries made all the difference,
and trust me when I say you don’t want to run out of power when you need it most!
Fostering Community Connections
Building Relationships
Living off-grid can sometimes feel lonely, especially if you’re a social butterfly like me! This is where
building community connections comes in. I made it a point to reach out to my neighbors. Let’s just say the
potlucks have been life-changing for both my stomach and my social life!
Think about joining local off-grid groups or communities—online or in-person. These folks can share knowledge,
lend a hand during tough times, and help you feel less isolated. Seriously, there’s just something about being
with like-minded people that’s comforting.
Lastly, don’t underestimate networking for resources. A neighbor might have a gadget you could borrow, or maybe
they’re looking to swap skills. Building those social ties can make your off-grid journey smoother and more
enjoyable!
FAQ
1. What do I need to start living off-grid?
To start off-grid living, you’ll need essential skills in self-sufficiency, a good location, a plan for your
home, energy solutions, and community connections for support.
2. Can I live off-grid with kids?
Absolutely! Many families thrive while living off-grid. The key is to involve your kids in the process so they
can learn about sustainability and self-reliance alongside you.
3. What are the legal requirements for off-grid living?
Legal requirements vary depending on location. Always check local zoning laws, building codes, and permits
needed for off-grid systems.
4. How do I deal with isolation while living off-grid?
Combat isolation by fostering local community ties, joining groups focused on off-grid living, and regularly
reaching out to friends and family.
5. Is living off-grid expensive?
Initial setup costs can be high due to land purchase and building. However, long-term expenses can be lower since
you’re not relying on utility services. It’s an investment in sustainability!


