
Choosing the Right Location
Understanding Your Surroundings
First off, let’s talk about location because, trust me, it’s everything! When I found myself needing to build an emergency shelter, I learned quickly that you want to set up shop in a safe spot. Look for an area that’s away from potential hazards like falling branches, steep slopes, or flash flood zones.
Make sure you check the weather too. If it’s about to rain, don’t pitch your shelter in a basin where water can collect. It’s all fun and games until you wake up floating. Choose a flat, dry area to keep it cozy and secure.
Lastly, give some thought to your surroundings in terms of resources. Are there any nearby trees for support or brush you can use? Also, think about your exit routes. You never know, and it’s always smart to have a plan!

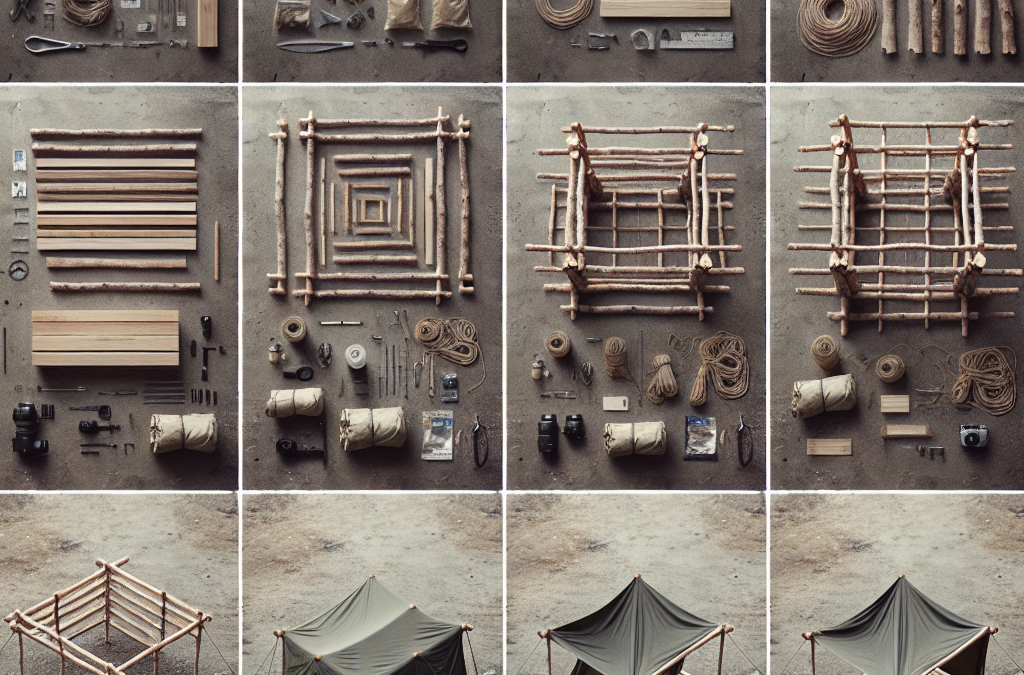
Gathering Materials
What You’ll Need
So, let’s get down to business on the materials. I quickly learned that you don’t need a Home Depot level supply list. All you need is a few essentials to get rolling. Generally, a tarp, rope, or even some branches will do just fine.
If you’re lucky enough to have access to a proper tarp, awesome! If not, any plastic sheet, or even a large garbage bag can be a lifesaver. Remember, the point here is to keep the elements at bay, and a little ingenuity goes a long way.
Rope is super handy too – I can’t tell you how many times I’ve used it to tie things together or create a makeshift structure. If you don’t have rope, paracord or even shoelaces can work in a pinch. Just get creative!
Thank you for reading this post, don't forget to subscribe NOW for FREE!

Building the Shelter Structure
Creating a Strong Frame
Once you’ve picked your spot and gathered your materials, it’s time to build! I usually start by creating a frame using branches. The trick is to find some sturdy ones that can handle the weight of your tarp or cover material.
Visualize a shape like a lean-to: one end of the frame should be elevated while the other rests against the ground. This creates a nice slant where rain can run off, keeping you dry. I’ve made a ton of these and don’t forget to secure your branches well so they don’t collapse when you lean against them!
As I build, I always keep the wind direction in mind. You want to have the opening away from the wind to make it more comfortable inside and ensure better protection from the elements. It’s all about maximizing your comfort!
Securing the Shelter
Stability Matters
Now, securing your shelter might just be the most important step. You want your creation to withstand those gusty winds when the weather decides to toss a tantrum! I always make sure that the tarp is tied down tightly to prevent it from flapping around.
If you can, use rocks or logs to weigh down the edges of your tarp. This makes your setup extra stable and keeps it from blowing away. Plus, it adds a little extra insulation to help keep you warm.
Checking for any weak points is vital too. If something seems loose, take the time to reinforce it. I remember a night where I didn’t… and let’s just say it was a very uncomfortable wake-up call when everything collapsed on me!
Maintaining the Shelter
Keeping It Safe and Comfy
Finally, once you’re all set up, maintaining your shelter is key. I always make it a point to check for any wear and tear throughout my stay. If a few branches are starting to buckle or if the tarp seems to be losing tension, I don’t hesitate to fix it right away.
Keep the inside of the shelter clean too! A tidy space can help keep out pests and makes for a much more pleasant experience. I like to use natural materials for bedding, like leaves, to create a comfy little nest.
And, if you can manage it, consider a small fire outside (safely, of course) to provide warmth and light. Just make sure to keep it a safe distance away from your shelter so there’s no risk of fire spreading.
FAQ
1. What materials do I need to build a portable emergency shelter?
You’ll need a tarp or plastic material, rope, and sturdy branches to create the frame. A bit of creativity goes a long way if you don’t have the usual gear!
2. How do I choose the right spot for my shelter?
Look for a flat, dry area away from potential hazards like falling branches or flood zones. Always consider the weather conditions and your exit routes too.
3. How can I secure my shelter against strong winds?
Tie down your tarp securely, and use rocks or logs to weigh down the edges. Ensure that the overall structure is tight and stable to withstand gusts.
4. What should I do to keep my shelter comfortable?
Keep the inside clean, use natural materials for bedding, and make necessary repairs promptly. If possible, set up a fire a safe distance away for warmth and ambiance!
5. Do I need any special skills to build a portable emergency shelter?
Not at all! Basic knowledge of tying knots and arranging materials will suffice. It’s more about being resourceful and proactive than having expert skills.
Related Content
- How to Build a Home Emergency Kit in 30 Minutes or Less
- Why Disaster Preparedness Matters: The Risks of Not Being Ready for an Emergency Situation
- Urban Survival Skills: Staying Safe in Cities
- Survival Pointer: The 7 Major Domains Of Quake Emergency Readiness Preparation
- How to Use Technology for Better Disaster Management


