
by Preparation | Apr 20, 2025 | Preparedness
Understanding the Value of Goods and Services
Recognizing What’s Valuable
When you’re deep in a crisis, the first step is recognizing what’s actually valuable. You might think that your old PlayStation is a treasure, but in a survival scenario, clean water and food are the hottest commodities. I can tell you, in my experience, getting to know the community and assessing their needs is paramount. If you can figure out what people around you find most valuable, you’re already on the right track!
Think about it: what skills do you have that others might need? If you’re a good cook, maybe your culinary skills are your best barter chip. If you’re handy, fixing stuff around the neighborhood could exchange for something you need. It’s a win-win when you understand the true value of what you can offer.
Don’t forget to look at seasonal goods. During a plant shortage, for example, home-grown fruits or veggies can be gold. So, tap into that awareness and keep a mental note of what’s hot and what’s not in your community.
Evaluating Your Own Resources
Before diving into bartering, take stock of your own resources. What do you have on hand that others might want? It’s not just about tangible items like tools or canned goods but also your skills or services. Trust me, once I started making a list of what I had, it opened my eyes to numerous opportunities for barter.
For instance, I once traded some homemade jams for firewood during a chilly winter. It’s these types of relationships that can bloom in times of need. You may have a spare set of clothes that could help someone in need. The key is to recognize that these resources can be incredibly useful during tough times.
Also consider any connections you might have. Maybe you know someone who can fix a car or set up a phone line. These are all part of your resource arsenal. Use what you have to make the most of the barter system.
Building Relationships
Bartering isn’t just a transaction; it’s also about relationships. In the heat of a crisis, trust becomes a currency of its own. When I first started bartering, I made sure to build connections with my neighbors. Getting to know them was key to success. Trust is what makes people willing to trade with you.
Be friendly, engage in conversations, and offer your skills or goods genuinely. Show that you care about their needs, and reciprocation in a barter system will follow naturally. I remember giving out some surplus food to neighbors, which directly led to getting help in return when I needed it. It’s all about cultivating a culture of trust and reciprocity.
Don’t rush these relationships, though. Take the time to get to know people’s stories. More than just an exchange, this can lead to a supportive network that lasts beyond immediate crises.
Creative Bartering Strategies
Mixing and Matching Resources
One of the fun parts of bartering is the creativity behind it. I’ve found that offering combinations rather than just one single item can be more enticing. Let’s say you have some canned goods, why not pair them with a few homemade cakes for a barter? These combos can often make the deal more appealing for both parties.
For example, I once combined some fresh veggies with a skill to bake bread. Many people had flour but no fresh produce, and vice versa. That melding of goods led to some delightful exchanges and made the bartering process richer!
Get your creative juices flowing and think about things like skills, crafts, or manuals that you could pair with tangible goods. The more unique the combination, the more likely you are to strike a deal.
Setting Barter Terms Clearly
When it comes to bartering, clear communication is super important. I learned this the hard way when a misunderstanding led to an unsatisfactory exchange. Always be upfront about what you’re willing to offer and what you expect in return. A simple conversation to lay out terms can save both parties from confusion later on.
Be aware of how you frame your offers. Instead of saying “Can I have that for this?”, try using a collaborative approach, like “What do you think about this in exchange for…?” This opens up the dialogue and allows for a smooth negotiation process.
And remember, it’s okay to walk away if you feel that the terms aren’t fair. Keeping your value in mind will reinforce your confidence in these exchanges.
Using Technology to Facilitate Bartering
In the age of technology, leveraging social media and community apps can enhance your bartering experience. I frequently utilize local Facebook groups and community forums to find out what others are offering or looking for. It’s a fantastic way to widen your reach without needing to physically go out.
Platforms like Nextdoor or even barter-specific apps can connect you with locals who are interested in trading goods or services. It’s amazing how technology can build a community feel, even in times of crisis.
Just remember to keep safety in mind. Always meet in public places or have someone with you when making exchanges. Building a bartering network offline that complements your online connections can provide a significant boost during tough times.
Reflecting on Your Bartering Experiences
Taking Time to Evaluate Successes and Failures
After a round of bartering, I always take a moment to reflect on what worked and what didn’t. This practice not only helps me improve for future exchanges but also makes me appreciate the relationships I’ve built. If a certain item didn’t trade well, I look at why that might be. Was it timing, price, or demand? Reflection provides invaluable insight!
This evaluation can enhance your future strategies. If one approach didn’t resonate, perhaps alter your resource offerings or your negotiation style. The learning from each experience is what fine-tunes your skills going forward.
Keep a little journal or notes on your phone of what worked well and what didn’t. These details can improve your bartering prowess significantly!
Sharing Experiences with Others
Finally, don’t underestimate the power of sharing your bartering stories with friends or community members. Sharing your experiences can not only inspire others but also build a stronger barter network. I’ve had people come back to me after I shared a successful barter idea, and it blossomed into a great community exchange event.
Additionally, discussions can yield new ideas for innovation. Each person brings a unique perspective, which can translate into fresh bartering techniques and strategies. Keep the dialogue open!
A community that learns together can become incredibly resilient. By sharing, we create an environment where everyone benefits, which ultimately makes our barter system even stronger.
Frequently Asked Questions
1. What are the first steps to start bartering?
The first step is to assess both what you have to offer and what you might need from others. Look around your space, whether it’s food, supplies, or skills, and figure out what’s in demand in your community.
2. How can I build trust with potential barter partners?
Building trust takes time. Start by engaging genuinely with people, offering help when you can, and being clear and honest in your exchanges. The stronger your relationship, the more willing they’ll be to trade with you.
3. Can I barter online?
Absolutely! Many community forums and social media groups facilitate bartering. Just ensure you follow safety precautions like meeting in public places.
4. What should I do if the barter doesn’t go as planned?
If you find that a barter didn’t meet your expectations, don’t hesitate to reflect on what went wrong to learn from the experience. Open communication can also help in finding middle ground for future exchanges.
5. How can I effectively evaluate my bartering success?
Take time to reflect after each barter. Consider what worked, what didn’t, and how both parties felt about the exchange. Keeping notes can help track your progress and adjust strategies for the future.

by Preparation | Apr 20, 2025 | Preparedness
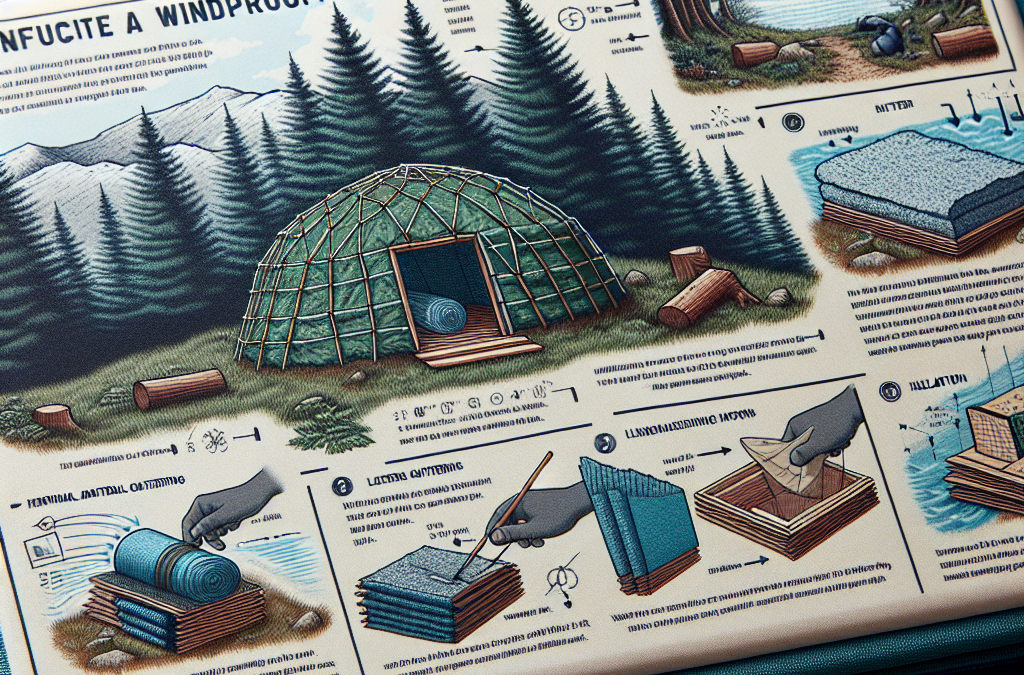
Selecting the Right Location
Assess Your Surroundings
Choosing the perfect spot for your windproof shelter is a critical first step. I always make it a point to check my surroundings thoroughly before I start building. Look for natural windbreaks like trees, hills, or even boulders. These features can significantly reduce the impact of strong winds on your structure.
Another thing I like to do is consider the terrain. Avoid low-lying areas where wind can swirl and pick up speed. Instead, I prefer locations that offer a bit of elevation without being too exposed. A spot that’s sheltered but still accessible is key to a successful build.
Finally, think about how close you are to water or resources. You want a place that’s convenient for you but also offers some form of natural protection. Balancing shelter and accessibility is essential for a windproof shelter that stands the test of time.
Mind the Wind Direction
Understanding the prevailing wind direction is fundamental in shelter design. You wouldn’t want to put your front door in the face of the wind, right? I typically check local forecasts or talk to locals to gather insights about which way the wind generally blows.
Once I know the wind patterns, I place the entrance of my shelter opposite to the wind direction. This simple adjustment makes a world of difference and keeps the inside of the shelter much more comfortable during storms.
It’s also smart to consider seasonal changes in wind direction. Make sure to plan ahead so that your shelter remains effective throughout the year, regardless of shifting weather patterns.
Consider Natural Wind Barriers
Building your shelter with existing wind barriers can greatly enhance its wind resistance. I often look for things like thick bushes or trees that can act as shields. If they’re already in place, I simply adapt my design to leverage them.
Sometimes, we can get a bit creative with our windbreaks. If there aren’t any solid features nearby, I might consider building a small fence or stacking some rocks. Techniques like these can create a buffer that significantly improves the windproof quality of my shelter.
Remember, nature can be your best ally. Incorporating the landscape into your design is a big win that pays off when the winds start howling.
Choosing Suitable Materials
Opt for Durable Options
The materials I choose for building my windproof shelter can make all the difference. Whenever possible, I go for sturdy options like logs, thick canvas, or reinforced tarps. The durability of these materials can withstand not only wind but also rain and snow.
I’ve found that selecting materials with some weight helps too. Heavier solutions tend to stay put during fierce gusts, while lighter materials may end up being tossed around like a feather. Choosing the right stuff from the get-go prevents a lot of headaches later on.
Also, think about weatherproofing. I often treat materials with a protective sealant or a weather-resistant coating. This additional step may seem small, but it can significantly extend the life of your shelter.
Use Wind-Resistant Designs
The design of your shelter plays a massive role in how well it stands up to the wind. I’ve learned that sloped or rounded roofs can help redirect wind away rather than letting it hit flat surfaces directly. It’s all about minimizing resistance.
You’ll also want to steer clear of sharp edges. The more streamlined your design, the better it can handle high winds. I tend to focus on creating rounded shapes that can disperse airflow rather than let it build up pressure against the structure.
Finally, I sometimes add additional stakes or ties to secure my shelter even further. This extra measure does wonders, especially when I expect challenging conditions.
Test Your Shelter’s Wind Resistance
Once my shelter is up, I always put it through a little test. I recommend standing inside during moderate winds and just feel how it holds up. Listen to the structure and see if there are any areas that creak or shake. It’s a good indicator of where improvements may be needed.
If possible, I like asking friends or family for help. Having a few people examine the structure and applying pressure in different areas can reveal weakness points I may have missed on my own.
Don’t be afraid to make adjustments. After an initial test, I sometimes tweak positions or add reinforcements where necessary. It’s all part of the building process, and every bit you do helps make your shelter even stronger.
Securing the Shelter Properly
Anchor It Down
No matter how great your design or materials are, it’s all useless if your shelter isn’t anchored properly. I always make sure to stake down the corners and use heavy rocks on top of any loose materials. This prevents the wind from lifting and shifting things around.
For extra security, I’ll sometimes use guy lines that extend outwards, creating a triangle of stability. It sounds technical, but it’s a straightforward method that pays off when the storms roll in.
Make it a habit to check your anchors regularly. Winds can change after a storm, and you want to ensure your shelter is still secure. Being proactive here saves you from disaster later on.
Inspect for Weak Points
Regular inspection is another golden rule I follow. After the initial build and after a storm, I like to comb through my shelter looking for any weak points. This could mean checking seams, hinges, or the integrity of the frame.
Maintaining your shelter isn’t just about looking for strong winds; it’s also about keeping up with wear and tear. I often find small repairs now can save me big-time headaches later.
If I do find damage, I address it immediately. A small tear can turn into a big problem if not handled right away. Being diligent means I can enjoy my time outdoors without worrying about where the next gust of wind will blow my shelter.
Prepare for Emergencies
It’s essential to have a plan in place should the winds get too high. I always make sure to have an emergency kit handy, with essentials like food, water, and first aid supplies. Knowing I’m prepared gives me peace of mind when the weather gets rough.
I also like to keep communication devices reset and tested, so I can reach out if things go sideways. There’s nothing worse than being caught off guard during harsh winds. Having reliable means of contact is key.
Lastly, I keep an eye on any weather updates and forecasts. Being informed lets me make proactive decisions about my shelter and whether I need to seek out shelter elsewhere if conditions worsen.
Choosing the Right Shelter Design
Understand Different Shelter Types
When I was starting out, I had no idea that the type of shelter could impact wind resistance. It’s crucial to know what your options are! For instance, a dome-shaped structure is naturally aerodynamic and can shed wind rather effectively.
I’ve also tried building A-frame designs, and they hold up pretty well against harsh winds. The key is to pick a design that complements your location and the materials you have at hand.
Researching different types gives you a broader perspective on what may work best for you. The great thing is, you can always combine elements of different designs to create something unique that fits your needs.
Adapt Your Shelter for Weather Conditions
You’ve got to be flexible! The most successful shelters I’ve built were ones that I could easily adapt based on the weather. For instance, adding extra walls on the windward side or a second layer for insulation makes a world of difference.
I often look for modular solutions. Building features that can be added or removed helps me stay prepared for any change in condition. If the wind picks up, I’m ready; if it calms down, I can simplify my setup.
Think about ventilation too! A well-ventilated shelter can limit wind effects while keeping you warm inside. Balancing these factors is all part of mastering the art of building a windproof shelter.
Experiment with Your Design
Building a windproof shelter is a learning process, and I really enjoy experimenting with different designs. Don’t be afraid to try something new! Each experience will teach you something valuable.
What I do is sketch out different concepts and then try them out. Some ideas work brilliantly, while others flop. But that’s okay—I consider each failure a step towards mastering my technique.
Engaging in building workshops or communities can be an excellent avenue for ideas. Sharing experiences, I find, can inspire innovative designs that can improve your windproof capabilities.
Frequently Asked Questions
1. What are the best materials to use for a windproof shelter?
The best materials include durable options like logs, thick canvas, or reinforced tarps. Always aim for something sturdy that can withstand not just wind but rain and snow too.
2. How can I tell if my shelter is anchored securely?
Check the stakes and ensure they’re driven deep into the ground. If the corners feel loose or can be easily shifted, it’s time to reinforce them. A good anchor keeps your shelter in place, even during strong gusts.
3. Should I worry about ventilation in a windproof shelter?
Absolutely! Proper ventilation helps prevent moisture buildup and keeps the interior comfortable. Make sure your design includes openings for air circulation without sacrificing the shelter’s wind resistance.
4. Can I build my shelter in a very windy area?
Sure! It just requires a bit more planning. Make sure to select a location that offers some protection, like trees or hills, and design your shelter keeping wind direction in mind.
5. What is the easiest design for beginners?
A simple A-frame or dome shape is great for beginners. These designs are relatively easy to construct and offer good wind resistance. Experimenting with these can help you build confidence in your skills.

by Preparation | Apr 20, 2025 | Preparedness
Building Trust Within the Community
Creating Open Lines of Communication
One of the first things I learned in building a community is the importance of open communication. It’s so much easier to collaborate when everyone feels comfortable expressing their thoughts and concerns. I often organize informal meetups or coffee chats just to encourage people to share. You’d be surprised how a simple cup of coffee can break down barriers!
Another key aspect is using social media wisely. Platforms like Facebook groups or neighborhood apps can help facilitate discussions. Make sure to moderate these spaces to keep conversations friendly and constructive. I remember when our group tackled an issue and it was through an unexpected Facebook thread that we found some brilliant solutions.
Lastly, create a feedback loop. After any community event or initiative, seek opinions on what went well and what could improve. This practice not only builds trust but also encourages everyone to engage in future discussions, knowing their voices are heard. It’s all about making folks feel valued!
Encouraging Diverse Participation
Recognizing Varied Contributions
Every community is made up of individuals with unique skills and perspectives, and I’ve found that recognizing these differences can lead to fantastic collaboration. From artists to engineers, each person brings something special to the table. Once, I initiated a community project where we had a mix of talents, and the results were incredibly creative!
It’s important to actively seek out quieter voices too. Not everyone feels comfortable stepping up, so I work on creating platforms that allow people to shine in their own ways—like workshops where individuals can showcase their skills or share personal stories. Doing so can help amplify diverse perspectives.
Moreover, I believe in promoting inclusivity. Ensuring everyone feels like they belong in the conversation not only enriches the community but also fosters a sense of ownership. When people are included, they’re far more likely to participate actively in projects and initiatives.
Creating Shared Goals
Establishing a Common Vision
When it comes to community collaboration, setting shared goals can make all the difference. I’ve led workshops where we brainstorm and align on objectives together. It’s incredible to witness the energy and enthusiasm that springs from collective ambition! The key here is to ensure that everyone has a say in what those goals should be.
Visual tools, like mind mapping, can really help in articulating these goals. I sometimes bring out giant post-it notes and markers to let folks jot down ideas. Seeing dreams and aspirations laid out visually is super inspiring and can spark motivation within the group.
Once shared goals are established, it’s important to regularly check in on them. Whether through monthly meetings or casual catch-ups, keeping these goals in front of everyone ensures that we’re all on the same page and working toward that common vision.
Organizing Collaborative Activities
Setting Up Community Events
In my experience, one of the best ways to foster collaboration is by organizing community events. Whether it’s a potluck, cleanup day, or a local sports tournament, bringing people together in a relaxed setting can work wonders for bonding. I often involve as many residents as possible in the planning phase, letting everyone contribute their ideas.
Sometimes, just having a fun activity is enough to break the ice. After planning a series of games, I saw friendships blossom and trust build—people who once barely waved at each other were now chatting like old friends. It’s amazing how creating shared experiences can unite a community.
Don’t forget about follow-up events too! Keeping the momentum going with seasonal gatherings or themed meetups ensures that those connections continue to grow. I’ve noticed that the more often we gather, the stronger our ties become!
Utilizing Resources and Assets
Pooling Local Knowledge and Skills
One thing I’ve come to appreciate is the vast well of resources within our community. From local businesses offering sponsorships to skill-sharing seminars by residents, leveraging these assets can boost collaboration significantly. I’ve organized skill swaps where people teach one another various crafts and trades, and let me tell you—it’s incredible what you can learn!
Additionally, I encourage local organizations to partner with us for mutual benefit. For instance, a local library may host a series of community talks, or a nearby business could lend space for projects. These relationships not only help with logistics but also create a culture of cooperation.
Lastly, it’s crucial to celebrate these resources publicly. Whether through social media shout-outs or community newsletters, showcasing what’s available keeps everyone informed and engaged. This transparency fosters a spirit of collaboration because people are more likely to contribute when they see how their participation can make an impact.
FAQs
1. What is positive preparedness in community collaboration?
Positive preparedness involves proactive measures taken by individuals and groups to enhance community resilience and collaboration. It’s about fostering a friendly environment where everyone can communicate, share ideas, and work together effectively.
2. How can I encourage my community to participate?
Start by organizing informal meet-ups and using social media to create discussion spaces. Be sure to recognize diverse contributions and create events that cater to various interests to attract different members of the community.
3. What types of events work best for fostering collaboration?
Community potlucks, skill-sharing workshops, clean-up days, and themed gatherings have proven to be effective in building bonds among residents. The key is to ensure everyone feels welcomed and has something to share!
4. How important are shared goals in community collaboration?
Shared goals are crucial because they provide a sense of direction and unity. When everyone has input into creating these goals, it fosters collaboration and engagement, making it more likely that the group will successfully work together.
5. How can I build trust within my community?
Start with open communication, encourage participation, and create feedback loops. Building relationships through casual chats and community events can also enhance trust as members get to know each other better.
by Preparation | Apr 20, 2025 | Preparedness
Assess Your Risks
Identifying Vulnerabilities
First up, I can’t stress enough how crucial it is to know what you’re up against. Take a good look at the geographical location of your business. Are you in a flood zone or an area prone to hurricanes? You’ll want to jot these vulnerabilities down and categorize them based on the likelihood of occurrence. Trust me, nothing beats being prepared based on solid knowledge.
Beyond just your location, consider the specific type of business model you have. Are there particular materials or equipment that could pose risks during a disaster? Knowing what’s on the line can help you make more informed decisions as you create your disaster preparedness plan.
Don’t forget to involve your team in this assessment. It’s always better to have multiple perspectives. Organize a brainstorming session where everyone shares what they think could be a risk, this not only creates a sense of involvement but also may surface some overlooked areas.
Utilize Resources
Another critical part of assessing risks is making full use of available resources. There are tons of online tools and local government resources that can help you gather data about potential disasters in your region. I often recommend checking out FEMA’s website for their comprehensive data on various natural disasters.
If you have the budget, consider hiring an expert or consultant who specializes in risk assessment. They can provide insights that you might miss as a business owner. Plus, it’s often worth the investment when you think about the potential losses you could avoid.
Lastly, don’t overlook community resources. Network with other local businesses to learn about what strategies they’re employing to mitigate risks. Collaboration can lead to innovative solutions that can keep everyone safer.
Regular Training and Drills
Once you’ve nailed down your risks, the next step is getting your team ready. Regular training sessions can make a world of difference. I recommend scheduling quarterly trainings that focus specifically on emergency preparedness. Go over what procedures to follow in different scenarios, whether it’s a fire, flood, or earthquake.
In addition to training, conducting drills is super important. Just like fire drills in schools, it’s essential for your team to get comfortable with the procedures. These drills help everyone know their roles and can significantly decrease panic during an actual event.
Make it fun! You can turn a serious training session into a team-building experience. Maybe have some friendly competitions about who remembers the most about safety procedures. This encourages participation and reinforces the importance of being prepared.
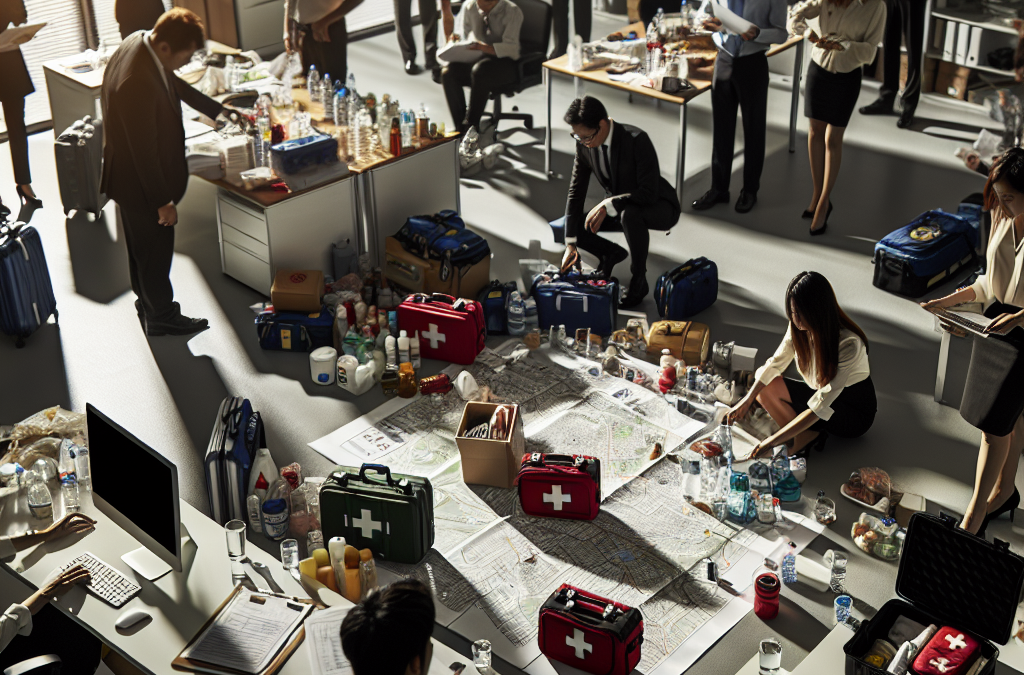
Create an Emergency Preparedness Plan
Outline Essential Procedures
Alright, so now that we’ve assessed our risks, it’s time to create a solid emergency preparedness plan. This ain’t just any ol’ document; it needs to clearly outline procedures for any disaster scenario. Get down to the nitty-gritty like evacuation routes, communication channels, and roles for team members during an emergency.
Having a structured plan helps eliminate confusion. I can’t tell you how many times I’ve seen chaos ensuing in the absence of one. Try to keep it simple enough that anyone can understand it, even under stress. Use clear language and visual aids like maps or diagrams to illustrate key points.
Lastly, remember that a plan is a living document. Make sure to regularly revise and update it as your business grows or as new potential threats emerge. Keeping it fresh ensures everyone’s on the same page.
Communicate Effectively
Alright, so here’s where the rubber meets the road: communication. Your plan is fantastic, but if nobody knows it, it’s pretty useless. Establish effective communication channels before a disaster strikes. This could be through group texts, email chains, or even a dedicated app based on your team’s needs.
Involve your employees in this aspect as well. Ask for their preferences on communication methods and ensure everyone knows how to reach each other in an emergency. It’s all about creating a dependable network within your business.
And don’t forget about external communication with customers and stakeholders. Being transparent can help maintain trust during troubled times. Have a communication plan ready for how you’ll disseminate information about closures or reopening plans.
Regular Plan Review and Updates
Creating a plan is just the start; you’ve got to keep it alive by regularly reviewing and updating it. I’d recommend setting a schedule—maybe bi-annually—to revisit all components of the preparedness plan. This keeps things relevant and allows your team to adapt to any changes or new circumstances.
Encourage feedback from your employees on what works and what doesn’t with the current plan. Getting fresh perspectives can lead to improvements that you might not initially see. This fosters a culture of continuous improvement in safety measures.
Finally, documenting updates is key. Keep an updated version of your plan accessible to all employees, so they can refer to it whenever needed. This shows your commitment to safety and helps your team feel more secure.
Build Strong Connections with Local Agencies
Networking with Local Authorities
Building relationships is crucial, folks. One way to amp up your preparedness is by connecting with local emergency management agencies. By doing so, you gain access to crucial information and resources. Many local agencies offer workshops or meetings that can keep you informed about potential threats and best practices in emergency management.
Not only should you connect, but try to attend community meetings where these topics are discussed. It’s a great way to stay in the loop and show your business’s commitment to readiness. Plus, knowing who to contact in an emergency is vital for peace of mind.
These relationships can even lead to partnerships during community emergencies, where businesses can collaborate to provide mutual aid. It strengthens the resilience of your business and the community as a whole.
Collaborate with Other Businesses
Don’t be an island; it’s all about teamwork and collaboration! Partner up with other local businesses to develop a cohesive disaster response strategy. Sharing resources or ideas can have a massive impact when a natural disaster hits. You might even find that pooling resources can save everyone money and effort.
Think about creating a business alliance focused on disaster preparedness. This group can work together on training and resources, and even conduct joint drills together. It can vastly widen your safety net!
Another cool avenue can be sharing insights from your experiences. I’ve learned tons from other business owners who’ve been through the storm (literally and figuratively) and took the time to share their insights. Offer to share your own lessons learned; it’s a great way to build camaraderie and reinforce community resilience.
Stay Informed About Upcoming Events
Lastly, make it a habit to stay informed about upcoming weather events or natural disasters that might impact your area. This includes subscribing to alerts from local news, weather channels, or emergency management services. Being proactive about information can make a huge difference in your level of preparedness.
Moreover, encourage your employees to stay informed too. An informed team is a prepared team. You might consider a regular newsletter or chat group where people can share updates or news relevant to your industry and location.
Remember, staying informed means not just reacting but being ready before an emergency hits. The more steps you take to foster awareness, the better your business can respond when it counts.
Conclusion
Preparing for natural disasters is no small feat, but it’s essential for the longevity and safety of your business. Start with assessing your risks, creating an actionable emergency preparedness plan, establishing solid communication channels, and building meaningful connections in your community.
Staying proactive and involved will not only help protect your assets but also ensure the safety and well-being of your employees and customers. So, roll your sleeves up and start preparing today—it’s a task well worth the effort!
Frequently Asked Questions
1. What should I do first when considering disaster preparedness?
The first step is to assess your risks. Identify the potential natural disasters relevant to your geographical area and consider how they could impact your business operations.
2. How often should I review my emergency preparedness plan?
It’s recommended to review your plan at least bi-annually. Keeping it updated ensures everyone is aware of the current procedures and any significant changes in your setup or location.
3. Why is training important for my team?
Training prepares your team for real-life situations. Regular drills and training sessions help employees feel more confident, reducing panic and confusion during actual emergencies.
4. How can collaboration with local businesses benefit my disaster preparedness efforts?
Collaborating helps pool resources, share insights, and potentially develop joint strategies for emergency response, making the entire community more resilient.
5. What resources are available for disaster preparedness?
There are plenty of resources ranging from FEMA’s website to local emergency management services. Many offer workshops, online tools, and guidelines that can assist businesses in preparing effectively.

by Preparation | Apr 20, 2025 | Preparedness
Recognizing Toxic Animals
Understanding Common Species
One of the essential skills in handling toxic animals is knowing which ones to look out for. I’ve had my share of close encounters with species like the black widow spider and the Eastern diamondback rattlesnake. These creatures are incredibly dangerous and can cause serious harm if not respected. Educating myself about the various types of toxic animals in my area has been a game changer for my safety.
For instance, in my local hiking trails, I often encounter the heavily camouflaged poisonous toads. Not only do their vibrant colors signal danger, but also their skin secretes toxins that can be fatal to pets and even humans if ingested. Taking time to observe and educate myself about their habitats and behaviors has definitely sharpened my survival skills.
By keeping a field guide handy or using an app dedicated to wildlife, I can quickly identify potential threats. Each toxic creature usually has unique signs that can alert us to their presence. Whether it’s a certain coloration, body shape, or behavior, these are clues I’ve learned to recognize and respect.
Staying Safe in Their Presence
Keeping a Safe Distance
Whenever I’m outdoors, one of the first rules I abide by is to keep my distance from any wildlife that I suspect to be dangerous. With animals like snakes, it’s crucial to understand that they often won’t attack unless provoked. I make sure to always give them plenty of space. Trust me, a little caution goes a long way!
I also firmly believe in the power of observation. I stick to trails and well-lit paths to avoid surprising any hidden animals. Being aware of my surroundings is key. If I spot a snake basking in the sun or a spider spinning its web, I quietly back off and continue my adventure elsewhere.
And of course, wearing appropriate clothing—like sturdy boots and long pants—adds a layer of protection. This isn’t just about style; it’s about safety. I’ve had a few close calls where my gear saved me from accidentally stepping onto a spiky thorn or even a hidden snake. Dressing smart can be my first line of defense.
First Aid for Toxic Encounters
Basic Steps to Take
If a toxic animal does manage to bite or sting, it’s essential to stay calm. I’ve learned that panic can intensify the situation. The first thing I do is to assess the injury. Checking if the bite is localized or if I’m experiencing any systemic reactions can help dictate my next steps.
First aid techniques vary depending on the animal. For a snake bite, for instance, I’ve always been advised to keep the area still and below the heart, and to avoid sucking out venom or applying ice. Instead, I’ll seek medical attention promptly. Knowing the right responses can literally be life-saving!
And if the culprit is a sting, like from a wasp or bee, I use a card or my fingernail to scrape out the stinger and then apply a cool compress. I keep antihistamines handy for allergic reactions that may follow. Preparing ahead of time ensures I can act swiftly and effectively when things go awry.
Understanding Toxic Animal Behavior
How to Avoid Provocation
One of the most critical lessons I’ve learnt is to understand the behavior of toxic animals. Just like humans, many animals signal when they feel threatened. For instance, I’ve seen snakes coil back or puff up before an attack. Recognizing these signs helps me back the heck away before things get hairy.
Additionally, I’ve noticed that many toxic animals are more active at certain times, like dusk or dawn. Knowing when to avoid specific areas during those hours has helped me not encounter these creatures unexpectedly. It’s basically about respecting their territory and timing my adventures accordingly.
I always tell others that if you’re hiking with friends, make sure to maintain a group dynamic. Animals are less likely to approach larger groups. Loud chatter, while an annoyance sometimes, can be a great deterrent for unwanted encounters!
Educating Yourself and Others
Sharing Knowledge on Safety
Finally, I believe that one of the best survival skills is to educate not just myself but also those around me. I often organize small safety workshops, where we discuss how to identify toxic animals and what to do in case of an encounter. This is not only fun but also crucial for building a safer community.
It’s staggering how much misinformation exists about toxic animals. I’ve seen people believe that all snakes are inherently dangerous, which isn’t the case. By sharing accurate information, we create a better understanding and reduce unnecessary fears.
Additionally, community forums or social media can be fantastic platforms for sharing experiences and knowledge. I often update my friends about new species I’ve learned about or interesting encounters I’ve had. This helps everyone stay informed and prepared.
FAQ
What should I do if I encounter a toxic animal?
If you encounter a toxic animal, it’s best to stay calm and back away slowly. Avoid sudden movements that could provoke it. Keeping a safe distance is key!
Are all snakes dangerous?
No, not all snakes are dangerous! Many are harmless and play crucial roles in their ecosystems. It’s essential to be educated on which species are toxic.
How can I tell if a spider is poisonous?
Many poisonous spiders have distinctive markings or colors. Researching species in your area can help you identify them accurately. If uncertain, it’s best to stay away!
What are the signs of a toxic reaction?
Signs of a toxic reaction may include swelling, difficulty breathing, nausea, or other systematic responses. If you suspect a serious reaction, seek medical attention immediately.
Is it safe to handle all animals in the wild?
It’s generally not safe to handle animals in the wild. Many can carry diseases or may be toxic. If you must handle something, ensure you have the proper knowledge and equipment to do so safely.


