by Preparation | Apr 21, 2025 | Preparedness
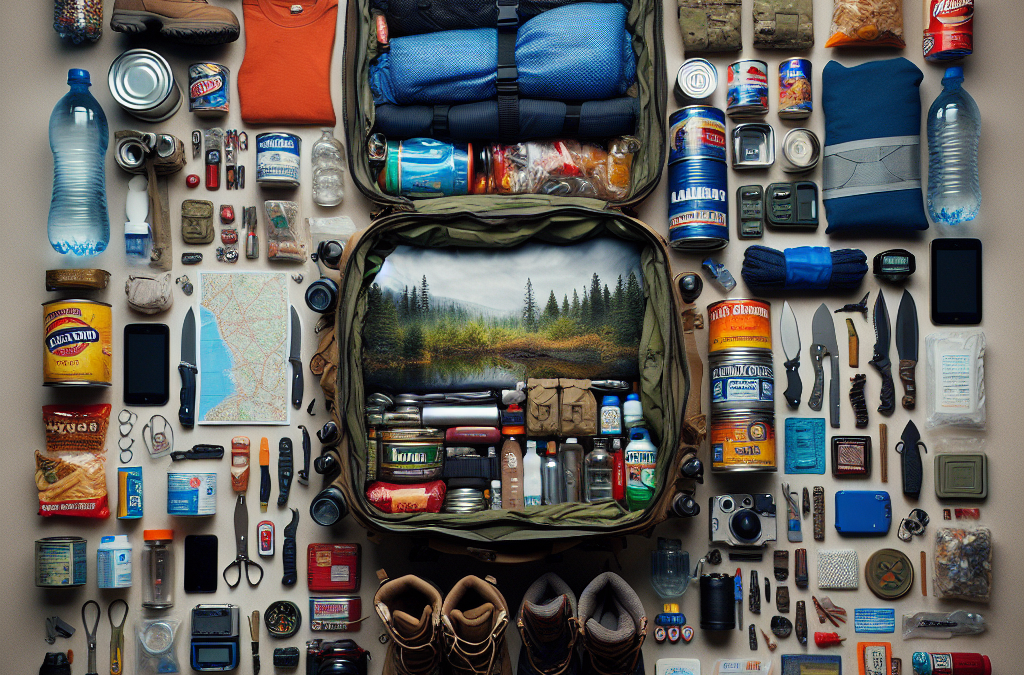
1. Choosing the Right Bag
Assessing Your Needs
Alright folks, let’s get right into it! When you’re choosing a bug-out bag, you have to think about what you’re gonna need it for. Are you planning for a natural disaster, a road trip, or maybe just some wilderness adventure? Each scenario will require different items, so sit down and really consider what your top priorities are.
I remember when I first put together my bug-out bag; I just grabbed the biggest backpack I had lying around. That was a mistake! A bag that’s too big can get heavy fast, so ensure it’s not just spacious but organized enough to find everything you need quickly.
Also, your bag should be durable. Look for something made out of tough materials, with water-resistant properties. You want this bag to last through rough conditions, not fall apart after a few uses.
Different Sizes and Styles
Next, consider the size and style of your bag. You don’t want to go overboard; usually, something that holds 72 hours’ worth of supplies is ideal. That’s about 50-75 liters for most people. For me, I found that a medium-sized backpack with compressible features does wonders because it keeps everything compact.
Then there are different styles. You’ve got the classic backpack, sling bags, or even tactical options. I personally lean towards a tactical bag because of the versatility and extra features. They can be handy for attaching gear and organizing tools, which is super important when you’re on the go.
So, think about what fits comfortably and suits your style. If you don’t like carrying it, you won’t use it, and that’s the last thing you want in an emergency!
Budget Considerations
Let’s not forget about budget! I get it; you want to stock up on all the cool gadgets and tools, but it’s crucial to set a budget for your bug-out bag. You can find quality bags and supplies without breaking the bank. Check out sales or even second-hand options; sometimes, you can score fantastic gear for much less.
On my journey, I discovered that there’s no single “perfect” bag for everyone. Sometimes you find a decent bag that just needs a few tweaks with added pockets or pouches. Do a bit of research and read reviews before plopping your cash down.
Remember, the goal is to be prepared, so don’t skimp on quality where it really matters—like the bag itself—but also know you don’t need to spend a fortune to be ready for anything.
2. Essential Supplies
Food and Water
Moving on to supplies! When it comes to food and water, the rule of thumb is to pack enough for at least three days. I usually throw in some energy bars, freeze-dried meals, and even a couple of nice protein packs that I know won’t spoil quickly. High-calorie foods are your best friend here!
Water is a huge must-have. I always include a portable water filter and a few collapsible water containers. Trust me, carrying bottles around can become cumbersome. With a filter, you can refill from almost any fresh water source.
Don’t forget about the space! Keep everything compact to save room. You might want to consider some waterproof bags to keep your food fresh and dry in case of mishaps.
First Aid Kit
Now let’s talk about the first aid kit. I can’t stress how crucial this is! A well-stocked first aid kit can be your lifesaver. I started with a basic one and added my personal touch over time: more antiseptic wipes, bandages, and even some pain relievers.
Make sure you have items tailored to your specific needs, especially if you have allergies or chronic conditions. I’ve also found it helpful to keep a little instructional guide in my kit for emergencies. You never know when someone’s going to need some basic first aid!
Don’t forget to check your kit regularly and replace items that have expired. If you’re not prepared, it can lead to bigger problems when you actually need it.
Tools and Gear
Alright, now let’s cover tools and gear. You might be a whiz at survival skills, but having the right tools can make a massive difference. I always keep a multi-tool in my bag; they’re incredibly versatile and save space.
Flashlights, fire starters, and emergency blankets are also a must. And trust me, a good rope can come in handy in various situations—from securing items to makeshift shelter—in case you find yourself in a bind.
Lastly, don’t forget a map and compass or a satellite communicator if you’re going off the grid. Technology can fail, but the classics will always work. These tools can help you navigate back to safety when things go haywire.
3. Clothing and Shelter
Choosing the Right Clothing
Clothing should never be overlooked in your bug-out bag preparations. I mean, think about it—it’s your first line of defense against whatever Mother Nature throws at you! I always pack moisture-wicking base layers, a durable outer layer, and of course, a warm hat and gloves.
The trick is to layer, layer, layer! That way, you can adjust according to the temperature. Also, try to stick to neutral colors that blend in with your surroundings. Bright colors can attract attention you might not want!
Water-resistant fabrics are essential, so consider that when you’re selecting your clothing. I once got caught in the rain with cotton clothes, and trust me, you don’t want to feel soaked when you could be warm and dry.
Personal Shelter Options
When it comes to shelter, I always prioritize lightweight options, like a compact tent or a hammock with a rainfly. The last thing you want is to be weighed down by heavy gear. I remember the first time I set up a tent; it was a game changer. Having a place to stay dry and shielded from the elements is crucial.
Consider a thermal or emergency protection blanket too. They don’t take up much room, and boy, they work wonders in keeping your body heat in when the temperatures drop at night!
Plus, a tarp can provide versatile options, whether you’re building a makeshift shelter or covering your gear during poor weather. It’s about thinking ahead and preparing for the unknown!
Adjusting for Seasons
Now, don’t forget to adjust your clothing and shelter based on the season. In the summer, you might prioritize breathable fabrics, while in winter, insulating layers become essential. I try to review my bug-out bag every few months, swapping out items as the seasons change.
Also, keep an eye on the weather, and if you’re going somewhere specific, make the necessary adjustments! You wouldn’t want to be caught in the wrong gear during extreme conditions.
This attention to detail can greatly increase your chance of survival and comfort while you’re out adventuring. Always think about where you’re headed and prepare thoroughly!
4. Important Documents
Identification and Legal Papers
When I first put together my bug-out bag, I completely overlooked documents! Your ID, insurance papers, and any legal documents should always be on your packing list. You never know when you might need to prove your identity or access emergency services!
Make copies of important documents and store them in a waterproof bag. Even a digital copy stored on a USB can come in handy, so you have access regardless of what happens to the physical copies.
Think about things like financial information, medical records, and any permits you require depending on where you’re heading. These details can make navigating emergencies that much easier!
Emergency Contacts
Keep an updated list of emergency contacts, too. If you’re in a bind, you need to reach your family, friends, or even emergency services quickly. I keep mine in my wallet and a copy in my bug-out bag in case I misplace my phone.
Consider including an emergency communication plan with instructions on how to contact each other in case of separation. This can ease a whole lot of stress during chaotic situations.
It helps to ensure that you are on the same page with those closest to you, reducing panic if something goes wrong. Plus, it’s good to have everyone’s contact information in one place.
Miscellaneous Documents
Additional documentation like property deeds, titles for your vehicle, and financial information can help you get back on your feet later if disaster strikes. I like to keep these in a separate, waterproof pouch just to be safe.
In some situations, you might also need maps of your area or lists of critical resources nearby. Think about your location and what kind of documents could be beneficial, and then stash them in your bag!
Having these important papers at your fingertips when you need them can make a huge difference, so don’t overlook this aspect of your emergency preparation!
5. Regular Maintenance and Updates
Check and Replace Supplies
Last but definitely not least is the regular maintenance of your bug-out bag. It’s easy to throw stuff in there and forget about it, but trust me, you need to check your supplies regularly! You don’t want to find out that your food has expired or your flashlight batteries are dead when it’s go-time.
I usually set a reminder to go through my bag every six months. I check the food items, swap out batteries, and ensure everything is still in working condition. It’s a quick process if you stay on top of things!
Plus, you’ll probably spot things that need to be reinforced or improved. Each review means your bug-out bag just keeps getting better!
Stay Informed
Staying updated on potential threats in your area and new survival techniques can impact your bug-out strategy. I like to read up on survival blogs or join local prepping groups to stay in the loop; there’s always something new to learn!
Also, try practicing your skills. Go out camping or hiking and actually use your gear! It helps you know how to best utilize your bag when you really need it.
Knowledge is power in emergency situations, so keeping your skills sharp is as important as the supplies you carry!
Adapt to Changes in Life Circumstances
Your needs might change based on your lifestyle, so don’t forget to adapt your bug-out bag accordingly. Whether you have kids, pets, or new hobbies, think about how these elements fit into your kit.
As life evolves, so should your bug-out strategy. If you know you’re gonna be in a different region soon, adjust your supplies to fit that area’s specific needs. Every detail matters!
Remember, being prepared for anything means being adaptable. Take that to heart as you review and update your bug-out bag regularly!
FAQs
1. What is a bug-out bag and why do I need one?
A bug-out bag is a portable kit that contains everything you might need in an emergency situation where you have to leave your home quickly. It’s essential for being prepared for situations like natural disasters or unexpected evacuations.
2. How often should I check my bug-out bag?
It’s a good idea to check your bug-out bag every six months. This way you can replace any expired supplies and ensure everything is in working order.
3. What should I prioritize when preparing my bag?
Your priority should focus on food, water, shelter, first aid supplies, and important documents. Outside of essentials, think about your personal needs and preferences!
4. Can I pack my bug-out bag too heavily?
Absolutely! A heavily packed bag can slow you down. Aim for lightweight, essential items and regularly assess what you truly need.
5. What if I have special needs or kids to consider?
If you have special needs or children, ensure your bug-out bag reflects their needs. Pack any necessary medications, foods, and supplies that are specific to them for a successful evacuation.

by Preparation | Apr 21, 2025 | Preparedness
Understanding the Basics of Boating Safety
Importance of Safety Gear
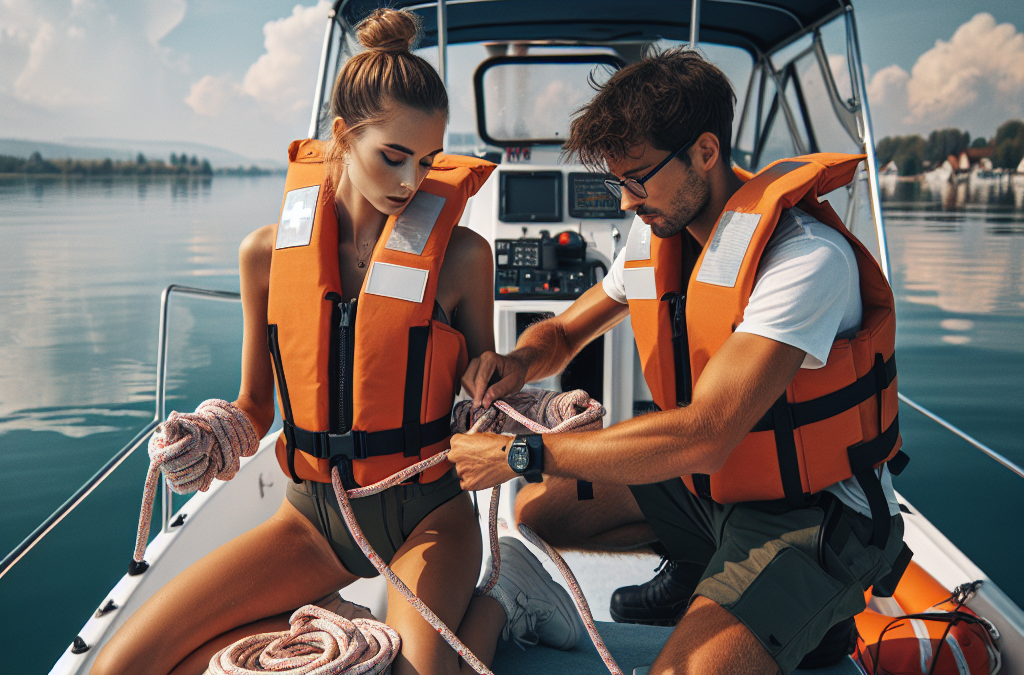
Let’s kick things off by chatting about safety gear. Honestly, having the right equipment can be a real game changer when you’re out on the water. When I first started boating, I didn’t quite grasp just how vital life jackets and other gear were!
Every time I step onto a boat, I ensure that I have my life jacket on. They come in all shapes and sizes nowadays, so there’s no excuse to go without one. And don’t forget about other essentials like flares, a whistle, and a first aid kit. You never know when you might need them!
Also, ensure your gear is in tip-top shape. A cracked life jacket or faulty flair might just make all the difference in an emergency, and trust me, you don’t want to find that out the hard way.
Understanding Weather Conditions
Another crucial skill I’ve picked up is reading the weather. Before any of my outings, I always check the forecast. Trust me, clear skies can turn stormy in the blink of an eye, and I’ve learned that lesson well!
Pay attention to wind patterns and cloud formations as well. If you see dark clouds rolling in, it might be time to cut your trip short. I’ve had to turn back more times than I can count because I ignored the signs—a real lesson learnt.
Consider downloading a weather app that gives updates in real-time. Having that info at your fingertips can mean the difference between a fun day on the water and a hectic scramble to safety.
Basic Navigation Skills
The first time I hopped on a boat, I thought the GPS was all I needed. Boy, was I wrong! Basic navigation skills are essential. Knowing how to read a compass and understand your maps can save you a ton of trouble.
It’s super important to familiarize yourself with navigational markers and buoys. They’re not just decoration! Each color and shape has a specific meaning, and learning what they are can help you steer clear of hazards.
Also, practice makes perfect. Try to navigate familiar waters first. This way, when you venture into uncharted territory, you’ll feel more confident in your abilities.
Emergency Preparedness and Response
Creating an Emergency Plan
Now, let’s talk about emergency preparedness. Every trip out should start with a solid plan. I like to sit down and outline what I would do in various emergency scenarios the night before my outing. Why? Because it’s better to be safe than sorry!
Think about potential emergencies: capsizing, getting lost, or even medical issues. Your plan should address these situations and cover action steps for everyone on board. Make sure your crew knows the routine!
Make it fun; include role-playing to help everyone understand their responsibilities. You’d be amazed at how much more at ease everyone feels once they know what to do in a crisis.
First Aid Knowledge
I can’t stress how important basic first aid knowledge is. Accidents happen, whether it’s a scrape from fishing or something more serious like a severe allergic reaction. Knowing what to do can literally keep someone alive.
I took a first-aid course a couple of years back, and it wasn’t just helpful; it made me feel empowered. From CPR to bandaging a wound, these skills are invaluable on the water, where help can feel so far away.
Remember to carry a first aid kit, but don’t just stash it away. Familiarize yourself with the contents and ensure it’s stocked up and always accessible. It’s one of those things that could really make a difference.
Staying Calm During Emergencies
In any emergency, staying calm is key. I remember a time when my engine stalled in choppy waters—panic was creeping in, and I had to consciously remind myself to breathe. It’s easier said than done, but keeping a level head can save your life!
When things go south, rely on your training and your emergency plan. If you’ve prepared well, you’ll have a framework to operate within, which can stabilize you when panic tries to take hold.
Practice calming techniques, like deep breathing or counting to ten. The better you are at staying calm, the easier it’ll be to respond rather than react during an actual emergency.
Swimming and Water Survival Techniques
Enhancing Your Swimming Skills
If you’re going to be on the water, you should be able to swim, plain and simple. I took swim lessons to boost my confidence and technique, and that was one of the best decisions I made! Even if you feel like a decent swimmer, there’s always room to improve.
So, hit your local pool and practice. Even doing drills to improve your endurance and speed can make swimming feel second nature when you’re in open water.
Get comfortable with various strokes, and practice swimming in clothes, too. You never know when you might find yourself in that kind of situation, and you need to be prepared for it!
Reaching Safety in Emergencies
Let’s say you fell overboard or your boat capsized; your immediate goal is to reach safety. Familiarize yourself with the safest swimming techniques to get to the nearest shore or floating objects.
Remember to float on your back if you need a breather. This can conserve energy and keep you above water. I’ve found practice in calm waters to be hugely beneficial, as it helps me feel prepared for the chaos of an actual emergency.
If you’re ever stuck in open water, try to stay calm and assess your surroundings. Look for other boats or landmarks to help guide your way. Keeping your wits about you can help tremendously!
Using Personal Flotation Devices (PFDs)
I’ve already harped on the importance of life jackets, but let’s dive deeper into PFDs. Modern flotation devices are designed to keep you safe in style, with options ranging from vests to jackets.
Ensure your PFD fits properly, as an ill-fitting device may not save you. I learned the hard way when my jacket slipped off during a boating mishap. You want it snug but comfortable enough to swim in it!
Lastly, get familiar with how your PFD functions. If you’re in open water, having the confidence to use your flotation device can save lives. Trust me, it can be a lifeline when the unexpected happens!
Regular Maintenance of Your Boating Equipment
The Importance of Routine Checks
Before hitting the water, I always conduct routine checks on my boat. Trust me, doing these checks can prevent a ton of headaches later on! I’ll check the batteries, the engine, and all safety equipment to ensure everything’s in shipshape.
Creating a checklist can be really helpful. I simply go through it before every outing so I don’t forget a crucial piece of equipment or overlook potential issues. This routine has saved me more than a few times!
Staying proactive rather than reactive can truly make a world of difference. Trust me, you don’t want to deal with a breakdown miles from the shore!
Cleaning and Storing Your Equipment
After an outing, I make it a habit to clean and store my gear properly. Saltwater and grime can quickly damage equipment if you leave them unattended. A quick rinse and thorough drying can extend the life of your valuables!
When storing my boat for extended periods, I do a full inspection. I’ll cover it up to protect it from the elements and keep it functioning well for my next adventure.
By taking care of your gear, you’re not just ensuring its longevity; you’re also ensuring safety for yourself and your fellow boaters. It’s vital to keep that cycle going!
Keeping Up with Safety Regulations
Rules and regulations for boating are always evolving, and keeping up with them can be tricky. I make it a point to regularly check local regulations and any updates regarding safety requirements and navigation rules.
Consider joining a local boating community or online forum. Networking with fellow boaters can provide you with valuable insights into the latest safety regulations and best practices in your area.
Staying informed means not only keeping yourself safe but also contributing to the safety of others. When we all adhere to the same set of rules, everyone benefits!
Frequently Asked Questions
What is the most essential survival skill for boating?
One of the most essential skills is understanding basic safety gear and ensuring you have all necessary equipment on board, like life jackets, signal devices, and a first-aid kit.
How can I effectively handle an emergency on the water?
The best way to handle emergencies is through preparation. Have an emergency plan in place, know basic first aid, and practice staying calm under pressure.
Is swimming proficiency necessary for boating?
Yes, swimming proficiency is very important. It’s crucial to feel comfortable in the water in case you need to swim or assist someone in distress.
What should I do if I get caught in rough weather while boating?
If you’re caught in rough weather, execute your emergency plan. Seek shelter if possible, and try to navigate back to shore while staying calm and focused.
How often should I check my boat’s equipment and safety gear?
It’s advisable to conduct routine checks before every outing. Post-outing checks are also critical to ensure everything is maintained and stored properly for future use.
by Preparation | Apr 21, 2025 | Preparedness
Assess Your Communication Needs
Understanding Your Audience
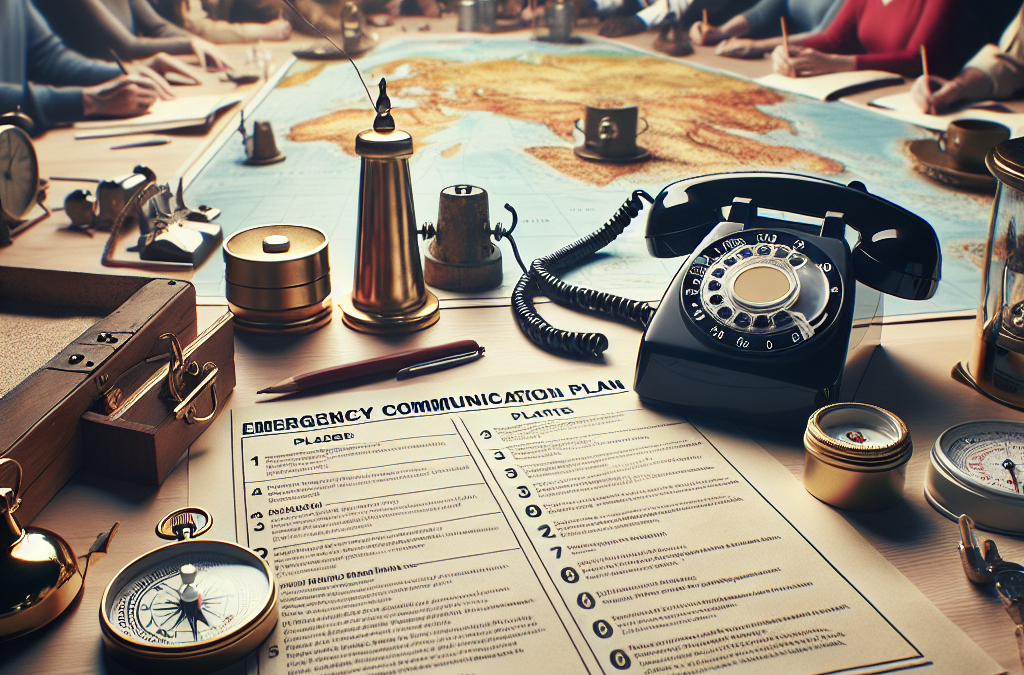
One of the key aspects of creating an effective emergency communication plan is to really understand who you’re communicating with. Whether it’s your family, staff at work, or even your community, knowing your audience will guide how you convey your message. For instance, different age groups or backgrounds might require tailored communication methods to ensure everyone gets the message.
Think about the different modes of communication people might respond to. For instance, younger folks may prefer texts or social media, while older adults might appreciate a quick call or even a face-to-face meetup. Identifying these preferences early on can help in crafting a plan that resonates with all parties involved.
Another critical part is knowing where to reach your audience. Sometimes it’s about being in the right place at the right time to get that message across. So, take some time to gather this information on your audience; it’s going to save you headaches down the line.
Identifying Key Messages
Next, you’ll want to think about what key messages you need to get across. In an emergency, it’s vital to have clear, concise, and actionable messages. Avoid jargon and make sure that anyone hearing your message knows exactly what’s happening and what they need to do. Write down a few key messages that can be readily shared across various platforms.
You might also want to run these messages by a few people to see if they understand them as intended. It’s super helpful to have fresh eyes on your material. Out in the field, you may encounter unexpected questions, so it’s a good idea to anticipate these and have answers at the ready.
Keep your language simple, direct, and to the point. During emergencies, people tend to be stressed, and clear communication can make a world of difference in ensuring everyone stays safe and informed.
Choosing Communication Tools
Now, let’s dive into the nitty-gritty of what tools you’ll use to communicate. Depending on your audience, you could use anything from social media platforms like Twitter or Facebook to SMS text alerts, emails, or even printed flyers. Every tool offers different advantages, so think about what will work best in your situation.
Don’t forget to consider the diversity of your audience. Some might not have access to tech, or they may be in areas with poor reception. In those cases, having face-to-face methods or emergency radio communications might be best. It’s all about ensuring that your message reaches everyone.
Also, test your chosen tools ahead of time. Send practice messages, monitor responses, and refine your methods. The last thing you want is to find out in a crisis that a tool you planned to use is not reliable or effective.
Establish Roles and Responsibilities
Define Who Does What
One of the best things I learned while creating my emergency communication plan was to define roles early on. Everyone involved should be crystal clear about what they’re responsible for during a crisis. This not only ensures smooth communication but also eliminates any confusion when the heat is on.
Assigning roles can range from spokespersons to logistical support. For instance, who will communicate with the media? Who will handle internal communication within the organization? Make a list of roles and make sure everyone understands their responsibilities. Seriously, having this laid out makes life so much easier during emergencies!
Prioritize and delegate tasks based on people’s strengths. For instance, someone with clear communication skills may be better suited as a spokesperson, while those with organizational skills could manage logistics. Trust me, efficiency is key during critical times.
Training and Drills
Training is a huge part of ensuring everyone is prepared. Schedule regular drills so that everyone knows exactly what to do when an emergency occurs. Just like fire drills in school, these moments help familiarize everyone with the plan and reduce panic during real situations.
Training should also involve reviewing the communication tools you’ve chosen. Make sure everyone knows how to operate them properly. Hold mock scenarios where you test out messaging and roles, and see what works and what doesn’t.
After each drill, gather feedback and refine your plan accordingly. It’s a learning experience, and each step forward gets you closer to achieving your communication goals during a crisis.
Encourage Feedback and Adaptation
Once your plan is in place, creating a culture of open communication and feedback is essential. After drill sessions or actual incidents, take the time to gather everyone’s thoughts on how things went. Was something unclear? Did certain tools not work as expected?
Being adaptable is crucial. Don’t be set in your ways; tweak your plan based on actual feedback. The world is always changing, and having an adaptable plan may very well be the difference between chaos and effective communication down the line.
It’s a tough pill to swallow sometimes, but realize that your initial plan is not the be-all and end-all. It’s a work in progress, and improvement should be continuous.
Test and Review Your Plan Regularly
Schedule Regular Reviews
Get into the habit of regularly reviewing your communication plan. I like to set reminders every six months or so. This is a great opportunity to assess your tools and messages, ensuring they’re still effective and relevant. Something that worked a year ago might not cut it now!
During your reviews, consider asking the team if any new technology or platforms could improve communication. Stay up to date with the latest trends so that your plan remains fresh and effective.
Don’t underestimate the value of these reviews. They can prevent someone from being left out in case something changes last minute. Plus, it keeps everyone on their toes and engaged in the process!
Run Simulations
Once or twice a year, I recommend running a full simulation of your communication plan in action. This is a great way to see if everything operates smoothly under pressure. Will everyone know their roles? Are the established messages still clear and actionable?
It’s kind of like a sports team practicing before the big game. The more you practice, the better you perform. During these simulations, address any issues that arise and make a note for future trainings.
Trust me; running simulations will boost everyone’s confidence, being prepared for real emergencies. Plus, it’s a bit of a team-building activity!
Incorporate New Communication Channels
As new communication tools come onto the scene, it’s essential to incorporate them into your plan. Social media and messaging apps are always evolving, and being aware of these changes can make a significant difference. Maybe a new app would work better for the whole group or allow for quicker updates!
Keep an ear to the ground so you can swiftly adapt. The faster you can integrate these tools into your existing plan, the more effective your overall communication will be.
Being proactive rather than reactive will save you a ton of stress when an actual emergency occurs. Just remember: embrace change!
FAQs
What is an emergency communication plan?
An emergency communication plan outlines how to communicate effectively during a crisis. This includes assessing needs, defining messages, choosing tools, assigning roles, and reviewing regularly.
Why is it important to assess communication needs?
Assessing communication needs helps tailor your messages and methods to ensure everyone affected understands the situation and knows what actions to take.
How often should I review my emergency communication plan?
I recommend reviewing your plan at least twice a year. It helps ensure it’s relevant and effective in case of an emergency.
What if my audience doesn’t have access to the latest technology?
That’s a great concern! Always consider a mix of communication methods, including traditional approaches like face-to-face interactions or printed materials, to reach everyone.
How can I involve my team in building the plan?
Involving your team is key! Encourage open discussions about roles, conduct drills together, and gather feedback. Their insights can help create a more robust communication plan.

by Preparation | Apr 21, 2025 | Preparedness
Food and Water Supplies
Types of Food to Stockpile
When it comes to post-disaster survival, food is a must-have. I’ve learned that non-perishable food items like canned goods, rice, beans, and dehydrated meals are invaluable. They not only last a long time but are also compact and easy to carry around if you need to relocate.
In my personal stash, I like to include some comfort foods, too. Things like chocolate bars or powdered drink mixes can really uplift spirits in tough times. Remember, having a morale booster is just as vital as having nutritional food!
Don’t forget to think about dietary restrictions. If you or those you may barter with have allergies or special diets, it’s important to stock up on foods that cater to those needs.
Water Filtration and Purification
You can’t survive long without water, and that’s why I recommend investing in good water filtration systems. During my research, I discovered that portable filters can provide clean drinking water without relying on electricity, which is super important in a disaster scenario.
Also, purification tablets are a game-changer. They’re small, lightweight, and can be used to make sure any water source is safe to drink. Storing a supply of these can easily become a bartering item.
Lastly, never underestimate the value of water containers. Whether it’s jugs, bottles, or storage tanks, having a way to collect and store water can make a significant difference in your survival strategy.
Cooking Equipment
If you’re trying to make the best out of scarce resources post-disaster, having cooking gear is essential. A small camping stove or portable grill can seriously elevate your food game. I mean, who wouldn’t want a hot meal instead of cold beans from a can?
Alongside that, I find utensils and cookware like pots, pans, and cutlery are neat to have. In a barter situation, these could attract a good trade for the right people, especially if they are planning to cook their own food.
Moreover, I believe a backup power source, like solar chargers or even batteries, is handy. Heating meals could literally mean the difference between survivors’ morale or despair.
Medical Supplies
First Aid Kits
First aid kits are an obvious essential. I’ve always made sure to have a well-stocked kit with bandages, antiseptics, and pain relievers. It’s amazing how quickly one can get hurt when chaos unfolds, so having this in place could save a life.
Don’t forget about prescription medications here, either! I’ve seen firsthand how crucial it is to have any necessary medications on hand for chronic conditions. These can be a hot ticket item for bartering, especially if someone has been cut off from their regular supply.
Lastly, some basic knowledge about how to use these supplies effectively can be crucial. Being able to treat injuries to not only yourself but others can position you as an essential person in a disaster scenario.
Hygiene Products
Let’s be real, hygiene might fly out the window during a disaster, but it shouldn’t. It dubs as a much-needed bartering item. I always keep things like soap, toothpaste, and sanitary products locked away in my emergency stash because trust me, they’re hard to come by when supplies are limited!
Wipes and hand sanitizers are lifesavers too. You never know when you might be stuck without water, so having alternatives handy can keep you feeling somewhat fresh and healthy.
Finally, make sure to have a supply of trash bags to keep your living area clean. This is not just for hygiene but also prevents the spread of disease, making it crucial for survival.
Knowledge and Skills
Skills can be the most valuable currency during a crisis. I placed a huge focus on learning skills like basic medical assistance, gardening, and even self-defense. The more skills you have, the better you’ll be prepared for bartering!
Sharing knowledge can also be a worthwhile barter. If you can teach someone how to grow food or start a fire, you can exchange that for goods you wouldn’t otherwise have. Skills are versatile and can transcend the need for physical items!
So, take some time to invest in your own skills. Whether it’s online classes or hands-on practice, being skilled means you’re in a stronger position to survive and barter in a post-disaster scenario.
Tools and Equipment
Basic Tools
Having a toolkit with basic hand tools can be incredibly handy. I strongly suggest gear like pliers, screwdrivers, hammers, and wrenches. You never know when you might need to fix something or construct a shelter!
I once traded a small toolkit with a neighbor for some water. Tools can often be overlooked, but they’re essential for maintaining your environment and improving your situation.
Plus, if you become the go-to person for repairs or building projects, you’ll find that others will approach you when they need something fixed, allowing you to barter for goods or services.
Self-defense Items
In uncertain times, having something for self-defense is non-negotiable. I’ve personally researched options like pepper spray or personal alarms which are great for keeping intruders at bay without needing a firearm.
Additionally, something as simple as a sturdy walking stick may serve a dual purpose for defense and mobility. I appreciate tools that work for multiple situations!
In a barter scenario, self-defense items can be immensely valued. Many people dread the idea of being unprotected, so having extra items might put you in a position to make favorable trades.
Communication Devices
Being able to communicate is key in a disaster, so think about investing in walkie-talkies or ham radios. I once had to rely on these gadgets during an emergency, and they were a lifesaver!
My recommendation is to keep spare batteries as well since a dead device isn’t going to help anyone. These items make for great bartering tools when others realize how essential they are when the communication lines are down.
Furthermore, understanding how to use these devices is vital for effective communication. In a crisis where information is scarce, knowledge of survival communication can make you invaluable.
Community and Relationships
Building Connections
Lastly, I want to stress how important connections are. Building relationships within your community can be the strongest form of bartering. Trust me, the stronger your network, the better your survival chances.
People share resources and skills within a community; for instance, I’ve seen neighbors exchange food for medical advice. This gives everyone a sense of support and hope in tough times.
Don’t forget to work on your interpersonal skills too. Sometimes your biggest resource in dire situations can be the friendships you’ve cultivated.
Sharing Resources
Don’t hoard everything for yourself! Learning to share resources with others in your community can turn the tide during a disaster. I found it rewarding to share supplies and skills, as this helped build trust among us.
Pooling resources can create a more resilient group. If there are assorted supplies, it makes it easier for everyone to survive and increases the chances of successful bartering.
Remember, sharing can earn you goodwill, and in a barter situation, that can translate to significantly favorable conditions for you!
Group Strategies
Being part of a group can be beneficial when it comes to survival. In my personal experience, I’ve found that groups help strategize the best way to gather supplies and defense. There’s strength in numbers!
Plus, you can divide tasks based on skills. If one person is a fantastic cook and another knows how to collect water, everyone contributes their strengths for mutual benefit.
Ultimately, working together can improve your chances in bartering as the collective knowledge and resources create more opportunities for advantageous exchanges.
FAQ
What are considered essential bartering items for post-disaster survival?
The essential items include food and water supplies, medical supplies, hygiene products, tools and equipment, and community relationships.
How do I effectively barter in a post-disaster situation?
To effectively barter, be prepared with a variety of items and skills. Know the needs of those around you and use your network of relationships to trade items or services.
What foods should I stock up on for emergencies?
Ideal foods are non-perishable items like canned goods, rice, beans, and dehydrated meals. Don’t forget comfort foods to keep spirits high!
Are medical supplies important for bartering?
Absolutely! First aid kits, prescription medications, and hygiene supplies are highly valuable when others are in need, making them top bartering items.
How can I prepare my community for a potential disaster?
Engage in open communication with your community, share resources, focus on building trust, and work together for emergency preparedness plans to ensure everyone’s survival.

by Preparation | Apr 21, 2025 | Preparedness
We’ve all been there—unexpected expenses pop up and suddenly, it feels like the world is caving in on our finances. Personally, I’ve faced my share of financial crises, and let me tell you, it’s a wild ride. But over time, I’ve learned some valuable lessons on how to prepare and protect myself from going broke during tough times. Let’s dive into the strategies that I’ve found helpful over the years.
Build an Emergency Fund
Understand the Purpose of an Emergency Fund
When I first heard about an emergency fund, I thought, “Do I really need that?” But then life tossed me a few curveballs—unexpected car repairs, medical bills, you name it. An emergency fund is essentially your safety net. It provides peace of mind knowing that you have money set aside for emergencies, so you’re not scrambling to find cash in a crisis.
The idea is simple: set aside enough money to cover at least three to six months’ worth of living expenses. This way, if something goes wrong, you’re prepared. It’s like having a cushion for when things get bumpy.
Plus, it helps you avoid putting expenses on credit cards or borrowing from friends and family, which can create additional stress and complications.
How to Start an Emergency Fund
Getting started is easier than you might think. First, take a look at your monthly expenses. Create a realistic budget that highlights where you might be able to pull some cash aside. I started out with small, manageable contributions—like skipping that extra venti latte each week!
Automating your savings can be a game-changer. Set up a regular transfer from your checking account into your savings account. This way, you won’t have to remember to do it—it just happens. Before you know it, you’ll see your emergency fund growing.
And don’t forget to celebrate your small wins! Each time you hit a savings milestone, treat yourself to something nice (but not too pricey). This makes saving feel rewarding rather than a chore.
Keep Your Fund Accessible yet Secure
Now, while it’s important to have your fund accessible, you don’t want to mix it up with your daily spending money. I recommend keeping your emergency fund in a high-yield savings account. This way, you can earn a little interest while still having quick access when you need it.
Just remember: this money is for emergencies, not for that cute handbag or the latest gizmo. Being disciplined about its use is key. I’ve had to remind myself, “This is for when life happens, not just when I feel like treating myself.” You’ve got this!
Reduce Debts Wisely
Assess Your Debt Situation
Debt can feel like a heavy weight on your shoulders. Trust me; I’ve been there. Before anything else, take a clear inventory of your debts. List everything out—credit cards, student loans, mortgages—whatever it is, get it down on paper. This clarity helps you understand just how much you’re dealing with.
Different types of debt can have different interest rates and terms, so knowing the details is crucial. It gives you a roadmap for repayment strategies down the line. Plus, it’s empowering to see the full picture—it’s the first step in taking control.
Don’t forget to reflect on what led to your current debt situation. This doesn’t mean berating yourself; think of it as learning from your past. What decisions can you change moving forward?
Create a Debt Repayment Plan
Once you have that assessment, it’s time to make a game plan. One technique I swear by is the snowball method: pay off your smallest debts first while making minimum payments on the others. There’s something super motivating about crossing that first debt off the list!
Alternatively, if you’ve got high-interest debt, consider the avalanche method. Tackle those high-interest debts first and save the most cash in the long run. Whichever method you choose, just get started! Action is the key here.
And remember to stay consistent. Set reminders to track your progress and adjust your plan if necessary. Life happens, and it’s okay to tweak things as you go. The goal is to keep moving forward!
Avoid Accumulating New Debt
As you work on reducing your current debts, it’s equally important to avoid adding new ones. I had to challenge myself to only use credit for planned purchases, and I stuck to it. If it wasn’t in the budget, it wasn’t happening.
Leverage cash instead of credit; believe me, there’s something satisfying about handing over cash and watching your spending limit right there in your wallet! Plus, it helps you stay conscious of how much you’re really spending.
Alongside this, consider building a lifestyle that encourages saving rather than overspending. Trust me, it opens up so many possibilities for financial freedom down the line!
Diversify Income Sources
The Importance of Multiple Income Streams
Having multiple sources of income has saved my bacon more than once. Whether it’s a side hustle, freelance work, or passive income, diversifying your income can provide security. It’s like having little safety nets scattered across your financial landscape.
In my experience, starting a side hustle doesn’t always mean turning your entire life upside down. Look for skills or passions you can monetize. For instance, I turned my love for writing into freelance gigs, and it has proven to be incredibly rewarding—both creatively and financially.
Don’t underestimate the power of passive income too! Whether it’s renting out a room, dividend stocks, or creating an online course, there are countless ways to grow your income streams. Get creative with it!
Explore Gig Economy Opportunities
In today’s gig economy, opportunities abound. Apps and platforms like Uber, Fiverr, and TaskRabbit can connect you to quick gigs whenever you have some extra time. I often pick up tasks on weekends or when I have a free hour here and there—it’s a fantastic way to bolster my income without committing to something long-term.
Experiment with different roles to find what fits your lifestyle and interests. Not only can this give you extra cash, but it can also lead to potential career changes or new skills you never expected to acquire!
And if there’s something you’re passionate about—like art, cooking, or coaching—why not try turning it into a side business? The possibilities are endless.
Invest Smartly
When it comes to diversifying income, investing is a powerful ally. In my journey, I’ve learned that even small investments can grow over time. Whether it’s stocks, mutual funds, or real estate, educating myself on different investment options has paid off tenfold.
Start small if you’re unsure—consider a robo-advisor for guided investment choices. And remember: the earlier you start investing, the more time your money has to grow!
Keep in mind that investing involves risks, so make sure to do your research and consider what fits your risk tolerance. Get in the habit of continuously learning about investment strategies to sharpen your skills further.
Stay Informed and Adaptable
Continuous Financial Education
Staying informed about personal finance is crucial. Over the years, I’ve made it a routine to read books, follow experts, and listen to podcasts. Financial literacy is the best form of self-defense against financial crises, in my opinion.
The world of finance is ever-evolving. New investment strategies, savings tips, and financial tools pop up frequently. Keeping up with these changes can make a world of difference in how I approach my own financial planning.
Consider joining online communities or forums dedicated to finance. Sharing insights with others and learning from different experiences can be invaluable. It’s like having a support system on your financial journey.
Track Financial Trends
Understanding broader financial trends can help you remain adaptable. For instance, keeping an eye on economic indicators, interest rates, and stock market fluctuations can provide insights that impact how you manage your funds. I often find myself watching financial news a few times a week to stay updated.
This knowledge empowers me to make more informed financial decisions—whether it’s knowing when to invest, when to save, or when to adjust my budget based on inflation, for example.
And if you’re not into traditional news outlets, look for financial apps that provide real-time updates and alerts about changes that could affect your financial situation. Stay plugged in!
Adjust Plans as Life Changes
Life is unpredictable. I’ve learned to embrace change and adapt my financial plans as needed. Whether it’s a new job, a change in family dynamics, or relocating, adjusting my budget and savings plans accordingly has kept me afloat during turbulent times.
Be proactive rather than reactive. Regularly review your financial goals and make any necessary adjustments. This habit ensures I’m always prepared, no matter what life throws my way.
Flexibility—it’s not just a yoga term, folks! In finance, being flexible means keeping a cool head and finding new paths when needed.
Seek Professional Advice
When to Consult a Financial Advisor
There’s no shame in asking for help! If you’re feeling overwhelmed, reaching out to a financial advisor can provide clarity and direction. I’ve done this a few times, and honestly, it’s been a game changer. Advisors are trained to see the bigger picture and offer personalized strategies.
They can help you assess your investment strategies, create a retirement plan, or even work through debt management. Choosing the right advisor makes all the difference. Look for someone reputable, ideally a fiduciary who puts your interests first.
And don’t forget, these consultations don’t have to break the bank. Many offer a free initial consultation, which can give you valuable insights without the commitment of a full service right away.
Utilizing Online Resources
If you can’t swing professional help yet, there are loads of online resources available. Websites, forums, and financial apps offer a wealth of information, often for free! I’ve found success with budgeting apps that guide me in tracking expenses and improving saving habits. They’re super handy!
Online courses or webinars can also offer guidance on specific topics—whether it’s investing basics, retirement savings, or tax strategies. I recommend dedicating some time to explore these resources to empower yourself.
Knowledge is a powerful tool; the more informed you are, the better decisions you can make. Take advantage of the resources at your fingertips!
Networking with Financial Peers
Believe me when I say networking can provide insights that professionals might overlook. Engage with others in financial wellness groups, online forums, or local meetups. Sharing experiences and strategies can open your eyes to new paths and resources you hadn’t considered before.
Talk about your financial goals and challenges with trusted friends or family. Those discussions often lead to helpful tips or support that can make a world of difference during tough financial times.
Remember, you’re not alone on this financial journey. Connecting with others who face similar challenges can provide motivation and accountability!
Frequently Asked Questions
1. How much should I have in my emergency fund?
It’s generally recommended to save three to six months’ worth of living expenses. This amount can vary based on your personal situation, risk tolerance, and job stability.
2. What is the best approach to paying off debt?
Two popular methods are the snowball method (paying off smallest debts first) and the avalanche method (paying off high-interest debts first). Choose the one that fits your motivation style best!
3. How can I find additional income opportunities?
Explore freelance gigs, side hustles, or even renting out a room on services like Airbnb. The gig economy is booming, and there’s plenty of opportunities waiting for you!
4. What should I do if I can’t save money each month?
If saving feels impossible, start small. Even setting aside a tiny amount can add up over time. Look for areas in your budget to cut back, even if it’s just a little at first.
5. When should I consider hiring a financial advisor?
If you’re feeling overwhelmed with your finances, a financial advisor can provide tailored advice and strategies. It’s especially useful during life changes, such as starting a family or nearing retirement.


