
Dress in Layers
Understanding Layering
When it comes to staying warm in freezing temperatures, layering is my go-to strategy. It’s not just about throwing on a ton of clothes; it’s about knowing how to create a barrier against the cold. The idea is to trap heat while wicking moisture away from my body. I usually start off with a moisture-wicking base layer that hugs my skin, keeping it warm and dry.
The second layer, which I often choose to be fleece or down, helps to insulate. This is crucial because it traps body heat effectively but remains lightweight. It’s important to avoid cotton for this layer, as it absorbs moisture and loses its insulating properties. Trust me, getting wet in the cold is no fun at all!
Finally, I always top my outfit with a waterproof and windproof outer layer. This protects against wind chill and any wet conditions, ensuring that my inner layers stay dry and effective. Adopting the right layering technique has been an absolute game changer for me during cold weather outings.

Choosing the Right Materials
Not all fabrics are created equal when you’re battling the cold. In my experience, wool, polyester, and nylon are winners, while cotton is a big no-no. Wool is fantastic for retaining warmth even when wet, and believe me, I’ve had my share of snowy adventures where that’s come in handy!
Polyester, on the other hand, is excellent for moisture-wicking, keeping me dry during high-energy activities. When I’m out there skiing or hiking, staying dry is essential. As for nylon, it’s tough and offers wind resistance, which can be a lifesaver during blustery winter days.
One tip I’ve picked up over the years is to be mindful of my socks and gloves. I always go for thermal materials that not only keep my extremities warm but also wick moisture away. Cold feet and hands? Yeah, let’s avoid that at all costs!
Thank you for reading this post, don't forget to subscribe NOW for FREE!

Monitoring Your Body Temperature
Throughout my freezing adventures, I’ve learned to listen to my body. It’s super important to monitor how I’m feeling temperature-wise. If I start to feel too warm, I know it’s time to shed a layer or two. Conversely, if I begin to feel chilled, I need to add another layer back on.
Dressing appropriately can help me avoid both overheating and hypothermia. I often keep an eye on the signs of frostbite as well, particularly on my fingers and toes. Redness, tingling, or numbness are all indicators that I need to warm up quickly.
Being proactive about my comfort and warmth has really increased my enjoyment of winter activities. If I understand how my body reacts to cold, I can adjust my layers to keep myself cozy without overdoing it.
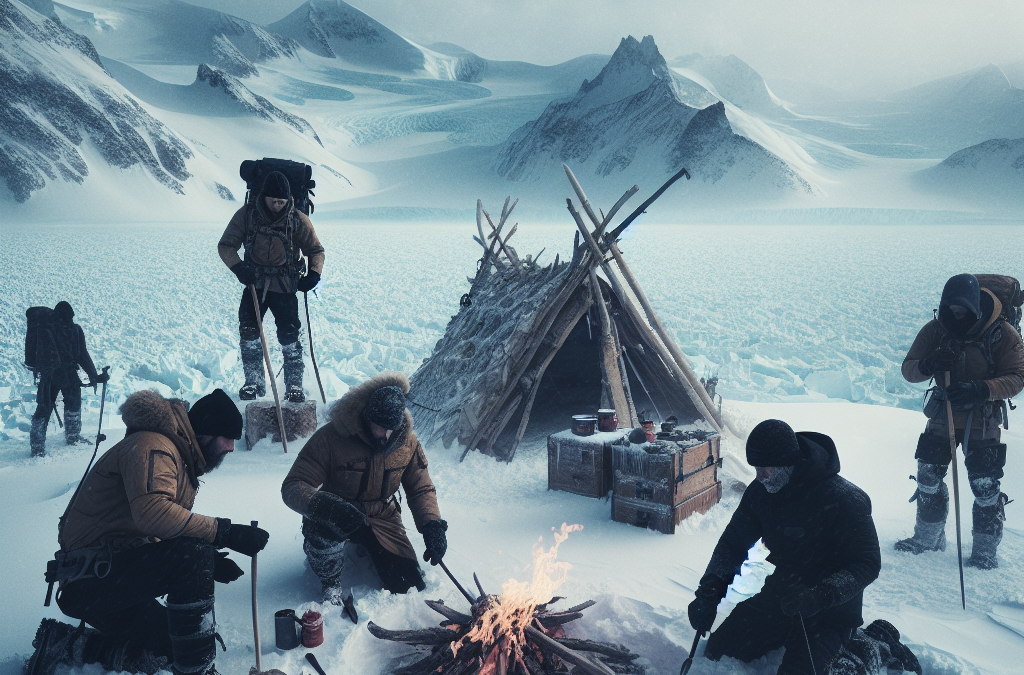
Building a Shelter
Finding the Right Location
Whether I’m stuck overnight in a snowstorm or camping out, knowing how to properly set up a shelter can be a lifesaver. I always prioritize finding a spot that’s away from the wind and provides some natural cover. Ideal locations might be near trees or boulders; those spots break the wind and reduce chill.
It’s also important to choose a spot that’s dry; the last thing I want is snow or moisture seeping into my shelter. If I can find a natural depression in the ground, even better! It naturally provides some insulation. I’ve learned that a good view might be nice, but protecting myself from the elements is way more important.
Orientation matters, too! Positioning the entrance away from the wind can make a world of difference. I’ve made the mistake before of not paying attention to this, and it left me cold and uncomfortable!
Constructing the Shelter
When I get the location figured out, it’s time to build the shelter itself. For a quick and effective structure, I often lean towards a simple snow cave or a debris hut. Both methods are pretty straightforward, and I love how easy it is to find materials in my surroundings.
A snow cave, for instance, uses the insulating properties of snow to keep the temperature regulated inside. I usually dig into the snow and design it in a way that it’s spacious enough for me to sit or even lie down comfortably.
If it’s not snowy, I tend to gather branches, leaves, and other debris to create a hut structure. Layering branches on a frame gives me a strong foundation, while more foliage offers insulation and wind protection. It’s amazing how resourceful you can be when you put your mind to it!
Insulating the Shelter
Insulation is key for ensuring my shelter remains warm. I like to gather leaves, pine needles, or even more snow (if available) to stuff in the nooks and crannies. This helps trap the heat and keeps the cold at bay. It’s surprising how much of a difference a few extra layers can make!
I also make sure to create a comfy place to sit or lie down. Finding or creating a bed of leaves or branches elevates me off the cold ground and gives added insulation. It’s so worth the time and effort for a better night’s sleep!
The whole insulating process makes my shelter not just a temporary fix but a real haven against the chilly temperatures outside. In my experience, putting in the effort to properly insulate pays off when I’m hunkered down in the cold.
Finding Food and Water
Locating Fresh Water
In cold climates, finding water can be as challenging as finding food. I always need to observe my surroundings for sources, like streams, rivers, or melting snow. Drinking snow is often a last resort, and I typically avoid it unless I’m desperate since it can lower my body temperature.
When it comes to melting snow, I generally prefer to use a stove if I’ve got one, but if not, I’ll collect it in a vessel and let it sit until the sun does the work. Every drop counts when you’re out in the cold.
I make it a habit to check for clear, running water, as it’s usually the safest choice. Staying hydrated is crucial; dehydration can sneak up on me during cold weather just as easily as in the heat!
Identifying Edible Plants
Foraging for food in the winter can seem daunting, but trust me, it’s doable. I’ve had luck by keeping an eye out for certain hardy plants; dandelions, for example, have leaves that can be eaten, and their roots are edible too. In fact, I’ve even made a tasty tea from dandelion roots when I’m in a pinch!
I also pay attention to berry bushes, as many species retain some fruit in colder months. Ripe berries are not only a source of food but can also provide a much-needed dose of energy. Just a quick word of caution, though—always double-check what you’re consuming.
Getting familiar with edible plants takes practice, but I’ve found that keeping a simple guide with me can be helpful. You never know when you might spot something edible on your chilly adventures!
Hunting and Trapping
If I’m in a situation where I need a more substantial meal, knowing how to hunt or trap small game can be perfect. Depending on the area I’m in, I look for tracks or signs of animals. I’ve often used snares or simple traps to secure food when essentials run low.
Setting up traps can be tricky, but it’s rewarding when done right. I usually look for spots where animals are likely to travel, like game trails. The more I observe their behavior, the better my chances become.
Remember, patience is key here. Waiting quietly is essential to let the animals do their thing. Eventually, I’ve managed to catch my own meals which adds a real sense of accomplishment to my winter survival skills!
Staying Warm with Fire
Gathering Firewood
Fire can be a lifesaver in freezing temps, so I always begin by collecting dry wood. I like to search for dead branches that are still off the ground; these tend to be much drier. When I’m getting wood, I also gather smaller twigs to use as kindling to help the fire get going.
It’s crucial to make sure everything is dry for an effective fire. I’ve learned the hard way that trying to burn wet wood can be a total bummer, so I do my best to find the best materials.
I also collect tinder from things like dry grass, pine needles, or birch bark. These can spark up quickly and help get the larger pieces of wood to ignite. Having these materials on hand often turns out to be a real game-changer!
Building the Fire
Building the fire itself is where the fun starts. I usually set up a small base using logs in a teepee or log cabin style, ensuring that my kindling is in the middle. The idea is to allow airflow, which helps ignite the fire more easily.
Once I’ve struck a spark onto my tinder and got it going, I gradually add larger pieces of wood to the fire. It’s all about patience; I’ve seen too many folks try to rush it, only to end up with a smoldering mess! If I take my time, I’ve found fires are much easier to maintain.
Finally, once the fire is going strong, I keep an eye on the flames and regulate the size by adding wood as needed. A well-maintained fire not only keeps me warm but also serves as a beacon in case I need to signal for help!
Using Fire Wisely
Fire is a powerful tool, but it demands respect. I’ve made it a point to never leave my fire unattended, as this can lead to dangerous situations. Safety is key, especially in remote areas. If it’s dry, I make sure to create a fire ring if I can to prevent any chance of it spreading.
Also, when the fire’s not in use, I’ll cover it up using some damp soil or leave it to go out naturally instead of dousing it with water. I’ve learned fires can leave a lasting imprint on the environment if not put out properly.
Lastly, I use my fire smartly, positioning it not just for warmth but for cooking or melting snow too. Balancing all functionalities has really enhanced my overall survival experience in freezing temps!
Using Survival Tools and First Aid
Essential Survival Gear
Having the right tools can be the difference between comfort and chaos. I always carry a well-stocked survival kit, including a knife, fire-starting tools, and a first-aid kit. A good knife is invaluable when it comes to making shelters or preparing food!
I also make sure I’ve included a multi-tool; this little gem can serve various purposes, from cutting to screwing or opening cans, you name it! It’s one of those tools that always comes in clutch.
Don’t forget a good map and compass, or a GPS if I have the battery life. Getting lost in the wilderness can be not only scary but dangerous, especially in freezing temps. I’ve learned to orient myself with the terrain around me and take the right tools along to always find my way home.
Basic First Aid Skills
Accidents can happen, and dealing with injuries in freezing weather can be tough. I find it crucial to know how to treat common ailments, such as frostbite or hypothermia. Recognizing signs early can make a big difference—like understanding when tingling starts in my extremities!
If someone is showing signs of hypothermia, I focus on warming them up with layers and getting them sheltered quickly. When it comes to frostbite, I’ve learned to never rub the affected area; instead, I should gently warm it up using body heat or warm water if possible.
Having a first-aid kit handy with bandages, antiseptics, and pain relievers keeps me prepared for any unexpected scrapes or bruises during cold adventures. I always take note of any allergies as well and plan the contents of my kit accordingly!
Emergency Signals
When all else fails, knowing how to signal for help is crucial. I usually pack a whistle—trust me, it’s way more effective than yelling! It carries farther, and I can conserve my energy this way.
I also don’t forget mirrors or bright colors that can be used to attract attention. Flashing sunlight off a mirror or wearing neon can work wonders. It’s all about being visible in the best way possible.
And finally, I always keep a flashlight handy. Not only does it help me to navigate in the dark, but it’s also a great signaling device if the need arises. Preparation is everything when I plan to face the elements!
Frequently Asked Questions
1. What’s the best way to stay warm in freezing temperatures?
The best way to stay warm is by dressing in layers. Start with a moisture-wicking base layer, add insulation, and top it off with a weather-resistant outer layer. It’s all about trapping heat and staying dry!
2. How do I make a shelter in the snow?
To build a shelter in the snow, look for a windbreak area, dig a snow cave, or construct a debris hut using branches and leaves. Be sure to insulate it well to keep warm!
3. Can I drink snow for hydration?
Drinking snow is not the best option as it can lower your body temperature. If you must, melt it first, but always try to find fresh water sources instead.
4. What materials are best for starting a fire?
When starting a fire, look for dry twigs, small branches, leaves, and other tinder materials. Using dry wood will help the fire ignite more easily.
5. What should be included in a survival kit for freezing temperatures?
A solid survival kit should include a knife, fire-starting tools, a first-aid kit, food rations, and water purification tablets. A map and compass are also vital for navigation!


